


FITTING THE APEX 40 TO A WALL
To fix the Apex 40 to a wall (horizontally or vertically), follow the step by step instructions
below:
• We do not supply fixing screws or wall plugs with these products so please purchase
these separately choosing appropriate length screws (40mm (1 3/4”) minimum) and
the correct plugs for the wall/ ceiling your loudspeaker will be fixed to.
• When the location of the Apex 40(s) has been decided, use the supplied template to
mark the fixing points and cable hole. The Apex 40 can be secured using just 2 fixings,
but additional fixing points are incorporated if required. Ensure there are no electrical
cables or gas/ water pipes behind the proposed locations.
• With the holes marked, proceed to drill them using the correct size drill bit for the wall
plugs being used.
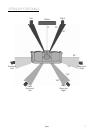
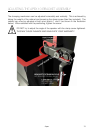
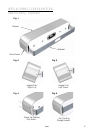
• Remove the bracket from the cabinet by loosening the grub screws at each end of the
cabinet.
• Fix the bracket to the wall.
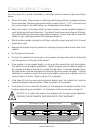
• Connect the cables to the terminals on the speaker and align the ends of the bracket
with the apertures in the rear of the cabinet.
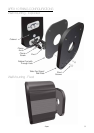
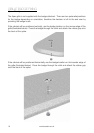
• If the cabinet is to be angled slightly, do not push the cabinet fully onto the bracket.
This allows for some angular adjustment. Tighten the grub screw to take the weight of
the cabinet, and take a step back to check the alignment. If correctly aligned, check
the grub screw is secure and press the rubber grub screw covers into place. If further
adjustment is required, loosen the grub screw slightly, adjust and re-tighten until the
correct position is found. Refer to figures 2 & 3 opposite.
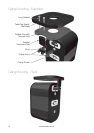
• If the Apex 40 is to be used pointing directly ahead, push the cabinet fully onto the
bracket and tighten the grub screw. Refer to figures 4 & 5 opposite.
• If the Apex 40 is to be used with the grille on, the badge can be added to either of the
locations depending on orientation. An illustration of this can be seen on page 16.
DO NOT try to adjust the angle of the speaker with the grub screw tightened.
THIS MAY CAUSE DAMAGE AND INVALIDATE YOUR WARRANTY.
monitoraudio.co.uk
14
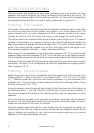
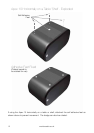
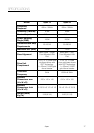
Apex 40 Wall Fixing Template. Horizontally and Vertically
This template shows the
fixing points to secure
the Apex 40 to a wall.
The Apex 40 will be secure using just 2 fixings (one at each end).
Others are provided for added security and alternative configurations.
Fixing Points
Fixing Points