


2
1. Preliminary Procedures for Use of the E-A-RTONE
®
3A
Initially examine the ear canal for obstruction(s) and evaluate the proper size E-A-RLINK
®
disposable foam eartip needed to fit the
particular ear canal. Although the standard E-A-RLINK
®
3A fits most ear canals, for smaller ear canals, the smaller diameter
E-A-RLINK
®
3B eartips are available. It is important to obtain a good seal and achieve the proper insertion depth. Insertion
procedures are the same for the E-A-RLINK
®
3A and E-A-RLINK
®
3B, but deep insertion may be difficult to achieve in extremely
small ear canals. In these instances, a shallow placement will have to suffice.
Secure the section of black tubing, which protrudes from the
E-A-RLINK
®
eartips to the sound tube nipple located at the end of the E-A-RTONE
®
sound tube.
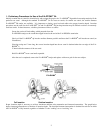
Slowly roll the E-A-RLINK
®
tip into the smallest diameter possible and insert the E-A-RLINK
®
well into the ear canal (see
illustrations).
Since the eartips are 12 mm long, the correct insertion depth into the ear canal is obtained when the rear edge of the E-A-
RLINK
®
is
2-3mm inside the entrance of the ear canal.
Hold E-A-RLINK
®
in ear canal until expanded.
After the test is completed, remove the E-A-RLINK
®
eartips and replace with a new pair for the next subject.
E-A-RLINK
®
Full Insertion Shallow Insertion
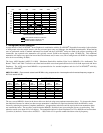
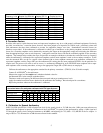
Proper insertion depth is necessary to achieve maximum ambient noise attenuation and interaural attenuation. The graph below
depicts interaural attenuation as a function of insertion depth. The described interaural attenuation is obtained for each ear in which
the E-A-RLINK
®
is fully inserted, regardless of whether it is the “sending” ear or “receiving” ear.