


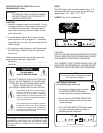

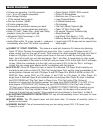
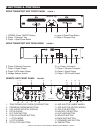
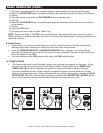
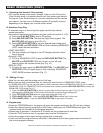

B. Control Unit - Front (Figure 3)
1) TRAY OPEN/CLOSE BUTTON - Press it to open
and close the disc trays. The control unit also
includes OPEN/CLOSE buttons. The disc holders
cannot be opened during playback, so stop play-
back before pressing these buttons.
2) PROGRAM BUTTON - Press the PROGRAM
button, the player will enter the program mode and
stop the CD playback.
3) LCD DISPLAY - This high quality LCD display
Indicates all the functions, as they are occurring.
This display is viewable at several comfortable
angles. The display ICONS will be explained in the
next section.
4) PITCH SLIDER - Use the slider to adjust the
BPM. Slide up to decrease the BPM, down to
increase the BPM
5) FLIP-FLOP BUTTON - This button activates Flip-
Flop mode. This mode allows you to activate drive
two when drive one has completed it's play cycle
and vice versa. For example if disc one is playing
and ends, disc two will immediately being to play
when disc one has ended.
6) PLAY BUTTON - Use this button to start playback.
Press once to start playback, once again to set the
pause mode, and once more to resume playback.
7) (-) PITCH BEND - The (-) pitch bend function
allows a momentary “Slow Down” in the CD’s
BPM’s (Beats per minute) while it is playing. This
will allow you to match the beats between two
playing CD’s or other playing music source.
Remember, that this is a momentary function
when you remove your finger from the pitch button
the BPM’s will automatically return to SLIDERS
(5) selected pitch.
8) (+) PITCH BEND Button - The (+) pitch bend
function allows a momentary “BUMP” in the CD’s
BPM’s (Beats per minute) while it is playing. This
will allow you to match the beats between two
playing CD’s or any other playing music source.
Remember, that this is a momentary function
when you remove your finger from the pitch button
the BPM’s will automatically return to SLIDERS
(5) selected pitch. Use this function to catch up
to the your other playing music source.
9) PITCH BUTTON - Use these buttons to enable or
disable BPM adjustment with the pitch sliders.
BPM adjustment with the pitch sliders is enabled
when the PITCH LED lights.
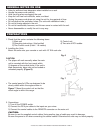
10) JOG SHUTTLE (INNER WHEEL) - This jog wheel
serves two functions depending on the operating
mode you are working in.
A. The jog wheel will act as a slow frame search
control when the CD is not playing but either
paused or set to a cue point. To set a new
frame cue point, spin the jog wheel then press
PLAY when you have determined the proper
position. Press CUE to return to the “CUE
POINT”.
B. It also works as a pitch bend, when you turn
clockwise the pitch will rise to 16%, and when
you turn counterclockwise it will fall to -16%.
The pitch bend is determined on how fast
you turn the wheel.
11) SHUTTLE WHEEL - (OUTER RING) This wheel
has 3 forward and 3 reverse speed positions
for speed searching through tracks. The more
you turn the wheel in either direction the faster you
search
12) CUE BUTTON - Press the CUE button during
playback to return to the position at which
playback started.
13) IN/LOOP (In Real-time Cue) - CUE “ON
THE FLY”) This allows you to set a CUE POINT
without interruption of music (“on the fly”). This
button also sets the beginning of a seamless loop
(see SEAMLESS LOOP)
.
14) OUT/LOOP - Used to set the ending point
when looping. When the OUT/LOOP button is
pressed, the player will play the loop continu-
ously. To exit the loop, press the OUT/LOOP
button agai
n.
15) RELOOP BUTTON - If a SEAMLESS LOOP
has been made, but the CD Player is not actively
in SEAMLESS LOOP mode, press the RELOOP
BUTTON to reactivate the SEAMLESS LOOP
mode. RELOOP will appear in the LCD DISPLAY
(3). To exit loop, press the OUT/LOOP button (14).
16) BACK SKIP BUTTON - Use this button to go
back to the beginning of the current track or select
a previous track for playing. This is fast BACK
SKIP through the tracks on your CD
17) FORWARD SKIP BUTTON - Use this button to
skip to the next track on the CD.
18) TIME BUTTON - Press this button to switch
the time display between the elapsed time and re-
maining time, and total remain time. The selected
mode is indicated by the ELAPSED, REMAIN and
TOTAL REMAIN indicator on the LCD.
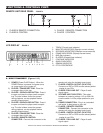
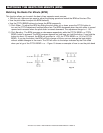
D. Control Unit - Rear (Figure 4)
1) PLAYER 2 REMOTE CONNECTOR - Connect
to player 2 connector on transport assembly.
2) PLAYER 2 CONTROL - Connect mini-plug from
CONTROL out on rear of CONTROL UNIT to a
mixer’s CONTROL out. This feature is available on
all mixers with Fader “Q” Start (see Q” Start
Control p.5).
3) PLAYER 1 REMOTE CONNECTOR - Connect to
American DJ® AUDIO • DCD-PRO250™ INSTRUCTIONS MANUAL • PAGE 9
FUNCTIONS & CONTROLS CONT.