


Chapter 2
Installation
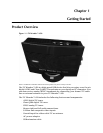
Installing Your TV Wonder™ 650
The following steps guide you through the installation of your TV Wonder™ 650
hardware and software.
Note:
• To install or remove the drivers, you must be logged on as a user with
administrator rights. We also recommend that you have the latest
Windows Service Pack installed.
• If a previous version of the product is installed on your machine,
uninstall the drivers and software for the previous version.
• The setup and install screens are displayed in English if your
operating system's language is not supported.
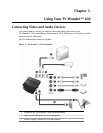
1. Connect the AC power adapter to the 6V DC connection located on the back
of the TV Wonder™ 650.
Important: Use only the model PSM11R-060 adapter included with your
TV Wonder™ 650.
2. Plug the AC adapter into an electrical outlet.
The green LED on the front of the device will light up when power is connected.
3. Connect a coaxial cable from a cable TV outlet or amplified antenna (not
included) to the ANT IN cable connection on the back of the TV Wonder™ 650.
4. If you connect your TV Wonder™ 650 before installing the included software,
the WindowsFound New Hardware Wizard should automatically notify you
that it has found a USB device. At that point you may proceed with software
installation
5. Insert the installation CD into your CD drive. The installation screen appears.
If your CD autorun is not enabled or the ATISETUP utility does not start
automatically, follow these steps:
a. In the Windows task bar, click the Start button.
b. Click Run.
c. In the Run dialog, type X:\ATISETUP.EXE (where X: is your CD/DVD
drive).
6. Click Software Install. The Software Install screen appears.
7. Click Install CATALYST. The ATI Software screen and installation wizard
appear.
8. Click Next and follow the instructions in the installation wizard to install your
drivers and configuration software.