


Planning Your System
Before beginning the installation, consider the following:
A. If you plan to expand your system by adding other components sometimes in
the future, ensure that adequate is left, and cooling requirements are met.
B. Are your components matched? The peak power rating of your speakers must
be equal or greater than the amplier’s. They also must be 2-8 ohms impedance
(This information is normally printed on the speaker magnet).
C. Consider the length of your leads which should not be too long or short when
determining the mounting location. Pre-Amp input jacks require a length of high
quality shielded male to male RCA patch cord.
Mounting Your Amplier
The mounting position of your amplier will have a greater affect on its ability to
dissipate the heat generated during normal operation. This amplier has ample
heat sink for heat dissipation, and is designed with a thermal shutdown circuit
(for heat protection). DO NOT enclose the amplier in a small box or cover it so
that air is not able to ow freely.
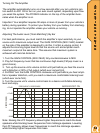
Temperatures in car trunks have been measured as high as (155 F) in the sum-
mer time. As the thermal shut down point for the amplier is (185 F), it is easy
to see that it must be mounted in an area that provides for maximum cooling
capability. To achieve maximum advantage of convection air ow in an enclosed
trunk, mount the amplier in a horizontal position.
Cooling requirements are considerably relaxed when the mounting inside the
passenger compartment since the driver compartment will not allow tempera-
tures to reach a critical point. Floor mounting under the seat is usually satisfac-
tory as long as there is at least 1 inch of clearance above the amplier’s heat
sink for ventilation.
A. Select a suitable location that is convenient for mounting, is accessible for
wiring, and has ample room for air circulation and cooling.
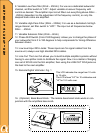
B. Use the amplier as a template to mark the mounting holes. Remove the
amplier and drill holes. Use extreme caution, inspect underneath surface before
drilling!
C. Secure the amplier using the screws provided.
Caution: Before connecting any wires to the amplier, disconnect the ground
lead from the battery. Leave the ground lead disconnected until you are done
wiring the amplier.
10
P
L
A
N
N
I
N
G
&
M
O
U
N
T
I
N
G
Y
O
U
R
S
Y
S
T
E
M