


© Copyright, Alliance Laundry Systems LLC – DO NOT COPY or TRANSMIT
Installation
802734
16
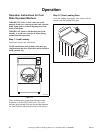
Vending
Meter Case
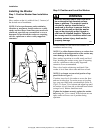
The factory mounted coin meter case does not include
the service door lock, coin slide, coin drawer, coin
drawer lock or keys. These parts must be ordered (at
extra cost) according to the purchaser’s requirements
direct from the manufacturer of your choice.
NOTE: On models with standard capacity meter
case and high capacity meter case models starting
with Serial Nos. beginning 1010, you have the
option of using a screw type lock or a 1/4 turn lock
on the meter case service door. If you choose to use
a screw lock, then the special bracket (located
inside the meter case) must be used. DO NOT use
the special bracket if a 1/4 turn lock is used. High
capacity meter case models with Serial Nos.
beginning 0910 through 1010 use 1/4 turn lock only.
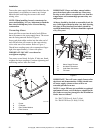
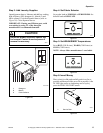
Coin Drawer Security (Models with standard
capacity meter case and high capacity meter case
models starting with Serial Nos. beginning 1010
only) – For additional security, drill out the two pilot
holes on each side of the front of the meter case to 1/4
or 5/16 inch (6.4 or 7.9 mm) holes and install a bicycle
lock through these holes.
NOTE: An 8 in. (20.32 cm) coin drawer is required
for coin operated electronic control models with
standard capacity meter case and high capacity
meter case models starting with Serial Nos.
beginning 1010. High capacity meter case models
with Serial Nos. beginning 0910 through 1010
require a 7.21 in. (18.31 cm) coin drawer.
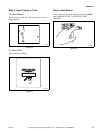
Slide Extension
(Coin Slide Models with standard capacity meter
case and high capacity meter case models starting
with Serial Nos. beginning 1010 only)
NOTE: High capacity meter case models with
Serial Nos. beginning 0910 through 1010 require a
coin slide with a switch installed on it.
1. Remove slide extension parts from parts
accessories bag included in unit.
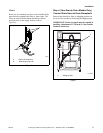
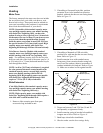
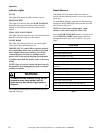
2. If installing a Greenwald coin slide, position
extension lever (to be installed on extension
bracket) with arm that has one star facing down.
Refer to Figure 13.
3. If installing a Monarch or ESD coin slide,
position lever with arm that has two stars facing
down. Refer to Figure 13.
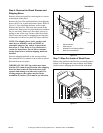
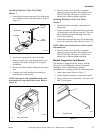
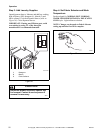
4. Install extension lever with rounded corner
facing away from extension bracket using bolt,
one or two flat washers (shims) (use number of
washers included in kit) and nut. Refer to Figure
14. Make sure washers are flat against bracket.
5. Torque nut between 2 and 2.26 Nm (18 and 20
inch-pounds), or tighten nut firmly.
6. Install extension spring in bracket hole and hole
in upper arm of lever. Refer to Figure 14.
7. Bend loops closed after installation.
8. Check to make sure the lever swings freely.
TLW2088N
Figure 13
TLW2089N
Figure 14
Greenwald
Coin Slide
Monarch or
ESD Coin Slide
One Star
Two Stars
TLW2089N
Extension Bracket
Spring
Bolt
One or Two
Flat Washers (Shims)
Nut
Extension Lever
Star(s) Facing Down
Loops
Rounded Corner