5
and special effects. See the Effect
Quick Reference for descriptions
of all the effects.
14. EFFECT MIX Knob – Controls the
wet/dry mix of the selected effect
from 0% to 100%. Turn the
EFFECT MIX knob to the right to
increase the amount of effect in
the signal. Turn the knob to the
left to decrease the amount.
The Display will show the
percentage of the wet/dry mix as
you turn the EFFECT MIX knob.
15. VOCAL CANCEL Button –
eliminates the lead vocal track
from the CD. As you press this
button, you’ll rotate through Type
1, Type 2, Type 3 and Off vocal
cancellation types. Depending on
the specific CD, you may find any
one of the three types to be most
effective.
16. OPEN/CLOSE Button – Opens
and closes the CD tray.
17. REPEAT Button – Press this
button repeatedly to cycle through
the four Repeat options:
• Track – Plays a track and
then stops.
• Track Repeat – Plays a
track and then plays it again,
over and over.
• Disc – Plays the disc and
then stops.
• Disc Repeat – Plays the
disc and then plays it again,
over and over.
18. TIME DISPLAY Button – Press
this button repeatedly to cycle
through the four Time Display
options.
• In Total mode, the Display
shows the time elapsed on
the CD.
• In Total Remain mode, the
Display shows the time
remaining until the end of the
CD.
• In Single mode, the Display
shows the time elapsed in the
current track.
• In Single Remain mode,
the Display shows the time
remaining in the current track.
Looping Features
Topics 19 – 22 cover the Playmate
Vocalist’s looping features. These
work together to allow you to
define a section of CD audio that
you would like to repeat
indefinitely. The Playmate Vocalist
makes looping easy: simply tell it
the locations on the CD at which
you want the loop to begin and
end, enable the loop, and then
sing or play along.
See “Creating a Loop” for more
information.
19. START Button – This button has
two functions: setting the Loop
Start and jumping to the Loop Start.
To set the Loop Start, hold down
the SET button and press START.
To jump to the Loop Start, simply
press START.
When you first insert a CD, the
Loop Start is automatically set to
the beginning of the disc (0:00:00).
20. END Button – This button also
serves two functions: setting the
Loop End point and jumping to
the Loop End point. To set the
Loop End, hold down the SET
button and press END. To jump to
the Loop Start, just press END.
When you first insert a CD, the
Loop Start is automatically set to
the end of the disc.
21. SET Button – Used in conjunction
with the START and END buttons
to set the Loop Start and Loop End.
You can also use the SET button
in conjunction with the ON/OFF
button to access Bank B of the
effects processor (press ON/OFF
while holding down SET).
22. ON/OFF Button – Enables and
disables the loop. If the loop is
playing when you hit ON/OFF, the
CD will continue playing through
the end of the loop instead of
returning to the Loop Start.
6
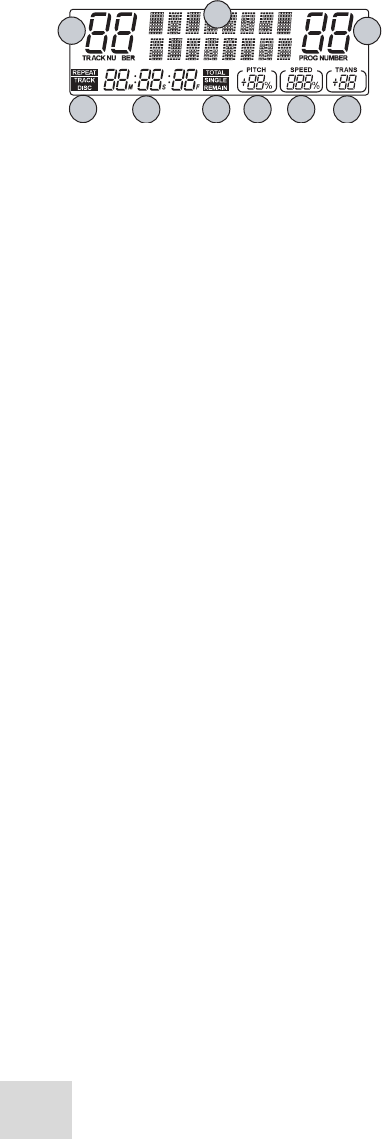
Features of the Display
1. Screen – When you turn the unit
on, the screen reads “Alesis
Playmate” for a few seconds. It
also does the following:
• During normal playing
mode, the screen displays the
currently selected effect
program.
• When you turn the EFFECT
MIX knob, the screen shows
the current effect level. This
level remains on the screen
for a few seconds after you
stop turning the knob.
• When you press the VOCAL
CANCEL button, the screen
briefly indicates whether
Vocal Cancel mode is on or
off.
2. TRACK NUMBER Indicator –
Shows the number of the currently
selected track.
3. PROG NUMBER Indicator –
Shows the number of the currently
selected effect program.
4. REPEAT Indicator – Displays the
current Repeat mode:
• Track – Plays a track and
then stops.
• Track Repeat – Plays a
track and then plays it again,
over and over.
• Disc – Plays the disc and
then stops.
• Disc Repeat – Plays the
disc and then plays it again,
over and over.
5. Time Display – Shows the current
playing time.
6. Time Display Indicator –
Indicates which of the four Time
Display modes is current: Total,
Total Remain, Single or Single
Remain.
7. PITCH Indicator – Shows the
current setting of the PITCH knob.
8. SPEED Indicator – Shows the
current setting of the SPEED knob.
9. TRANS Indicator – Shows the
current setting of the TRANSPOSE
knob.
Creating a Loop
1. Insert a CD and press Play.
2. Use the Skip button to move to
the track where you would like to
create the loop.
3. Listen to the track and make note
of the point at which you would
like the loop to begin.
4. Use the Scan button to reach a
point a few moments before the
place you want the loop to start.
You may allow the CD to continue
playing, or you may pause it to
give yourself preparation time.
5. Press and hold down the SET
Button.
6. If you paused the CD, hit
PLAY/PAUSE to continue playing.
As soon as the CD reaches the
point at which you want the loop
to begin, hit the START button
while holding the SET button. The
Loop Start is now set. You may
now return to the Loop Start at
any time by pressing START.
7. Allow the CD to continue to play,
or use the Scan button to move to
a point a few moments before the
point at which you want the loop
to end.
8. Press and hold down the SET
button.
9. When the CD reaches the point at
which you want the loop to end,
hit the END button while holding
down the SET button. The Loop
End is now set. You may return to
the Loop End at any time by
pressing END.
10. Enable the loop by pressing the
ON/OFF button. The Playmate
Vocalist will jump to the Loop
Start while continuing to play.
Every time it reaches the Loop End,
it will jump back to the Loop Start.
To disable the loop, press the
ON/OFF button again. it will jump
back to the Loop Start.
If you skip to another track, the
loop will be disabled. The loop
start and end points will automa-
tically change to coincide with the
start and end points of the new
track.
Display
M
3
2
7
6
5
8
9
4
1


