


5
PARTS AND CONTROLS
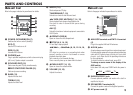
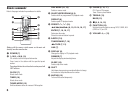
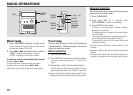
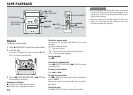
Main unit: front
Refer to the pages indicated in parentheses for details.
1
4
2
3
6
7
8
9
5
1 POWER 6STANDBY/ON (7)
Switches the unit on and off (standby).
ECO (7)
Sets the ECO mode on or off.
RDS (10-12)
Activates RDS features.
2 PHONES jack
Plug in optional headphones set with a stereo mini plug
(ø3.5 mm). Speaker output is cancelled.
3 SYNCHRO REC (15)
Starts recording and CD play simultaneously.
wREC START/REC PAUSE (15)
Starts and pauses recording.
4 BASS (13)
Adjusts the bass level.
TREBLE (13)
Adjusts the treble level.
5 ECD (7-9)
Starts and pauses CD play.
TUNER/BAND (7, 10)
Selects tuner function and the tuner band.
dTAPE (REC MUTING) (7, 14, 15)
Starts playback and changes the playback side.
Also used to enter 4-second blank spaces during
recording.
AUX (7)
Selects the function of external equipment connected to
AUX IN jacks.
6 zOPEN/CLOSE (8)
Opens or closes the disc compartment.
7 sSTOP (8, 9, 14, 15)
CD and Tape: stops playback.
f/r-, +t/g (8, 10, 12-14, 16,
17)
CD: skips to a previous or a succeeding track when
pressed, searches a track in fast forward or reverse
playback when held down.
Tape: rewinds or fast forwards the tape.
Tuner: manually tunes up or down within the band.
8 zPUSH EJECT (14, 15)
Opens or closes the cassette holder.
9 VOLUME (13, 16)
Adjusts the volume.
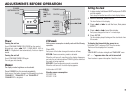
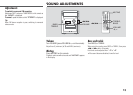
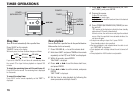
Main unit: rear
Refer to the pages indicated in parentheses for details.
1
2
3
4
5
1 AM LOOP terminal and FM 75 Ω terminal
(4)
Plug in the supplied AM and FM antennas.
2 AUX IN jacks
Accept analogue sound signals from external equipment.
Connect external equipment using an optional connecting
cable with RCA phono plugs (red plug to R jack, white
plug to L jack). Refer also to the operating instructions
for your equipment.
To switch function to external input, press AUX.
To change a source name in the display of the
AUX function.
Hold down AUX and press POWER while the power is
on.
AUX VIDEO TV
3 SUB WOOFER3 jack
Connect optional powered sub woofer with a built-in
amplifier to the jack.
4 SPEAKERS3 terminals (4)
Connect the speaker cords of the supplied speakers.
5 AC power cord (4)