


BEFORE OPERATION
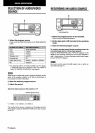
SETTING THE CLOCK
TAPE MONITOR
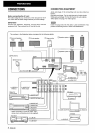
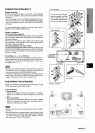
POWER I FUNCTION buttons
VOLUME
1,3,5
-t-l
1
!
PHONES FRONT SPEAKERS A, B
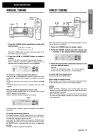
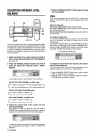
To turn the unit on
1
2
Turn the VOLUME control toward MIN.
Otherwise, the speakers may be damaged.
Press one of the FUNCTION buttons (TUNER,
PHONO, AUX/TV, CD, VIDEO 1, VIDEO 2 or
VIDEO 3) or the TAPE MONITOR button.
When pressing the TUNER button, the previously tuned
station is received (Direct Play Function).
The POWER button is also available.
Operation is possible after four seconds.
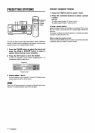
To select the front speaker system
To use speaker system A: Set the FRONT SPEAKERS A button
to sON.
To use speaker system B: Set the FRONT SPEAKERS B button
to wON.
To use both speaker systems : Set both the buttons to *ON.
Set the button(s) to mOFF to turn off the speaker system(s).
m
As the front speaker systems A and B are connected in series:
- The sound will be slightly decreased when using both speaker
systems
- No sound can be heard if the FRONT SPEAKERS A and B
buttons are set to w ON when only one speaker system is
connected
To change a displayed name for the AU)UTV button and
VIDEO 2 button
When the AUX/TV button is pressed, AUX is displayed initially.
It can be changed to TV.
With the power on, press the POWER button while pressing the
AUXfW button.
The displayed name for VIDEO 2 button can be changed to
VIDEO 2, LD or MD; with the power on, press the POWER button
while pressing the VIDEO 2 button.
Using the headphones
Connect headphones to the PHONES jack with a standard stereo
plug (06.3 mm, 1/4 inch). Be sure to set the FRONT SPEAKERS
A and B buttons to 10FF. Otherwise sound is output from the
speakers.
m
When using the headphones, set the Dolby Pro Logic and DSP
system to off.
To turn the unit off
Press the POWER button.
r
2,4
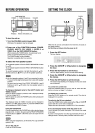
CL?CK
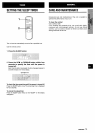
When the AC cord is connected for the first titme, the clock on
the display flashes.
Set the time aa ‘follows while the power is off.
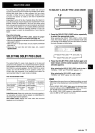
1
2
3
4
5
Press the SET button.
The hour flashes.
Press the SET button to set the hour.
The hour stops flashing and the minute starts flashing.
Press the [)OWN7 or UPA button to designate
the minute.
Press the SET button to set the minute.
The minute stops flashing on the display and the clock starts
from 00 second.
To correct the current time
Press the POWEERbutton to turn the unit off, Press the SET
button and carry out steps 1 to 5 above.
To display the current time
Press the CLOCK button on the remote control. The clock is
displayed for 4 seconds.
To switch to the 24-hour standard
Press the POWER button while pressing the UPA or DOWNY
button while the current time is displayed.
Repeat the same procedure to restore the 12-hour standard.
If the clock dislplay flashes while the power is off
This is caused by a power interruption.The current time needs
to be reset.
If power is interrupted for more than approximately 24 hours, all
settings stored in memory after purchase need to be reset.
ENGLISH6