


A85/P85
5
English
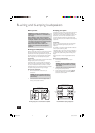
Connecting to a power supply
Wrong plug?
Check that the plug supplied with the unit fi ts your supply and
that your mains supply voltage agrees with the voltage setting
(115V or 230V) indicated on the rear panel of the unit
2
before plugging in.
If your mains supply voltage or mains plug is different, consult
your Arcam dealer or Arcam Customer Support on +44
(0)1223 203203.
The product must be earthed.
Mains lead
The appliance is normally supplied with a moulded mains plug
already fi tted to the lead. If for any reason the plug needs to
be removed, it must be disposed of immediately and securely,
as it is a potential shock hazard when inserted into the mains
socket. Should you require a new mains lead, contact your
Arcam dealer.
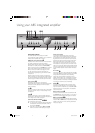
Plugging in
Push the plug (IEC line socket) of the power cable supplied with
the unit into the socket (POWER INLET)
1
in the back of the
unit. Make sure it is pushed in fi rmly.
Put the plug on the other end of the cable into your power
supply socket and switch the socket on.
Standby power
For remote standby operation, the amplifi er’s control power
supply is kept powered up all the time the unit is connected to
the mains supply. The front panel power switch powers down
all other circuitry. Power consumption in this mode is less than
2W.
This means that even though the power switch is off, it may be
possible to hear a slight residual hum coming from the mains
transformer inside the amplifi er. This is perfectly normal. If the
unit is to be left unused for an extended period, we recommend
that it is disconnected from the mains supply by switching it
off at the wall socket.
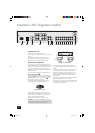
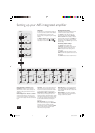
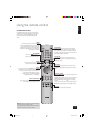
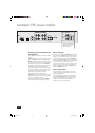
Connecting to other equipment
The use of high quality interconnect cables to and from your
amplifi er is recommended to ensure the best sound quality.
Sockets marked
L (and R) on your amplifi er should only be
connected to sockets marked L (and R) on other equipment. All
the line inputs have the same sensitivity and may be used with
equipment other than that labelled, if needed.
TAPE1/RECORD OUT
8
– Connect these output sockets
to the input sockets of your cassette deck (usually labelled
RECORD).
TAPE1/PLAY IN
9
– Connect these input sockets to the
output sockets of your cassette deck (usually labelled PLAY).
If you do not have a cassette deck you can use this input for
other (line level) equipment, such as a CD player, tuner, VCR,
etc., but not a turntable.
VCR/TAPE2 RECORD OUT
bk
– These output sockets can
be connected to the input sockets of VCR/second recorder
(usually labelled RECORD).
VCR/TAPE2 PLAY IN
bl
– Connect these input sockets
to the output sockets of your VCR/second recorder (usually
labelled PLAY). Alternatively, you can use this input for other
(line level) equipment such as a CD player, tuner, etc., but not
a turntable.
DVD
bm
– Connect this input to the audio outputs of a DVD
player.
AV
bn
– Connect this input to audiovisual equipment such as a
VCR, laserdisc player, satellite or Nicam tuner.
TUNER
bo
– Connect this input to the audio outputs of your
radio tuner.
CD
bp
– Connect this input to the audio outputs of your CD
player or DAC (digital to analogue converter).
AUX
bq
– Connect this input to the audio outputs of any unit
with a line level output, e.g. tape deck, tuner etc.
NOTE: The AUX inputs must not be used if the phono module
is fi tted. When this is fi tted AUX becomes an output carrying
the equalised phono signal at line level.
PHONO
br
– As standard, phono inputs are blanked. Phono
inputs are provided on a separate plug-in module which your
Arcam dealer or distributor can supply and fi t. This module
is compatible with most high output moving coil and moving
magnet cartridges (MM) and low output moving coil cartridges
(MC). MM or MC is selected via the MM/MC back panel switch.
Phono earth terminal – For connecting your turntable earth
lead (if fi tted). Note that this terminal must not be used as a
safety earth.
TRIG OUT and REMOTE IN
3
(12V in and out) – These
connections are for use in multi-room installations. In normal
use there is no need to make any connections to these
sockets. If you are bi-amping with a power amplifi er and wish to
power both units on or off simultaneously, see page 11.
Pre/power amplifi er connections
PWR IN
5
– To use your integrated amplifi er as a power
amplifi er, connect the output of your pre-amplifi er to the PWR IN
sockets.
Press in the
PRE/PWR switch
7
on the rear panel to
select separate pre-amp/power amp mode. Under these
circumstances your A85 has exactly the same specifi cation and
performance as a power amplifi er (see page 8).
PRE OUT
6
– To use your integrated amplifi er as a pre-
amplifi er, connect the PRE OUT sockets to the input sockets
of your power amplifi er. With a power amplifi er of the correct
gain (e.g. the P85 power amplifi er) you can bi-amplify (‘bi-amp’)
suitable loudspeakers, giving signifi cant improvements in sound
quality (see page 12).
A85/P85 multi.id 03/29/01, 3:34 PM5