


6
English
7
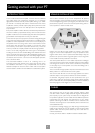
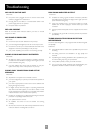
POSITIONING THE UNIT
Place the amplifier on a level, firm surface.
Avoid placing the unit in direct sunlight or near sources of heat
or damp.
Do not place the unit on top of a power amplifier or other
sources of heat.
Ensure adequate ventilation.
The P7 has a variable speed fan for cooling. If the unit is placed
in an enclosed space, such as a bookcase, equipment rack or
cabinet, ensure that there is adequate space and ventilation in
the enclosure for air to flow through the ventilation slots and
cool the amplifier. Inadequate cabinet ventialtion may cause the
P7 to shut down due to thermal overload.
The amplifier is designed to run warm during normal operation.
Ensure that the equipment rack or stand can support the 31kg
weight of the unit.
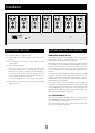
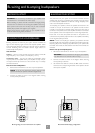
CONNECTING TO A PRE-AMPLIFIER
ANALOGUE AUDIO INPUTS
It is imperative to connect the pre-amplifier outputs to the module for
that particluar channel, e.g., connect the left surround output to the
module that will be driving the left surround speaker.
All modules are identical. However, we advise you to make connections
corresponding to rear panel labelling, since the amplifier modules are
muted in pairs. Due to the layout of the power supply circuitry in the
P7, you should connect the correct input signal and loudspeaker to
the recommended channel, or the left/right stereo imaging will not be
optimum.
The outputs from the pre-amplifier should be connected to the AUDIO
IN inputs on the P7. Be sure to note which channel from the pre-
amplifier is connected to which power amplifier module, so that the
correct speaker can be connected to that module and the correct
channel identity can be maintained.
If you wish to use four modules to bi-amplify a pair of speakers, or
would like to bi-amplify using another power amp, then you can take
the signal for that channel and feed it on to the additional modules
using the AUDIO OUT phono socket on that module. The signal is then
fed in to the first module, but also fed on to the second module so that
both modules can bi-amplify the loudspeaker.
12V TRIGGER INPUT
If your pre-amp provides a 12V Trigger output, it can be connected to
the 12V TRIGGER IN socket using a 3.5mm jack. This enables the P7 to be
turned on remotely from the pre-amp.
Note that the trigger input is only active when the central power
button on the front panel is depressed.
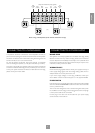
POWER INLET
50 – 60 HZ
~230V
3700 VA MAX
12V TRIGGER
IN
+
–
4-16 OHMS
AUDIO
IN
OUT
+
–
4-16 OHMS
AUDIO
IN
OUT
+
–
4-16 OHMS
AUDIO
IN
OUT
+
–
4-16 OHMS
AUDIO
IN
OUT
+
–
4-16 OHMS
AUDIO
IN
OUT
+
–
4-16 OHMS
AUDIO
IN
OUT
+
–
4-16 OHMS
AUDIO
IN
OUT
7. RS BACK
6. R SURR
5. R FRONT
4. CENTRE
3. L FRONT
2. L SURR
1. LS BACK
Installation