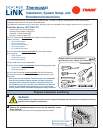
3
Label the wires on your existing thermostat to match terminal names.
• Do not use wire colors to chose labels. The terminal name is what is
important.
a. Locate the wiring labels located in the box with the new thermostat.
b. Lookatwhereeachwireisconnectedtotheexistingthermostatandndthe
letter shown next to that wire terminal.
c. Peel off the matching label and wrap it around each corresponding wire.
Important Notes:
• If you have a short jumper wire between two terminals, remove the jumper
and do not label it. This jumper wire is not required on the new thermostat.
• If you had to connect a new 24 VAC common wire in step 3a, you will use
the “C” label on that wire.
• If you have a W terminal, use the W1/W label on that wire.
• If your thermostat has any terminals with names that do not match any
on the label, write down the terminal names and wire colors for later
reference.
Y
Y G
W1 C
R
G
Rc
R
C
Wire colors and
letters may vary
!
W1
4
BCEFGOLY1Y2
Rc
R
Rh
R
X2 TW1
W
W2 W3
BCEFGOLY1Y2
Rc
R
Rh
R
X2TW1
W
W2W3XY
5
Remove existing wall plate.
• Note: During this process, make sure that the wires do not pull back into
wall opening.
a. Detach all wires from wall plate.
b. Remove all screws attaching the wall plate to the wall and remove wall plate.
c. See “MERCURY NOTICE” below.
MERCURY NOTICE
When this control is replacing an old control that contains mercury
in a sealed tube, do not dispose of your old control in the trash.
Dispose of properly. Contact your local waste management authority
for instructions regarding recycling and proper disposal of the old
control.
A listing of heating, ventilating and air conditioning wholesalers
that participate in the Thermostat Recycling Corporation’s recycling
program are available at www.thermostat-recyle.org .