111
“Memory Stick” operations
Viewing images using your computer
Installing the USB driver
Before connecting your camcorder to your computer, install the USB driver to the
computer. The USB driver is contained together with application software for viewing
images on a CD-ROM which is supplied with your camcorder.
For Windows 98/98SE/Me and Windows 2000 users
(1) Turn on your computer and allow Windows to load.
(2) Insert the supplied CD-ROM in the CD-ROM drive of your computer.
(3) Launch the application program on CD-ROM. After a moment, the dialog box
appears on your desktop. Set the cursor on “USB Driver Installation for
Windows ® 98/98SE/Me and Windows ® 2000” and click.
(4) The Setup program starts. Complete the installation on CD-ROM.
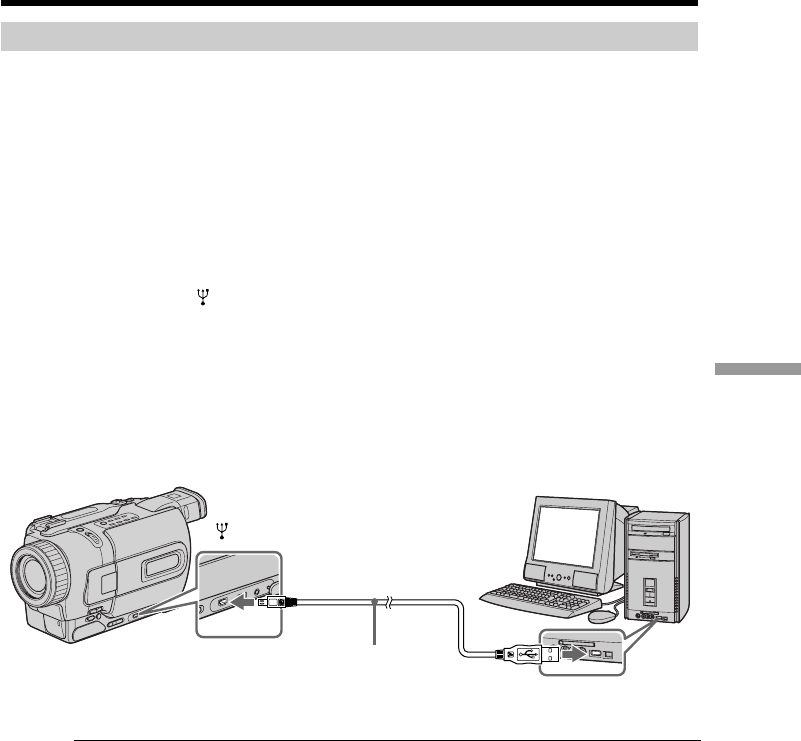
(5) Connect the
(USB) jack on your camcorder with the USB connector on your
computer using the supplied USB cable.
(6) Insert a “Memory Stick” into your camcorder, connect the AC power adaptor
and set the POWER switch to MEMORY.
“PC MODE” appears on the screen of your camcorder. Your computer
recognizes the camcorder, and the Windows Add Hardware Wizard starts.
(7) The Add Hardware Wizard starts twice because 2 different USB drivers are
installed. Be sure to allow the installation to complete without interrupting it.
USB connector
(USB) jack
USB cable
Push in until
the connector
clicks into place
Note
You cannot install the USB driver if a “Memory Stick” is not in your camcorder.
Be sure to insert a “Memory Stick” into your camcorder before installing the USB driver.
For Macintosh users
(1) Turn on your computer and allow the Mac OS to load.
(2) Insert the supplied CD-ROM in the CD-ROM drive of your computer.
(3) Double-click the CD-ROM drive icon to open the window.
(4) Double-click the icon of the hard disk containing the OS to open the window.
(5) Move the following 2 files from the window opened in step 3 to the System
Folder icon in the window opened in step 4 (drag and drop).
•Sony Camcorder USB Driver
•Sony Camcorder USB Shim
(6) When “Put these items into the Extensions folder?” appears, click OK.
(7) Restart your computer.
