2-2
WATER SUPPLY AND DRAIN CONNECTIONS
8. Use 1/4″ (6.35 mm) O.D. copper tubing for
the cold water supply and:
a)Measure from the connection at the
back of the ice maker to the cold water
pipe.
b)Add an extra 36″ (91.4 cm) to ensure
that you have the proper length. Make
sure both ends of the copper tubing are
cut square.
c) Slip a compression sleeve and com-
pression nut over the ends of the cop-
per tubing.
d)Insert the end of tubing into the water
shutoff outlet as far as it will go, and
screw the compression nut onto the
outlet. Tighten the compression nut with
an adjustable wrench, but do not over-
tighten it.
9. Place the free end of the copper tubing
into a container or sink, and turn on the
main water supply. Flush the tubing until
water is clear, and then turn off the shutoff
valve on the water pipe. NOTE: Always
drain the water line before making the final
connection to the inlet of the water valve to
prevent a possible water valve malfunc-
tion.
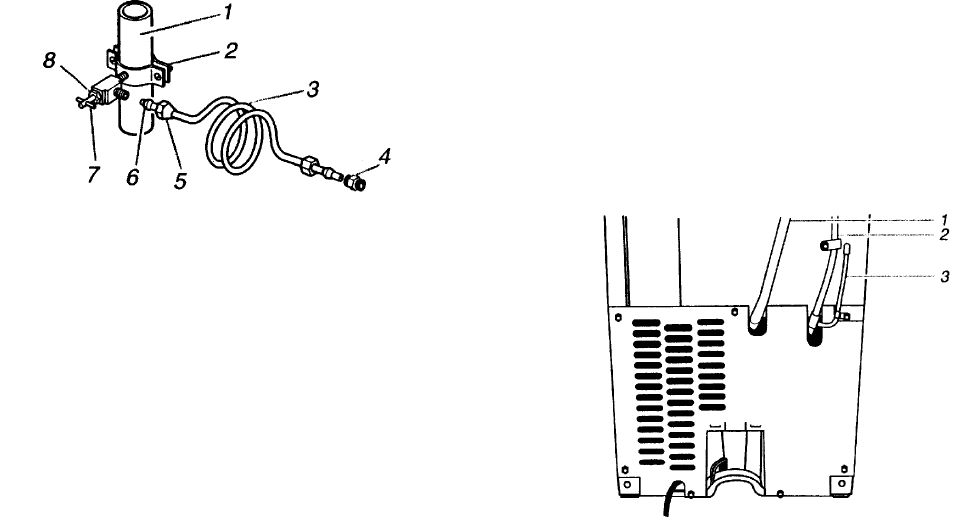
10. Bend the copper tubing to meet the water
line inlet, located on the back of the ice
maker cabinet, as shown below.
CONNECTING THE WATER LINE
1. Turn off the main water supply.
2. Turn on the nearest faucet and allow it to
run long enough to clear line of water.
3. Find a 1/2″ (12.70 mm) to 1-1/4″ (3.18 cm)
vertical cold water pipe near the ice maker.
NOTE: A horizontal pipe will work, but drill on
the top side of the pipe, not the bottom. This will
keep water away from the drill motor, and also
keeps normal sediment from collecting in the
valve.
4. Using a grounded drill, drill a 1/4″ (6.35 mm)
hole in the cold water pipe you have se-
lected.
5. Fasten a shutoff valve to the cold water
pipe with a pipe clamp. Make sure that the
outlet end is firmly in the 1/4″ (6.35 mm)
drilled hole, and that the washer is under
the pipe clamp.
IMPORTANT: Do not use a piercing-type, or a
3/16″ (4.76 mm) saddle-type valve. These can
reduce water flow and easily become clogged.
1. Cold Water Pipe 5. Compression Nut
2. Pipe Clamp 6. Compression Sleeve
3. Copper Tubing 7. Shutoff Valve
4. Coupling (purchased) 8. Packing Nut
6. Tighten the packing nut.
7. Tighten the pipe clamp screws carefully
and evenly so that the washer makes a
watertight seal. Do not overtighten the
pipe clamp. If the water line is soft copper
tubing, you could crush it.
1. Drain Hose (Drain Pump models only)
2. Vent Hose (Drain Pump models only)
3. Water Supply Line
