2
C O L I S E U M
Rear Panel
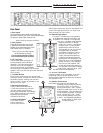
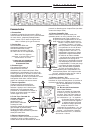
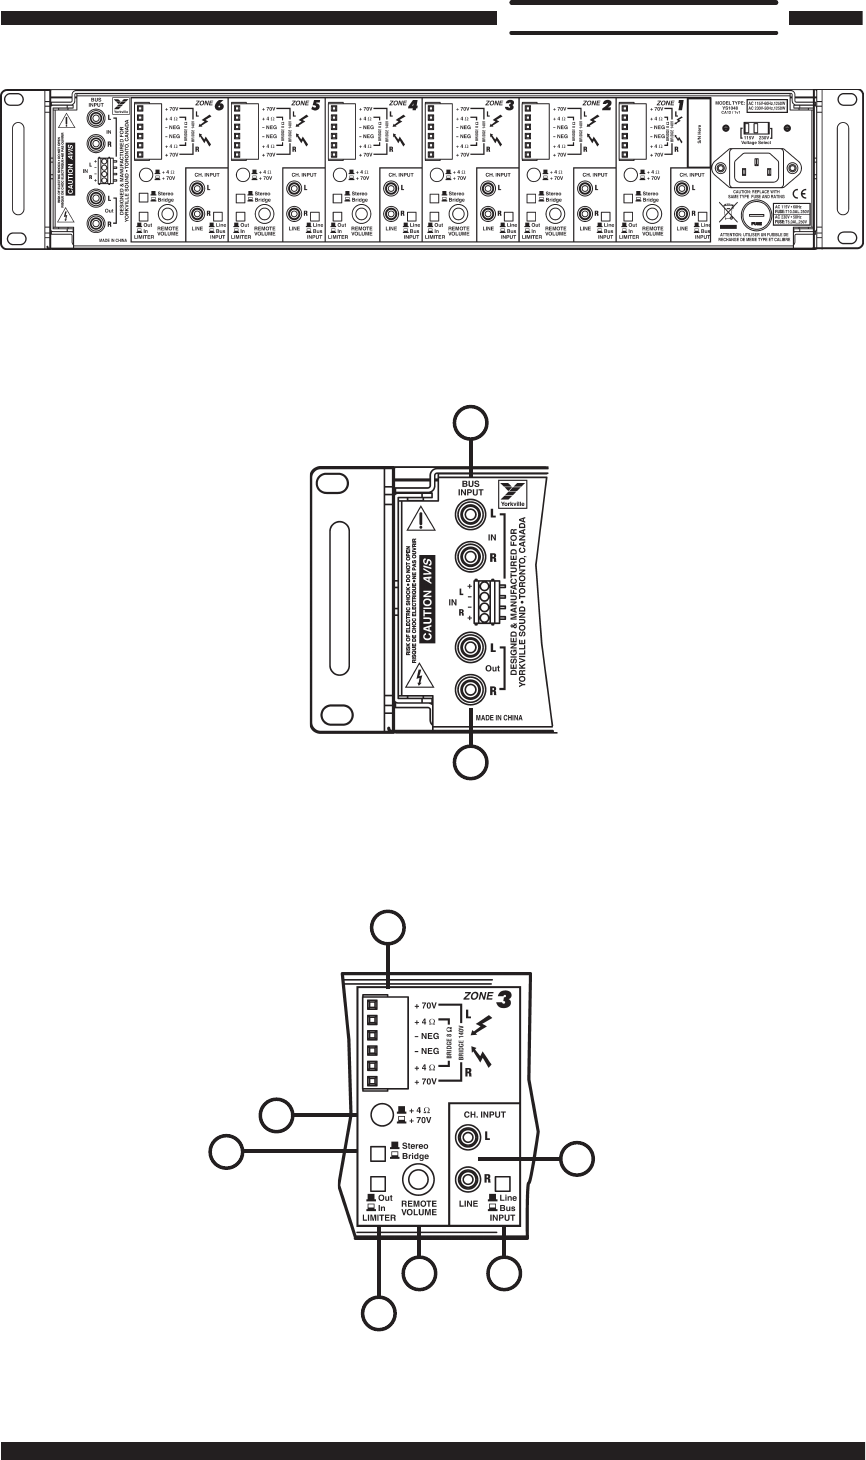
4. Bus Inputs
RCA connectors and a screw terminal strip are
provided to connect your mixer, stereo tuner/preamp,
CD player or other audio media device.
Note: use only one type of source.
5. Bus Outputs
These RCA connectors are simply
in parallel with the Bus Inputs and
enable you to interconnect the CA12
with another CA12 or amplifier.
Note: only the Input Bus signals
will be patched to Output.
The Following Applies to Each
One of the Zone Input Sections
6. Ch Line Input
These inputs allow connection of
sources directly to the individual
channels. This input allows stereo,
line-level source or two separate
mono audio sources. If you Bridge
the Zone’s pair of amplifiers into an 8-ohm
speaker circuit, use the Left input and connect a
mono source.
7. Line/Bus Button
Each Zone’s input source can be selected
using this switch. Depress the button to select
the audio program coming from the Bus
Input or leave it in the up position to use
the Zone’s Line Input.
8. Remote Volume Jack
Using a cable terminated with a
¼-inch mono phone plug, connect
your DC remote volume control
source (a potentiometer for example)
here. When connected, this feature
bypasses both front panel
controls for this Zone.
9. Limiter In/Out Button
The Limiter In/Out
button activates a
pre-set input limiter,
which helps reduce the level of accidental loud
noises and clipping distortion for each Zone
(both channels of each Zone).
10. Stereo/Bridge Button
For stereo, or dual-zone mono operation,
at 50 Watts per channel leave this in the
up position. To combine (i.e. Bridge) the
two into a 110-Watt mono amplifier,
depress the button. In Bridge
mode, the +4 ohm / +70V button
must be in the +4 ohm position
(depressed) to allow for the 8-
ohm speaker circuit, not 4-ohms!
In bridge mode, an amplifier
encounters a load that is about
one half of its actual value – a
4-ohm load would therefore be
2-ohms to a bridged amp and if
the amplifier isn’t designed to run
safely into such a low impedance
(which the CA12 is not) damage
may occur to the amplifier. We
do not recommend connecting a
70V speaker circuit while in Bridge
mode as the output will be at 140V
and the sound can be distorted.
11. +4 ohm / 70V Button
Leave this switch in the up position if you are
connecting 4-ohm or 8-ohm speaker circuit
(Stereo mode). Depress the button to connect a
70V speaker circuit.
12. Speaker Connections
Insert bare wire ends here and tighten the
retaining screws to secure properly.
For a stereo Zone or dual mono
Zones, connect the + and – system
leads from each Zone to one +4 ohm
and its adjacent – Neg terminal in the
L & R terminal groupings. In Bridge
mode, connect the + and – leads
from an 8-ohm speaker circuit (not
4-ohms – see Stereo/Bridge Button
section above) to each of the
+4 ohm terminals.
4
5
6
7
8
9
10
11
12


