


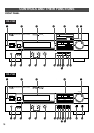

18
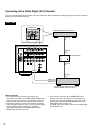
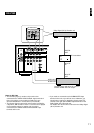
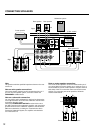
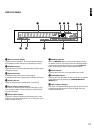
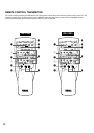
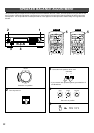
E MEMORY (MAN’L/AUTO FM) button
When this button is pressed, the
“
MEMORY” indicator flashes
for about 5 seconds. During this period, select a desired
preset station number by pressing the corresponding preset
station number selector button to enter the displayed station
into the memory.
When this button is pressed and held for about 3 seconds, the
automatic preset tuning begins. (For details, refer to page 31.)
F EDIT button
This button is used to exchange the places of two preset
stations with each other.
G TUNING DOWN/UP button
Used for tuning. Press the “UP” side to tune in to higher
frequencies, and press the “DOWN” side to tune in to lower
frequencies.
H TUNING MODE (AUTO/MAN’L MONO) button
Press this button to switch the tuning mode to automatic or
manual. To select the automatic tuning mode, press this
button so that the “AUTO” indicator lights up on the display. To
select the manual tuning mode, press this button so that the
“AUTO” indicator goes off.
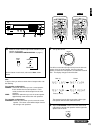
I DELAY/CENTER/REAR/SWFR and TIME/LEVEL +/–
buttons
RX-V493 only
Adjust the delay time (DELAY), the center channel output level
(CENTER), the rear channel output level (REAR) and the
output level to the SUBWOOFER OUTPUT terminal (SWFR).
Select the item which you want to adjust by pressing the
DELAY/CENTER/REAR/SWFR button and adjust its time or
level by pressing the TIME/LEVEL +/– button.
J CENTER MODE button
Selects a center channel output mode (NORMAL, WIDE or
PHANTOM). (For details, refer to page 23.)
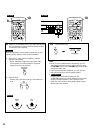
K PROGRAM selector button
RX-V393 only
When the built-in digital sound field processor (including the
Dolby Pro Logic Surround decoder) is on, this button changes
the currently selected DSP program whenever the right or left
side of this button is pressed.
L CENTER LEVEL control
RX-V393 only
Adjusts the sound output level of the center speaker.
M REAR LEVEL control
RX-V393 only
Adjusts the sound output level of the rear speakers.