


40
XM SATELLITE RADIO TUNING
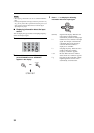
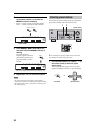
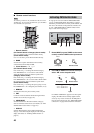
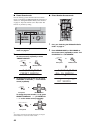
■ Remote control functions
The following controls are only available when the unit is in the
TUNER mode. To switch to the TUNER mode, press TUNER to
select TUNER as the input source.
1 Numeric buttons
(All Channel Search or Category Search mode)
Use 1 to 9 and 0 to enter a channel number directly.
(Preset Search mode)
Use 1 to 8 to enter a preset channel number directly.
2 BAND
Switches the reception band between the currently
selected band (AM or FM) and XM.
3 Cursor buttons u / d / j / i
(All Channel Search mode)
Press A-E/CAT. j / i to change the channel category.
Press PRESET/CH u / d to search a radio channel
within all channels. Press and hold for quick search.
(Category Search mode)
Press A-E/CAT. j / i to change the channel category.
Press PRESET/CH u / d to search a radio channel within
the selected category. Press and hold for quick search.
(Preset Search mode)
Press A-E/CAT. j / i to change the preset group (A to E).
Press PRESET/CH
u
/
d
to change the preset number (1 to 8).
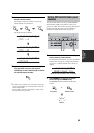
4 MEMORY
Switches the unit to the preset memory mode.
5 ENT.
Confirms an entered channel number during the Direct
Number Access mode (see pages 44).
6 SRCH MODE
Switches between the All Channel Search, Category
Search, and Preset Search modes. (For details, see “XM
Satellite Radio search modes” on page 42.)
7 DISPLAY
Switches XM information such as channel number/name,
category, or artist name/song title displayed in the front panel
display. (For details, see “Switching XM information” on
page 42.)
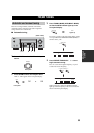
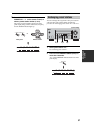
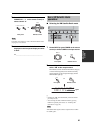
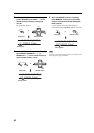
To sign up for an account with the XM Satellite Radio
service, an XM Satellite Radio ID number is required.
Follow the procedure below to check your ID number, and
then access the website at “http://activate.xmradio.com”
or call “1-800-XM-RADIO (1-800-967-2346)” with a
major credit card for signing up.
1 Rotate INPUT (or press TUNER on the remote
control) to select TUNER as the input source.
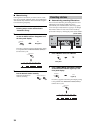
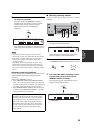
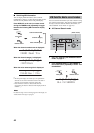
2 Press XM (or BAND on the remote control) to
select “XM” as the reception band.
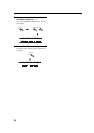
If “CHECK ANTENNA” appears in the front panel
display, the XM Connect and Play digital antenna
accessory may not be connected to the XM jack on
the rear of this unit properly. See “XM Satellite Radio
connections” on page 39 and check the connection.
Note
MENUTITLE
SET MENU
LEVEL
DISPLAYRETURN
BAND
SRCH MODE
MEMORY
A-E/CAT. A-E/CAT.
ENTER
PRESET/CH
REC
AUDIO
MUTE
VOLUME
DISC SKIP
STRAIGHT
MOVIE
ENTERTAIN
MUSICSTEREO
4321
8
10
7
09
65
ENT.
DIRECT ST.
EXTD SUR.
STANDARD
SELECT
NIGHT
AB
SPEAKERS
EFFECT
TV MUTE TV INPUT
TV VOL TV CH
FREQ/RDS
EONSTARTMODE PTY SEEK
1
2
3
4
5
6
7
Activating XM Satellite Radio
VOLUME
AUTO/MAN'L MONO
VIDEO L AUDIO R
MAN'L/AUTO FMLEVELNEXTEDIT
EFFECT
MEMORY
FM/AMPRESET/TUNING
A/B/C/D/E
l
PROGRAM
h
BASS/TREBLE
TUNING MODE
INPUT MODE
TONE CONTROL
STRAIGHT
SPEAKERSPHONES
SILENT CINEMA
STANDBY
/ON
BA
MULTI CH
INPUT
VIDEO AUX
INPUT
CATEGORY
XM
SEARCH MODE
l PRESET/TUNING/CH h
DISPLAY
12 3
INPUT
TUNER
or
Remote controlFront panel
TITLE
LEVEL
BAND
CDTUNER
MD/CD-R
DVD
DTV/CBL
V-AUX
VCR
XM
TUNED STEREO
A
SP
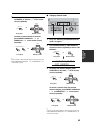
XM RADIO
Lights
or
Remote controlFront panel
FM/AM
XM