


5
English
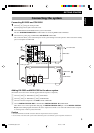
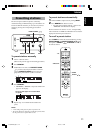
Connecting the system
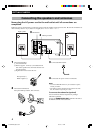
Connecting RX-E400 and CDX-E400
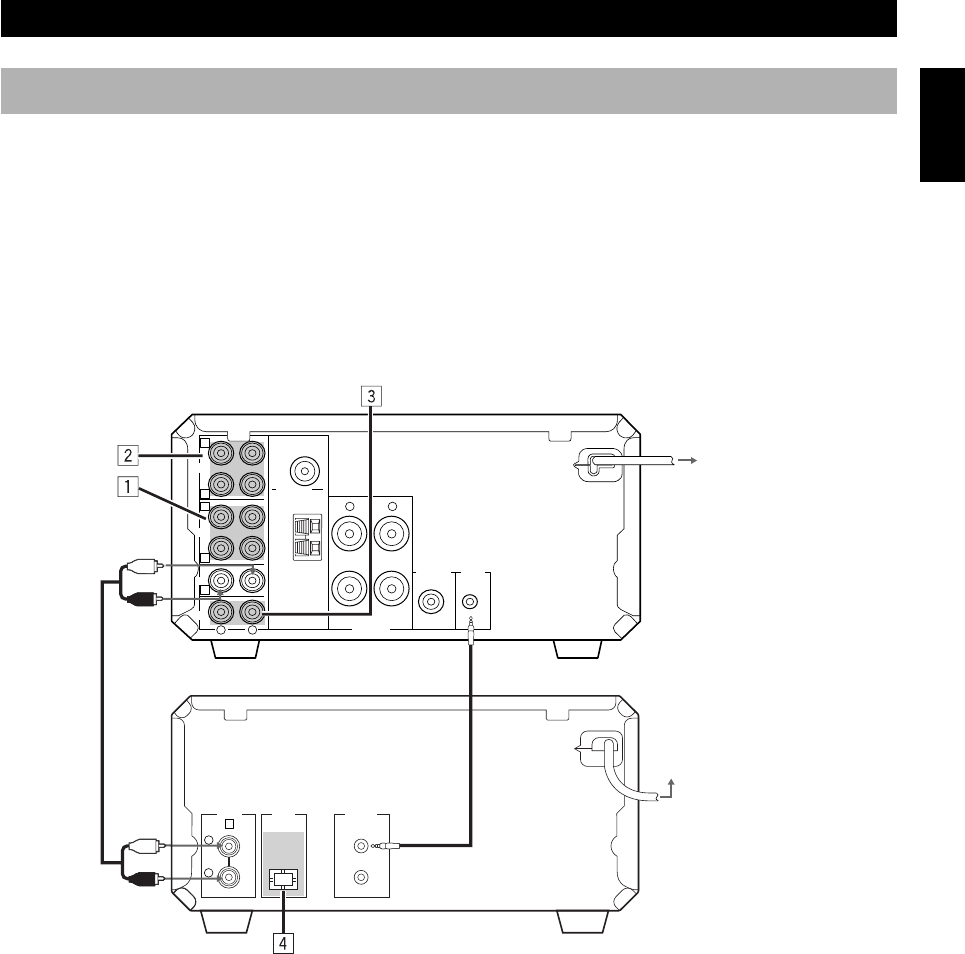
1 Connect ‰ to ‰ using the Audio pin cable.
Insert the plugs into the jacks of the same color.
2 Connect RX-E400 and CDX-E400 with the system control cable.
The other SYSTEM CONNECTOR of CDX-E400 is for connecting MDX-E300 or KX-E300.
3 Connect the AC power plug of CDX-E400 to AC OUTLET of RX-E400.
This connection allows you to control the power of the system through one-touch operation. It also reduces the standby
power consumption of CDX-E400.
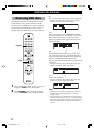
Adding KX-E300 and MDX-E300 to the above system
(For details, refer to the owner's manual supplied with the respective component.)
1 Connect Å and ı of RX-E400 to Å and ı of KX-E300.
2 Connect Ç and Î of RX-E400 to Ç and Î of MDX-E300.
3 Connect an external component to the AUX terminal of RX-E400.
4 Connect DIGITAL OPTICAL OUT of CDX-E400 to DIGITAL OPTICAL IN of MDX-E300.
Take off the covers of the optical fiber cable plug, the DIGITAL OPTICAL OUT jack, and the DIGITAL OPTICAL
IN jack before making digital connections. Be sure to replace the terminal’s cover when the terminal on the rear panel
is not being used, in order to protect from dust.
Caution
• Never turn RX-E400 on until all connections between components have been completed.
• Never connect or disconnect the system control cable and/or power cord while the system components are turned on.
GETTING STARTED
To wall outlet
To RX-E400
Audio pin cable
<RX-E400>
<CDX-E400>
FM ANT
75Ω UNBAL.
IN
IN
IN
IN
OUT
OUT
6Ω MIN./SPEAKER
SPEAKERS
SUBWOOFER
OUT
SYSTEM
CONNECTOR
GND
AM
ANT
TAPE
CD
AUX
MD
R
L
R L
+
–
A
B
E
C
D
DIGITAL
OPTICAL
ANALOG
OUT
SYSTEM
CONNECTOR
E
R
L
OUT
1
System control cable
2
3
0104CRXE400(M).03-08.E 02.6.13, 7:16 PM5