


DOWNUP
OCTAVE
SCENE
SF1 SF
2
SF
3
SF
4
SF
5
F
1
F
2
F
3
F
4
F
5
F
6
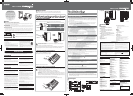
INFORMATION
COMMON
ELEMENT/PERF. PART/ZONE
FAVORITES
DRUM KITS
A. PIANOKEYBOARDORGAN
PRE 5PRE 6
PRE 1PRE 2PRE 3PRE 4
MUSIC PRODUCTION SYNTHESIZER
Integrated Sampling Sequencer /
Modular Synthesis Plug-in System / Real-time External Control Surface
USER 1
GUITAR/
PLUCKED
SYN LEAD
ABCDEFG
H
87654321
16
MUTE
TRACK
SELECT
SECTION
GROUP
NUMBER
CATEGORY
SEARCH
BANK
SOLO
15
1412 13
11
10
9
SYN PAD/
CHOIR
SYN COMP
CHROMATIC
PERCUSSION
DRUM/
PERCUSSION
SEMUSICAL FXCOMBI
USER 2
STRINGS
PLG 1
SLOT
1
SLOT
2
SLOT
3
BRASS
PLG 2
REED/PIPE
PLG 3
BASS
GM
REMOTE ARPEGGIO
ON/OFF ON/OFF
R-AUDIO
G-MIDI
BYPASS
INSERTIONSYSTEM
MASTER
EFFECT
VOICE
SONG
PERFORMMASTER
PATTERNFILE
EFFECT
MODE
SEQ TRANSPORT
SEQUENCER
LOCATE 1 2
INTEGRATED
SAMPLING
MIXINGUTILITY
EDIT
COMPARE SCENE STORE
SET LOCATE
JOBSTORE
DEMO
EXIT ENTER
EXECUTE
DEC/NO INC/YES
KNOB
CONTROL
FUNCTION
MASTER
VOLUME
ZONE 1
CS 1
VOLUME
1
SWING
CUTOFF
PAN
ASSIGN A
GATE TIME
RESONANCE
REVERB
ASSIGN B
VELOCITY
ATTACK
CHORUS
ASSIGN 1
UNITMULTIPLY
RELEASE
TEMPO
ASSIGN 2
LOW
KN
1
VOLUME
2
LOW MID
KN
2
VOLUME
3
HIGH MID
KN
3
VOLUME
4
HIGH
KN
4
CS 2
ZONE 2
CS 3
ZONE 3
CS 4
ZONE 4
ARP FX
EQ
TONE
ASSIGN
PAN/SEND
L
L
R
R
LR
LR
L
L
L
L
R
R
R
R
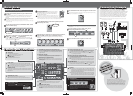
Microphones
This position
This position
Controls and FunctionsControls and FunctionsControls and Functions
Connection Example
Connection ExampleConnection Example
The STAGEPAS 300 can be used in a wide variety of sound reinforcement applications,
from a full-band performance onstage to solo street performance—providing a
powerful, high-performance system in an exceptionally compact and portable package.
Connect a guitar or a microphone to the monaural input jacks (channels 1 to 4) and
connect a keyboard to the stereo input jacks (channels 5/6 or 7/8). If you have a
powered speaker, you can connect it to the MONITOR OUT jack for monitoring your
vocals. For optimum results in band performance applications and to create a more
powerful sound for music, make sure to set the SPEECH/MUSIC switch to MUSIC.
NOTE:
For best results when connecting a electric guitar or bass guitar to the mixer, use a direct box,
preamp (guitar amp), or amp simulator.
Getting sound out of the system
Using the included speakers, set up the system and try it out.
Connect the included speakers and your instruments to
the mixer.
Connect the included speakers to the SPEAKER L/R jack. Connect the sources
(guitar, other instruments) to the input jacks. For details, see “Connection
Example.
”
Before connecting any devices, make sure to turn off the power for all devices (including microphones or the
included speakers). To avoid any possible malfunction, use only the speaker cables included with the device.
Also, before turning the power on or off, set the volume levels on all devices to minimum.
NOTE:
For best results when connecting a electric guitar or bass guitar to the mixer, use a direct box, preamp (guitar
amp), or amp simulator.
Set the mixer’s LEVEL controls and MASTER LEVEL control
to the minimum (zero).
Depending on the device used, set the MIC/LINE switch
to MIC ( ) or LINE ( ) as appropriate.
For low-level signals (such as that of microphones), set the switch to the MIC ( )
position. For high-level signals (such as keyboard instruments and audio equipment),
set the switch to the LINE ( ) position.
Turning the power on
First, turn on the power to any connected devices, then turn
the STAGEPAS 300 power on. If you've connected powered
speakers to the mixer, turn on the power of the mixer first,
then the powered speakers.
To avoid any loud, unexpected noise from the speakers, first turn on the
power to those connected devices that are closest to the sound source.
Example: Sound source (CD player or instrument) → STAGEPAS 300 → (Power amplifier)
When turning off the power to the system, reverse the order described above.
Set the MASTER LEVEL control to the optimum position
(indicated by the arrow).
While playing your instrument or singing into the microphone,
adjust the LEVEL control of the corresponding channel.
Adjust the LEVEL Control of the corresponding channel so that the “0” LED lights up
momentarily.
Use the MASTER LEVEL control to adjust the overall volume.
If the LIMITER indicator flashes continuously, the internal power amplifier section is being
excessively overloaded and may malfunction.
Applying reverb or echo to the sound
Reverb recreates the warm ambience of an actual performance space, such as a concert hall
or a night club.
For each channel you want to apply reverb, set the
corresponding REVERB switch to ON ( ).
Use the REVERB control to adjust the overall reverb.
POWER switch
For turning the power to the mixer on and off.
POWER indicator
This lights when the POWER switch is ON. When the indicator flashes, the protection
circuit is operating. Check that the speaker cable is correctly connected to the mixer and
reapply the power.
LEVEL meter
The LEVEL meter shows the level of the output signal from the SPEAKER L/R jacks.
If the LIMITER flashes continuously, the internal power amplifier section is being excessively
overloaded and may malfunction. Reduce the output level with the MASTER LEVEL control so
that the indicator flashes only briefly on the highest transient peaks.
MONITOR OUT L (MONO) /R jacks
These output the mixed signal channels from 1 to 7/8, and the level is adjusted with the
MONITOR OUT control. These jacks are convenient for connecting an external powered speaker
for monitoring purposes.
REC OUT L/R jacks
These output the mixed signal channels from 1 to 7/8, and the level is unaffected by the MASTER
LEVEL control. You can use these jacks, for example, to connect to an external recorder.
SPEAKER L/R jacks (for included speakers only)
These output the mixed signal channels from 1 to 7/8, and the level is adjusted with the MASTER
LEVEL control. When connecting the included speakers, make sure to turn the power off first.
Also, to avoid any possible malfunction, use only the included speakers and the speaker cables
included with the device.
MONITOR OUT Control
Determines the signal level output from the MONITOR OUT jack.
NOTE: The MASTER LEVEL Control does not affect the signal via the MONITOR OUT Control.
HIGH Determines the level of the high frequency band for each channel. Rotating the knob
clockwise boosts the high frequencies and produces a clearer, crisper sound. If you start
getting feedback (a high-pitched squealing sound) or you want to make the sound softer and
less harsh, turn the knob counterclockwise slightly.
LOW Determines the level of the low frequency band for each channel. Rotating the knob clockwise
boosts the low frequencies and produces a deeper, warmer sound. If you start getting
feedback or you want to make the sound less boomy, turn the knob counterclockwise slightly.
Equalizer
REVERB control
Determines the overall level of the reverb or echo that is applied to the
output signal. For best results, this level should not be set very high, to
avoid possible feedback and to prevent the sound from becoming
“muddy” with too much reverb.
REVERB switch
Set this switch to ON to recreate the rich ambience of various performance environments, such
as a concert hall or a night club. The switch lights up in green when REVERB is ON ( ).
LEVEL control
Use these controls to adjust the volume balance among the various channels.
To reduce noise, set any LEVEL controls on unused channels to the minimum.
MASTER LEVEL Control
Determines the volume of the signal output from the SPEAKER L/R jacks. This allows
you to adjust the overall volume without changing the relative volume balance among
the various channels (made with the LEVEL controls) or the tone settings (made with
the Equalizer).
SPEECH/MUSIC switch
Set this switch to SPEECH ( ) to optimize the mixer settings and sound quality for
speech purposes and announcements. Set this to MUSIC ( ) to optimize the mixer
for musical performance. The switch lights up in yellow when it is set to MUSIC ( ).
Quick GuideQuick GuideQuick Guide
The STAGEPAS 300 features a convenient storage
compartment in the speaker box for packing the included
power cable, speaker cable, Owner’s Manual (this booklet),
and an optional microphone, as shown above. Remove
the rear panel of the speaker and put in the things you
need. Carry the STAGEPAS 300 with you, and you’ve got
all you need to set up and perform—anywhere, anytime.
Convenient Convenient
built-in storage built-in storage
compartment compartment
Convenient
built-in storage
compartment
MIC/LINE switch
Set this switch to MIC or LINE for channels 1 to 4, depending on the level of the input signal. For low-level
signals (such as that of microphones), set the switch to the MIC ( ) position. For high-level signals
(such as keyboard instruments and audio equipment), set the switch to the LINE ( ) position.
Stereo channel input jacks (CH 5/6, 7/8)
I
nput the left and right channels of a stereo signal into the respective odd and even channels of
the mixer.These inputs are intended mainly for use with instruments and equipment having stereo
outputs, such as a synthesizer or CD player.
NOTE:
The channel 5/6 input provides two sets of jacks—both phone jacks and RCA-pin jacks. Either one one of these
jacks may be used, but not both at the same time. Please connect to only one of these jacks on each channel.
Channel input jacks (CH 1 to 4)
For connecting a guitar, microphone, keyboard or other instrument/device. For low-level signals (such as
that of microphones), set the MIC/LINE switch to the MIC ( ) position. For high-level signals (such as
keyboard instruments and audio equipment), set the MIC/LINE switch to the LINE ( ) position.
NOTE: On any given channel, you may use either XLR or phone jack, but not both. Please connect to
only one of these jacks on each channel.
AC IN jack
Connect the included power cable here.
Be sure to use the included power cord. Use of other cords
may result in malfunction, heat generation, or fire.
Caution
Caution
Caution
Powered SP
Included Speakers
Keyboard, etc.
CD Player
Microphones
Guitar
Caution
Caution
Caution