


Installation
All Xtant amplifiers and accessories are intended to be
installed by a certified mobile audio installation specialist. It
is the recommendation of Xtant Technologies that your new
Xtant amplifier(s) and accessory module(s) as well as all of your
mobile audio equipment be installed by your Authorized Xtant
Dealer. If, however, you choose to install your Xtant amplifier yourself,
please take the time to read this manual. The following guidelines are
designed to assure a safe and proper installation of your Xtant Mobile
Audio Sound System.
Tools / Parts Needed for Installation (not supplied):
Small flat blade screwdriver Phillips screwdriver
Wire cutters Wire strippers
Soldering iron Solder
Flux cleaner Heat shrink
Spade Connectors Grommets
Speaker wire – 16 gauge or larger In-line fuse holder and fuse
Power and Ground wire – 8 gauge or larger Silicone or similar material
Mounting
To prevent damage to you and the amplifier, mount it in a secure place.
Choosing the appropriate location will depend upon your vehicle and the
complexity of your system design. It may be mounted in any compatible
space that is convenient to your needs and provides sufficient airflow.
Adequate ventilation allows the amplifier to dissipate the heat that devel-
ops during operation.
Typical mounting locations include: trunk and passenger compartment.
Mounting the amplifier under a seat or in an enclosed area should only be
considered as a last resort. Never mount the amplifier in a location which
would subject it to immersion or exposure to water.
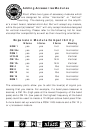
The M Series’ uniquely shaped heatsink is designed for high-efficiency
cooling, however, improper mounting may compromise its ability to cool.
When mounting the amplifier in a confined space, care must be taken to
ensure that at least two inches of clearance is provided around the ampli-
fier. If the amplifier is located in an area which has restricted air-flow or is
totally enclosed, a fan may be used to improve air circulation.
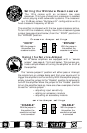
Power and Ground
Before beginning, disconnect the negative (-) terminal of the battery before
working on the positive terminal to prevent a short to ground. Reconnect the
negative terminal only after all connections have been made.
10