


2
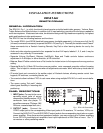
4. G S terminals. Input terminals for the IR control signal. Connect a 2-conductor cable from the emitter
or signal output port of any Xantech Connecting Block, IR receiver, Key Pad, or Controller here. The
positive lead connects to "S" and the negative to "G".
5. IR CONFIRM LED. Lights when power is applied and flashes when IR commands are received.
6. Mounting Holes.
RC68+ PROGRAMMER / REMOTE CONTROL
The RC68+ (and the RC68) programmer (available separately) contains all the commands necessary to
operate the RP41AV.
• You will need it to program universal learning devices such as the Xantech URC type learning remote,
the Xantech Smart Pads, the 590 Programmable Controller, the 710 Fone Link, etc., with commands that
operate the RP41AV.
• NOTE: The RC68+ will operate several other Xantech models as well, such as the RS41AV, ZPR68,
MIRV1, RAT1, etc. Therefore, only the button descriptions that apply to the operation of the RP41AV are
listed below. All others should be ignored.
• While the RC68+ will operate as a separate remote control, it is highly recommended it not be given to
the final user for the following reasons:
Since it permits code group changes , the user may inadvertently alter the installer configurations.
• Also, since the user will require IR commands from other brands of equipment to control the total system,
in addition to those of the RP41AV, all commands should be consolidated into one learning device, for
ease of use.
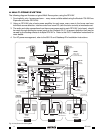
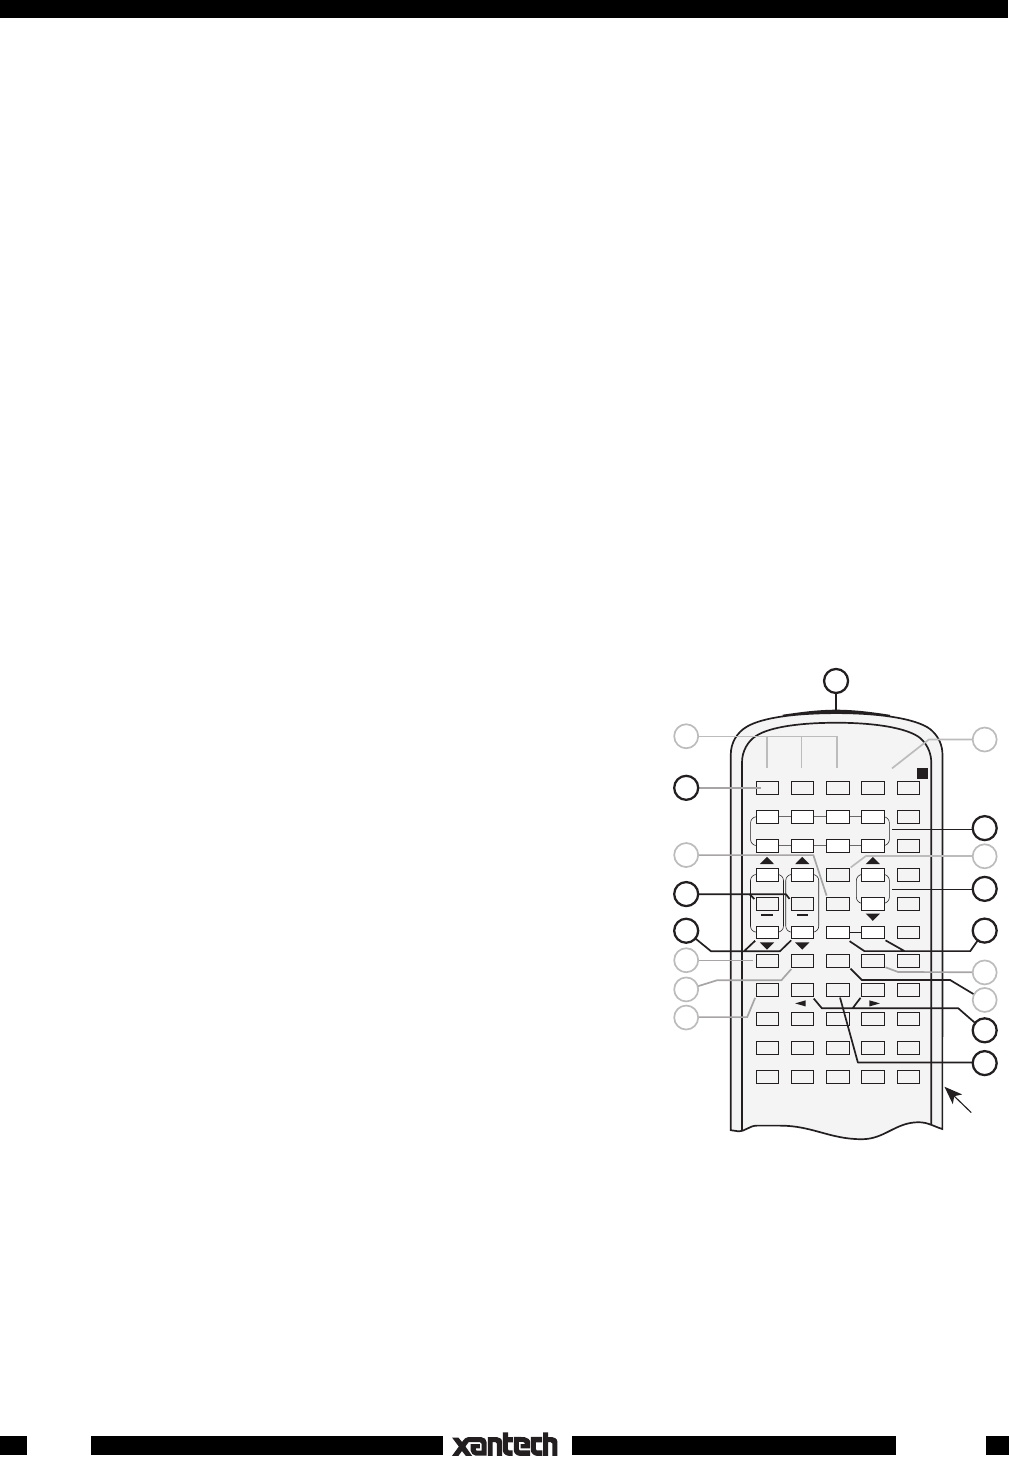
RC68+ BUTTON DESCRIPTIONS
1. IR Emitter Lens
3. INPUT Select buttons. Press buttons 1 through 4 to individually
select up to 4 audio/video sources connected to the RP41AV.
5. VOLUME Up/Down buttons. When pressed, volume will in-
crease and decrease in 2 dB steps between 0 dB and -80 dB.
When buttons are held down, the volume level will change
continuously.
6. MUTE ON / OFF buttons. Separate On / Off buttons give
positive mute commands without knowing what the status is.
This is very helpful in a remote room when all adjustments are
made “blind” without any visual aids for status.
NOTE: Mute is released (turned off) when a VOLUME, INPUT,
BALANCE, BASS or TREBLE button is pressed, in addition to
MUTE OFF.
9. BALANCE buttons. When the BALANCE "arrow" buttons are
pressed, the audio output will move to the left or right in 2 dB
steps with each left or right press. (No change will occur if they
are held down continuously).
10. Balance "Center" button. This button, when pressed (identified by "C_BAL"), will instantly return
the balance to the center position from any previous setting.
14. TREBLE & BASS control buttons. When the "arrow" buttons are pressed, the treble and bass
response can be increased or decreased from 0 dB to ± 12 dB in 2 dB steps with each up or down press.
(No change will occur if they are held down continuously). In "multi-zone" systems, you can use these
controls to "EQ" (equalize) the sound for each room's acoustic differences.
Fig. 2
1
A B C ADJ-OFF
1234
5678
GLOBAL
Z-ADJ
TREBLE
VOL
MUTE
ON OFF
E-FLAT LAST MAX-V TRIM
OFF C-BAL
BASS
INPUT
A
80 48 10 90 01
00 C0 50 D0 41
40 A0 30 B0 21
20 E0 70 F0 61
60 88 18 98 09
08 A8 38 B8 29
28 E8 78 F8 69
68 C8 58 D8 49
E1 89 C9 A9 E9
71 19 59 39 79
F1 99 D9 B9 F9
RC68+
2
3
4
5
6
7
8
9
10
11
12
13
14
15
16
17
18
RP41AV