


Model PA435X Page 13
© 2003 Xantech Corporation
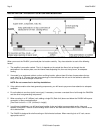
A Multi-Zone System Diagram Using The PA435X and MRC88
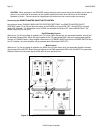
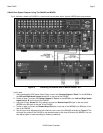
Fig. 9, following, shows the PA435X in a typical multi-room system with a Xantech MRC88 eight-zone preamp.
Figure 9: Interfacing the PA435X with an MRC88 Zones 7 & 8
In this case:
1. Using good quality RCA Stereo Patch Cords, connect the Preamp Outputs of Zone 7 on the MRC88 to
the Left and Right Audio Inputs labeled ‘A’ on the rear of the PA435X.
2. Similar to step 1, connect the Preamp Outputs of Zone 8 on the MRC88 to the Left and Right Audio
Inputs labeled ‘B’ on the rear of the PA435X.
3. Using two 3.5mm Stereo Mini Plug cables, connect the Remote Amp CO1 jack on the rear of the
MRC88 to the CI1 jack on the rear of the PA435X
4. Similar to step 3, connect the Remote Amp CO2 jack on the rear of the MRC88 to the CI2 jack on the
rear of the PA435X.
5. Set the Input Level Adjustment for both channels on the rear of the PA435X according to Figure 4. This
will match the output of the PA435X to the standard output of the other 6 Zones of the MRC88. You can
also adjust higher or lower according to customer preference.