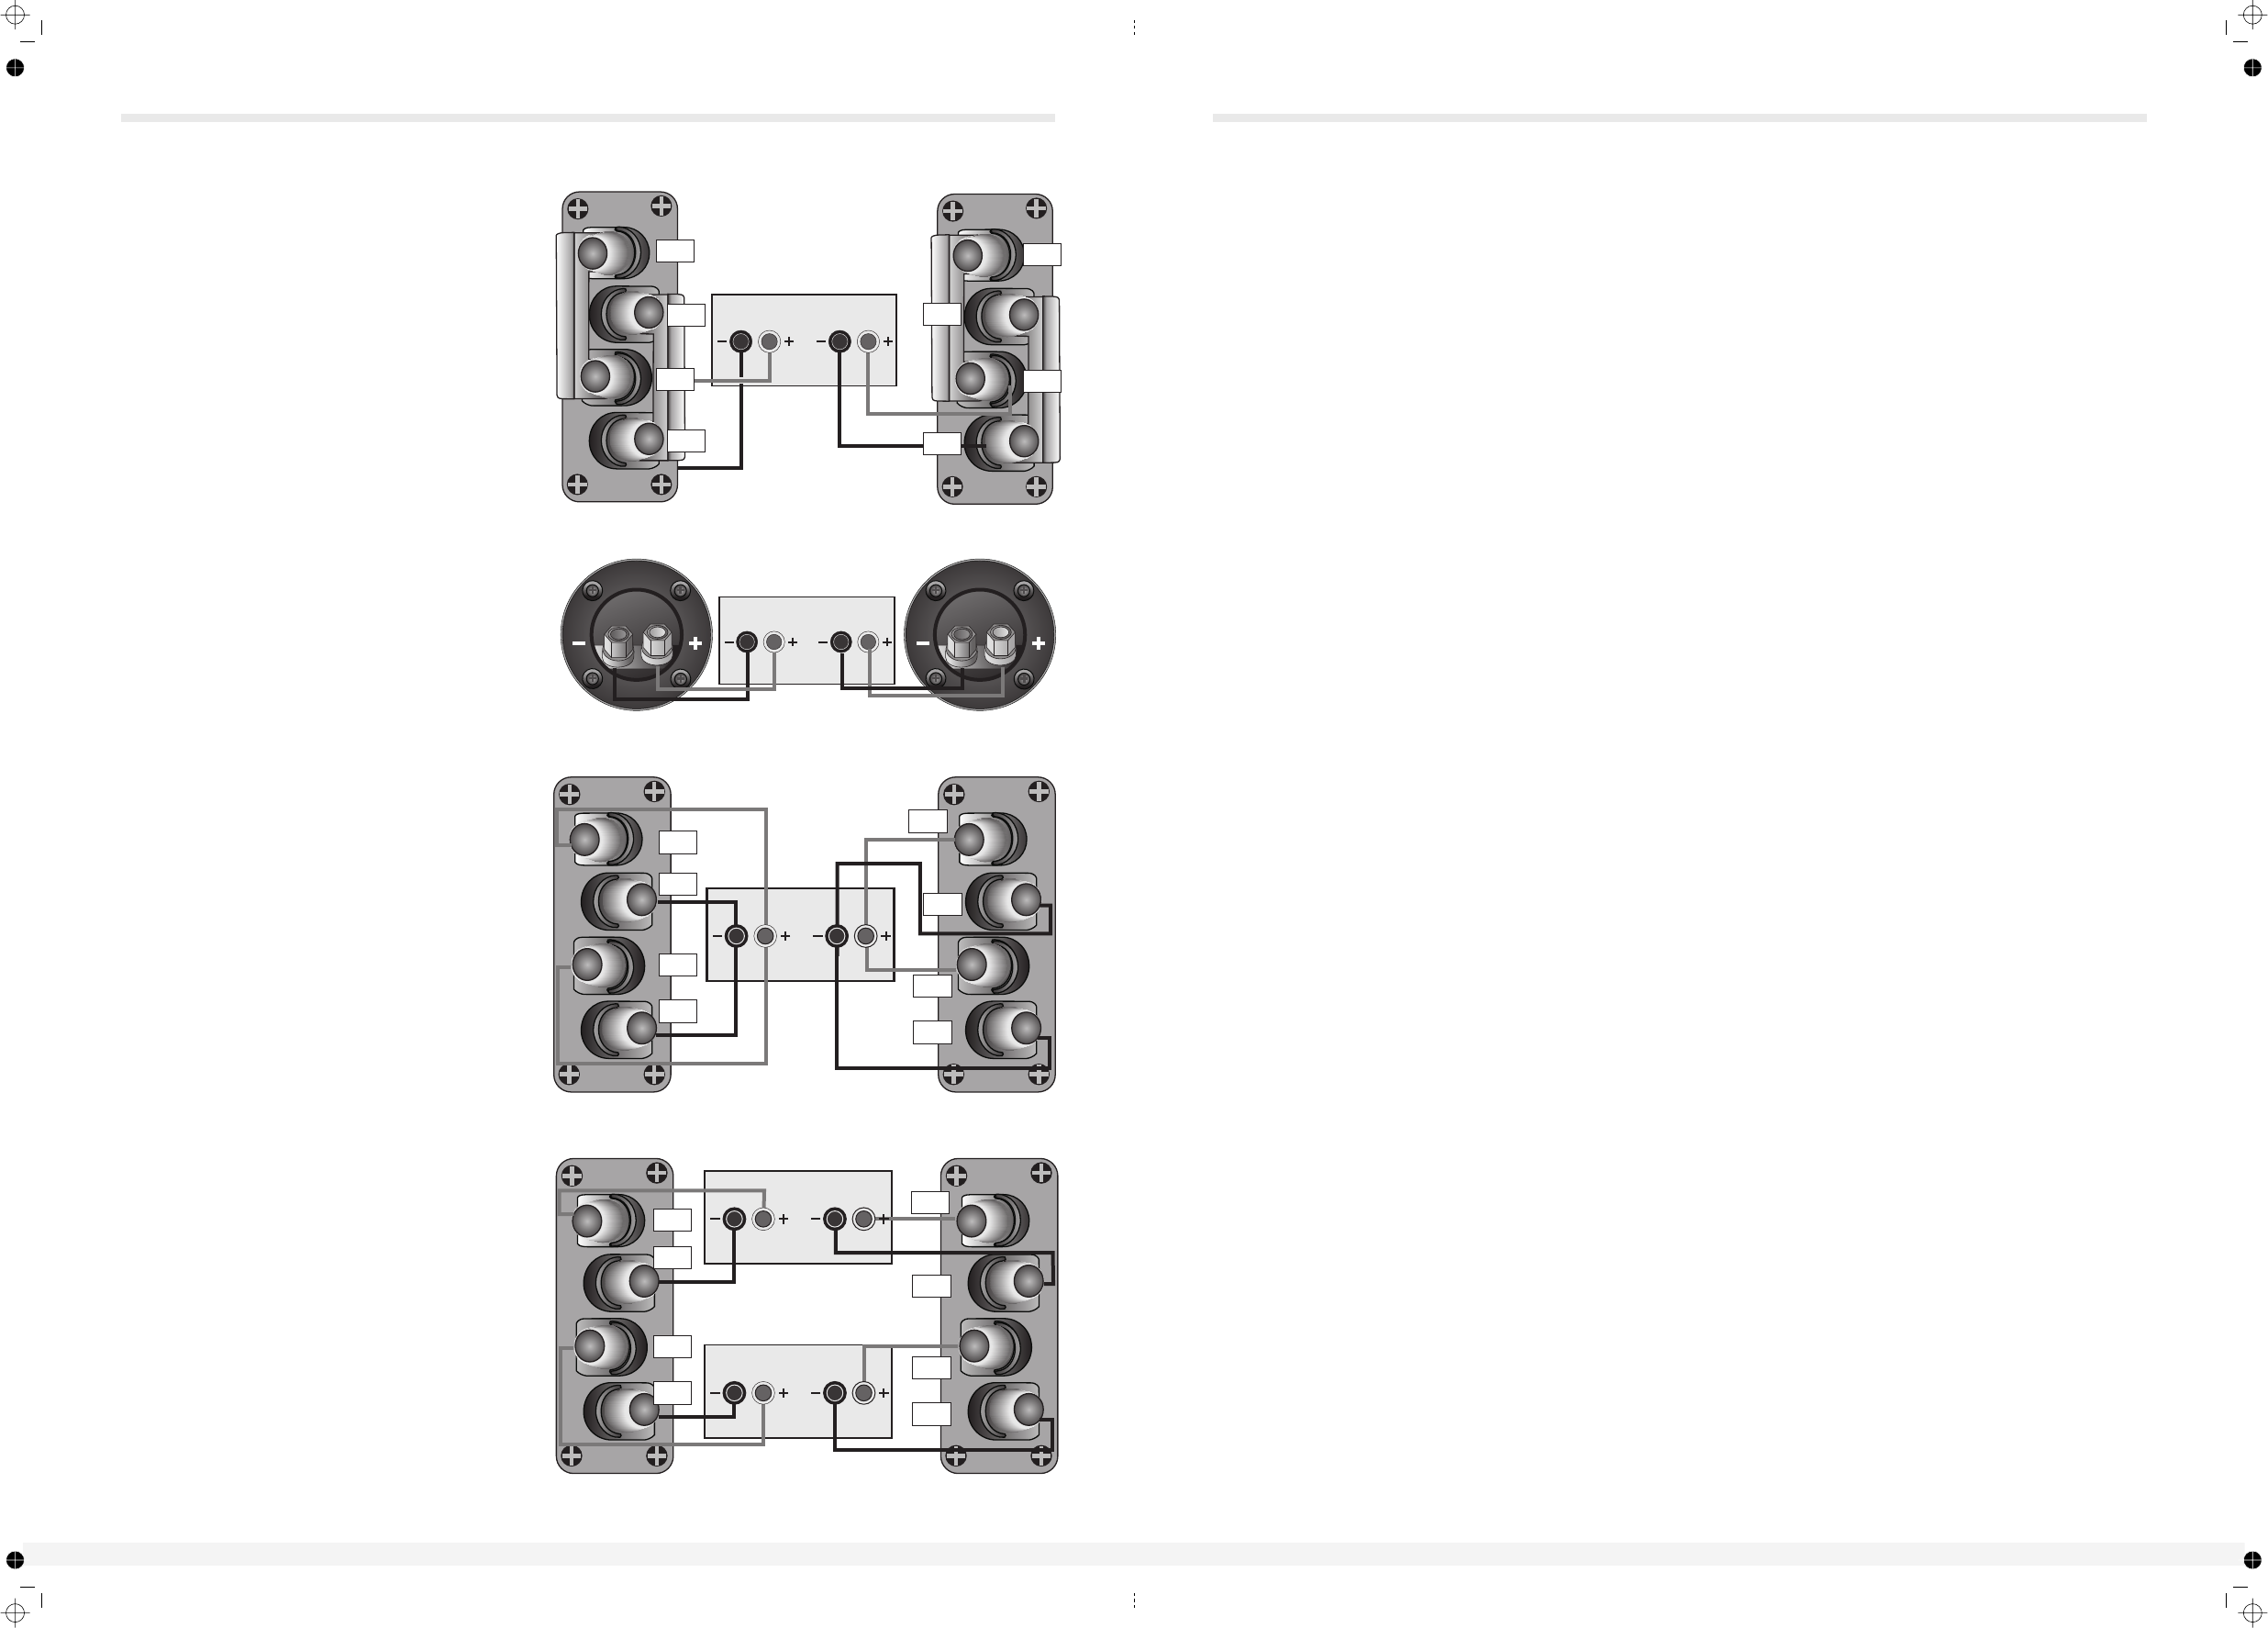
Standard Connection
Bi-Wiring
Bi-Ampifying (Bi-Amping)
Choose a suitable length of twin core speaker cable for
each channel, and prepare the ends. Unscrew each
terminal a few turns.
Connect the red, positive (+) terminal of the Left
loudspeaker to the corresponding red, positive (+)
amplifier terminal. Connect the black, negative (-) terminals
similarly. Tighten the terminals securely. Repeat this
procedure for the Right Channel.
Using separate cables for treble and bass units in a Bi-Wiring
configuration reduces intermodulation effects and improves
headroom and clarity. To bi-wire, you will need to install two
equal lengths of twin core cable between the amplifier and
each loudspeaker.
Unscrew each terminal a few turns and remove the metal
straps. Connect the cables between the amplifier and the
loudspeakers as indicated above and re-tighten all the
terminals securely.
By connecting each loudspeaker drive unit to its own
dedicated amplifier the advantages of Bi-Wiring can be
extended.
If you own two identical stereo power amplifiers, your
speakers may be Bi-Amped. For further details please consult
your dealer.
L.SPKR
R.SPKR
AMPLIFIER
CONNECTION - D10.0
Connecting the Front Loudspeakers
RIGHT SPEAKER
LEFT SPEAKER
L.SPKR
R.SPKR
AMPLIFIER
HF+
HF-
LF+
LF-
HF+
HF-
LF+
LF-
BI-WIRED CONNECTION
RIGHT SPEAKER LEFT SPEAKER
L.SPKR
R.SPKR
AMPLIFIER
HF+
HF-
LF+
LF-
HF+
HF-
LF+
LF-
L.SPKR
R.SPKR
AMPLIFIER
BASS
TREBLE
RIGHT SPEAKER LEFT SPEAKER
8
LEFT SPEAKER
L.SPKR
R.SPKR
AMPLIFIER
STANDARD CONNECTION
D10 SERIES EXCEPT D10.0
HF+
LF-
H
F
+
H
F
+
B
A
S
S
+
B
A
S
S
+
HF-
RIGHT SPEAKER
HF+
HF-
LF+
H
F
-
H
F
-
B
A
S
S
-
B
A
S
S
-
LF-
H
F
+
H
F
+
B
A
S
S
+
B
A
S
S
+
H
F
-
H
F
-
B
A
S
S
-
B
A
S
S
-
LF+
Operating Your Subwoofer
Check that all connections to the subwoofer have been properly made and that the main volume control is at
minimum. Plug the supplied power cord into the mains socket on the rear panel.
Initial Settings
Switching On
Basic Tuning
Mains Operation
Volume Control:
Crossover Control:
Phase Switch:
Volume Setting:
Phase Switch 0º
180º
Crossover Adjustment.
Autopower Switch. (
Set the subwoofer volume control to the mid position (12 o'clock) before proceeding.
This control should initially be set to 45 or 55 Hz when the subwoofer is used with small
bookshelf speakers and to 35 or 40 Hz when used with large floor standing speakers.
The Phase switch should be initially set to 0°.
Plug in the mains plug and switch the power on. Now switch the subwoofer on with the rest of your system.
The subwoofer ON/OFF switch has a rocker action; press “ ”to switch the equipment on and “ ” to switch it off.
When switched on the light beside the power switch and the light on the front of the subwoofer will glow and the
subwoofer will be operational.
Play a programme with extended bass and set the system volume to a reasonable level. Adjust the
subwoofer volume control to produce the desired level of bass.The bass should be even and an extension of the
main loudspeakers. Do not set the control too high or you will swamp the sound with too much bass and clarity and
definition will suffer.
: If the bass is indistinct or lacks depth, the Phase switch may need adjustment. Set the switch to
and listen carefully to some music with extended bass. If there is insufficient bass output from the sub-woofer set the
Phase switch to . Select the position which produces the most natural, extended bass.
This adjusts the blend between the subwoofer and the main speakers. and enables the
system to be set up for optimum bass performance.The higher settings are for use with small bookshelf
loudspeakers, the lower settings for large floorstanding models. If you choose too low a setting with small speakers,
there will be a‘hole’in the bass response; too high a setting with large speakers will result in the upper bass
becoming bloated. See the next section for further details.
Again the subwoofer should be an extension of the main loudspeakers.
When the system is not in use for extended periods, we suggest you switch off the subwoofer to protect it from
switching noises caused by domestic appliances, etc.The best practice is to switch the complete system on and off
from a central point. Bear in mind that if you play the system with the subwoofer switched off you will get no bass!
. If the subwoofer is left permanently on this may result in
low level hum or noise from the subwoofer when the rest of the system is switched off. Setting the AUTO switch to
ON will automatically turn the subwoofer on when a signal is detected at any of the inputs and turn it off (Standby
Mode) after a period of inactivity. We recommend that the AUTO switch be set to ON for normal operation.
In AUTO mode, when the subwoofer is switched on, the subwoofer will become active. If there is no audio input
present the subwoofer will go immediately into Standby. As soon as an audio input is detected the subwoofer will
then switch on.
When the system is not in use for extended periods, we suggest you switch off the subwoofer to protect it from
switching noises caused by domestic appliances, etc.
IO
Diamond 10. SX-SUB, 10.MX-SUB)
Always turn the main volume control to minimum when you switch the system on or off.
13


