


ON
OFF
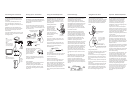
The IR light beam from the transmitter is
received by sensors on each side of the
headband, so the headphones must be
within sight of the transmitter in order to
operate properly.
Installing the Batteries
The headphones are
powered by 2 AAA
batteries (included)
located in the right
ear cup. Lift the battery
cover and insert both
batteries before operating
the headphones.
Power Switch
To turn on the power, quickly press and
release the push button power switch on
the left ear cup.
To turn off the power, quickly press and
release the push button power switch (or,
allow it to turn off automatically as
described below).
Power Indicator
The Turtle Beach Palm Tree Logo on the left
ear cup will flash about once per second
when the power is on.
Automatic Power Shut-off
If there is no sound transmitted for more
than a few minutes, the light will flash
faster to indicate that the headphones are
about to "power down". After about two
minutes, the power will automatically shut
off to conserve the batteries. To turn on the
headphones after they have auto-shut
down, press the power switch as described
above.
Volume Settings
Push in cover
and slide down
The X3 system has three volume control
settings that operate as follows:
Transmitter Input Level: This sets the
maximum game signal level transmitted to
the headphones and should be set as loud
as possible without causing distortion. In
most games, you can leave this set to
maximum. If you hear distortion on loud
parts in the game, turn this control down a
bit to reduce the level.
Headphone Game Volume Control: The
volume control on the headphones also
controls the game signal level, but should
be turned down to a comfortable level. For
best audio quality, the transmitter volume
should be as loud as possible and the
headphone volume should be as low as
possible for optimum game sound.
Talkback Volume Control: Chat volume from
other players during an Xbox Live gaming
session is set by the volume control on the
"puck" inserted into the Xbox controller. The
game volume control on the headphones
has no effect on this chat volume level. In
other words, even if you turn down the
game volume control you will still hear the
chat signal if the "puck" volume is turned
up.
Bass Boost Switch: You can enhance the
game audio quality by turning on the Bass
Boost switch on the headphones. When
turned on, this will increase the low
frequency response of both the game and
talkback signals to enhance the sound of
explosions, gun shots and other deep-bass
sounds.
Using the X3 Headphones
Setting up the Transmitter
Note: If you hear distortion, turn down the
transmitter input level and then adjust the
headphone volume.
Stereo Expander
The transmitter stereo expander provides a
"widening" effect on stereo signals.
Activate by placing the slide switch to the
"ON" position. The LED on the front of the
unit will light, indicating that the expander
effect is on.
Infrared light beam sensors are
located in each ear cup
Base unit transmits an infrared
light beam to the headphones
Input
Level
Stereo
Expander
Switch
Suction Cup
Infrared
Sensor
The transmitter communicates with the
headphones via an infrared (IR) light beam,
so it is important that there is a direct line of
sight between the transmitter and the
headphones.
You can adhere the included velcro pads or
suction cup to the bottom of the transmitter
to keep it in place on a smooth surface, such
as your Xbox or TV.
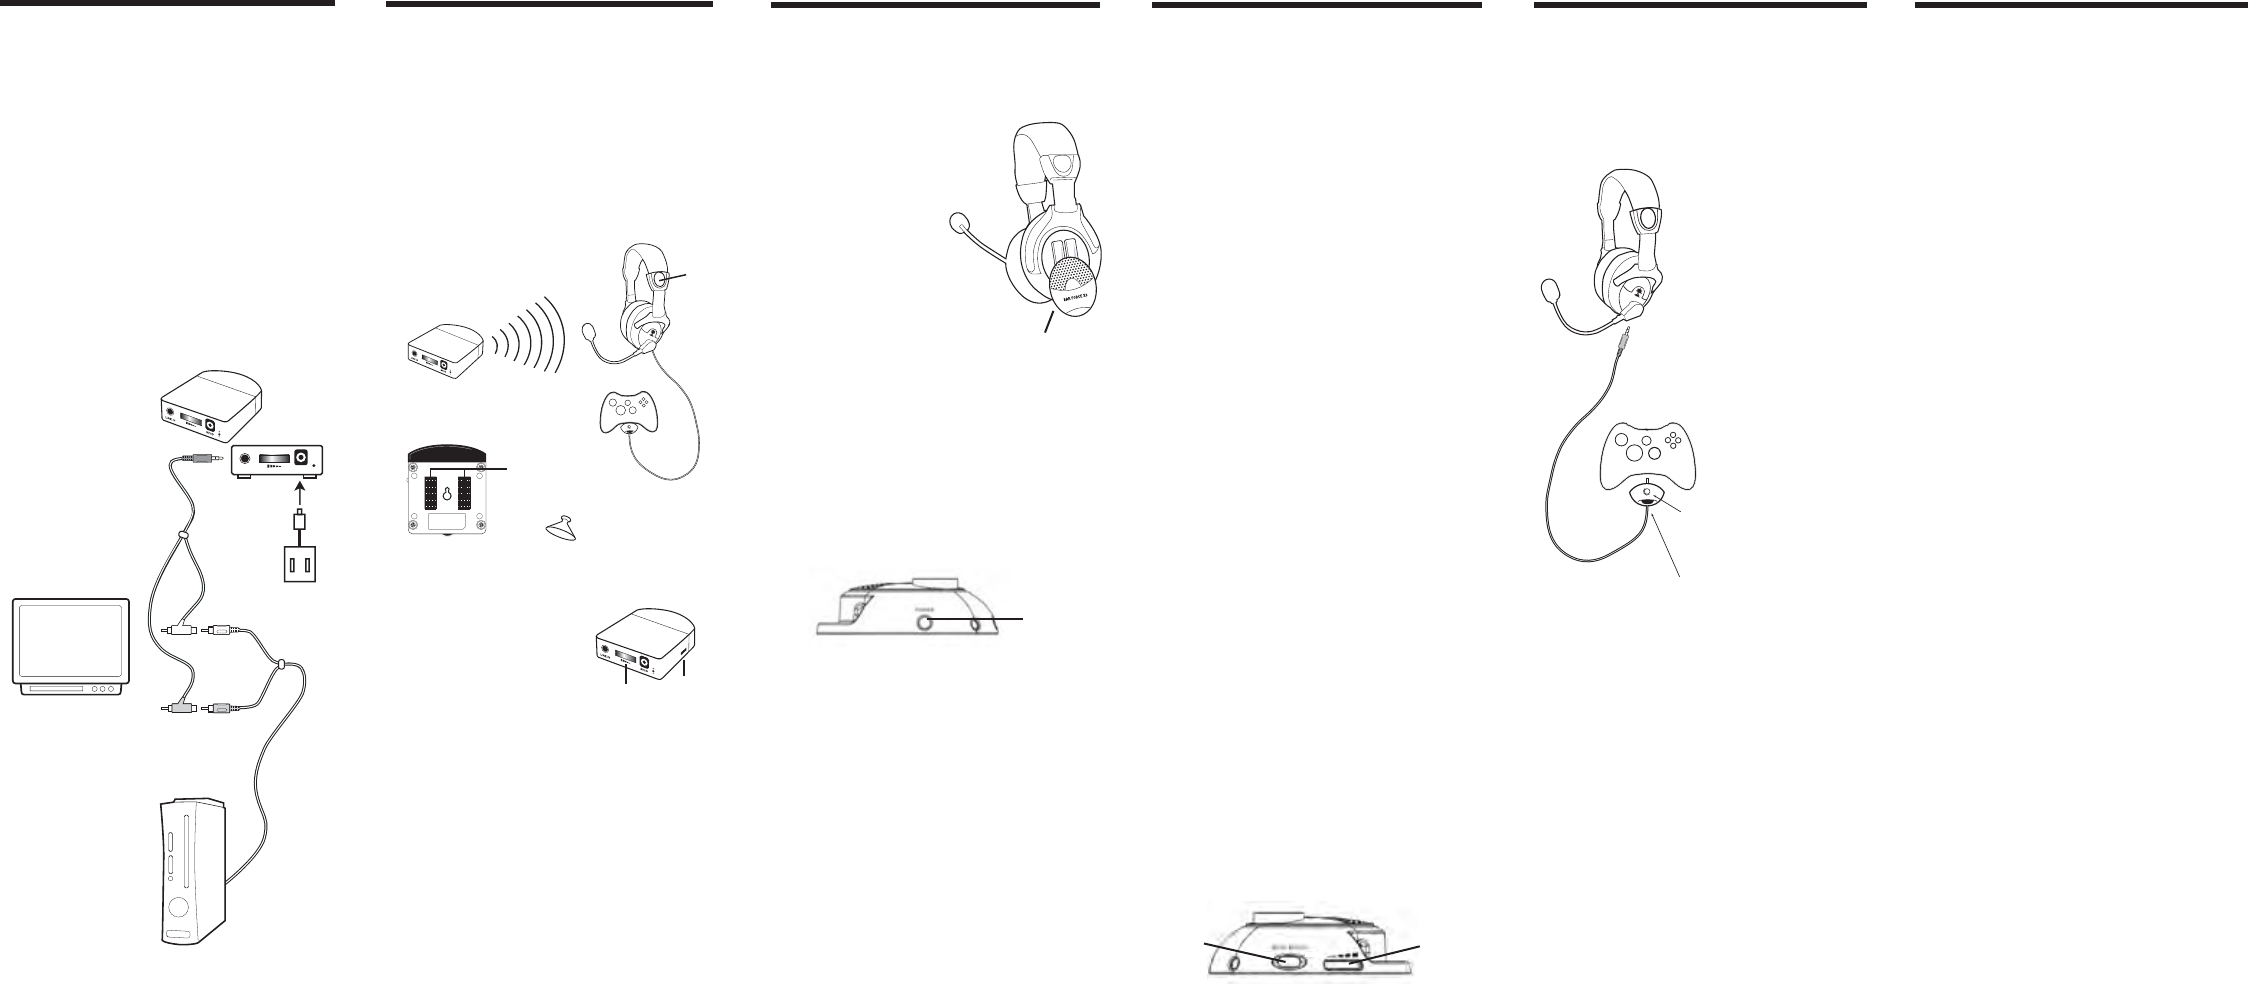
Using Xbox Live Chat
The X3 microphone may be used to
communicate with other players during Xbox
Live multi-player gaming sessions. Use the
included cable to connect the headphones
to the Xbox 360 controller as illustrated
below.
Using the Microphone
The microphone signal connects to the Xbox
controller via the cable plugged into the
headphones.
The mute switch on the "puck" plugged into
the Xbox controller can be used to silence
the microphone when you don't want to be
heard.
For optimum clarity, adjust the microphone
so that it is situated a few inches away from
your mouth.
A portion of the microphone signal is mixed
into the headphone signal when the puck
cable is plugged into the headphone Xbox
jack, so you can hear your voice along with
the online chatting and game audio.
Xbox Game
Controller
Insert the gray plug into
the headphone jack labeled
with the Xbox controller
symbol.
Insert the "puck" shaped
plug into the headphone
jack on the Xbox game
controller.
Use the Mic Mute switch to
prevent your voice from being
heard by other players.
The volume control on the "puck"
shaped plug may be used to adjust
the volume of the Xbox Live chat.
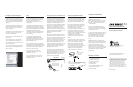
Connecting the Transmitter
1. Insert the included DC power adapter
into the power jack on the back of the X3
transmitter.
2. Insert the power adapter into an AC
outlet. The red light on the front of the
transmitter will light up to indicate power is
active.
CAUTION: Use only the supplied power
adapter. Failure to use the correct adapter
can result in fire, damage to the unit or
other hazards.
3. Use the included cable to connect the X3
transmitter to your TV and Xbox as shown in
the diagram below.
Transmitter
Power Adapter
TV or Sound System
Xbox
Step 1:
Insert the mini plug into
the Line In jack on the
transmitter.
Step 2:
Insert the male RCA plugs
into the audio input jacks
on the TV or sound system.
Step 3:
Insert the RCA plugs from the
Xbox into the female RCA jacks.
Step 4:
Insert the
power
adapter
TV L
TV R
SVCD
+
–
LINE IN
Power
Switch
Game
Volume
Control
Bass
Boost
Switch
Dynamic Talkback Expander
The X3 headphones include a dynamic
talkback expander that automatically
amplifies Xbox Live chat during loud
moments in your game. Since this is a
revolutionary new feature in gaming
headphones, it takes a bit of getting used
to. Here's how it works:
If you were to turn down the headphone
volume control all the way and turn up the
chat volume on the "puck", there would be
no game volume, but you would hear chat.
In this mode, the dynamic talkback
expander is doing nothing because there's
no game audio.
If you turn up the game volume and the
game sound is soft, there won't be any
change in the chat level. However, if the
game volume gets louder, the chat sound
level would normally be drowned out by the
game. That's where the dynamic talkback
expander kicks in!
As the game audio increases, the expander
boosts the chat volume so it keeps up with
the game level and you can hear what
everyone is saying. When the volume quiets
down again, the chat level returns to the
lower volume setting.
To properly set the expander function, first
turn down the headphone game volume
control so there's no game audio. Then
adjust the talkback volume control on the
"puck" so you can hear the chat voices at a
comfortable level. Now, turn up the game
volume and the chat volume increases as
the game gets louder, just as if the talkback
volume control is being automatically
turned up along with the game level.
Note that if the talkback volume on the "puck" is
set too loud, the expander might increase the
volume so much that the voices will distort. If
that happens, just cut back on the talkback
"puck" volume to adjust the level below
distortion.
Setting the Transmitter Input Level
Set the transmitter input
level to maximum and
use the headphone
volume to adjust the
game audio level.
Each Velcro strip is
approximately
25mm x 15mm
Underside of Transmitter