


47
continued. . .
☞☞
Crossover switch- In/Out
This switch allows the electronic crossover circuitry to be removed from the signal path.
This is preferable in certain installations which route the signal through external processors
with a crossover circuit of their own, such as the new digital units. Simply move the switch
to OUT to disengage the built in crossover. For all other installations which do not have
a separate electronic crossover we recommend you leave the internal crossover IN to
provide optimum performance.
Auto turn on function
With this function in the "auto" position, your subwoofer can be safely left with the
main power switch on continuously. The subwoofer will turn itself on automati-
cally when an audio signal is present. If no signal is present for approximately 15
minutes, the unit will switch to standby mode. While in standby mode, your
subwoofer will draw very minimal power. This function can be disabled by leaving
the switch in the "on" position.
Remote sensor
This connection allows for hook-up of the optional remote control receiver. With this
optional receiver plugged in you will be able to utilize the functions of the remote to control
power, volume and mute functions. Place the infrared receiver within direct line of sight
from your usual listening position.
Detachable power cord
Allows for easy replacement should the original be damaged.
Optional Infrared remote control
The optional remote control unit allows for convenient adjustment of select subwoofer
functions. The power button turns the unit on/off. The volume +/- buttons on the remote
allows you to increase or decrease the output volume of the unit relative to the setting of
the main volume control on the rear panel. The middle reset button returns the remote
volume control to neutral, output level will then be determined by the manual volume
control setting. Initial setup of the unit should be performed with the remote volume at
neutral, while you adjust the manual volume knob to match playback levels. The mute
button silences the unit. If you choose to utilize the remote to turn the unit on/off, we
suggest setting the auto turn on switch to the on position. This deactivates the sensing
circuitry allowing the remote to have total control of unit power.
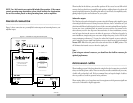
Placement
––––––––––––––––––––––––––––––––––––––––––––––––––––––––––––
True subwoofers operate at extremely low frequencies which are primarily omni-directional.
While it is recommended that the subwoofer be placed on the same plane as the satellite
speakers, room and system conditions often dictate otherwise. Keep in mind that frequency
response and output level can be drastically influenced by placement, depending on the
acoustic properties of the listening room. Typically, the optimum location for a subwoofer
is tucked away in a corner of your listening room. This location will usually provide the
greatest output levels with optimum low frequency extension. The worst location for a
subwoofer it typically far away from any walls, and close to the center of your room. Avoid
these locations when possible. When using a pair of Velodyne subwoofers in stereo, it is
preferable to place each subwoofer by the satellite of the same channel.
Caution!
This subwoofer has electronics built into the cabinet. Do not place the cabinet
next to sources of heat such as furnace registers, radiators, etc. Do not place
the unit near sources of excessive moisture, such as evaporative coolers,
humidifiers, etc. The power cord should be routed in such a way that it will not
be walked on, pinched, or compressed in any way that could result in
damaging the insulation or wire.
Regardless of where you install your Velodyne subwoofer, it must remain in an upright
position (woofer facing forward). Using, shipping, or otherwise storing the subwoofer in
any other position for an extended period of time may result in damage to the unit not
covered by warranty.
Certain types of televisions are particularly sensitive to stray magnetic fields. If your
television produces distorted colors after installing your subwoofer, simply increase the
distance between your television and the subwoofer, until normal color and operation is
returned.