


Page-12
Page-9
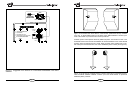
Crossover Switch
The subwoofer direct switch will disengage the built-in crossover in the DECO 8
subwoofer and is designed to be used with a home theater receiver which has a
built in crossover. Set this switch to the SUBWOOFER DIRECT position when you
are using a home theater receiver with a subwoofer (LFE) output that has a built
in crossover. If the Subwoofer Out or LFE Out in the receiver or processor
offers an adjustable crossover frequency, we recommend you experiment with
this setting. A crossover frequency from 100-120 Hz will work best in most
installations, allowing output from the DECO subwoofer and satellite speakers to
blend together seamlessly. Refer to the receiver owners manual for instructions
on adjusting its crossover frequency.
For all other installations which do not have a separate electronic crossover, we
recommend you leave the switch to INTERNAL X-OVER and set the crossover
knob to DECO Setting for optimum system performance (see Figure 8 page 14).
Auto/On Power Switch
With this switch in the AUTO position, the subwoofer can be safely left with the
master power switch on continuously. The subwoofer will power up automatically
when an audio signal is present. If no signal is present for approximately 10
minutes, the unit will switch to a standby mode. The subwoofer will draw very
little power while in the standby mode. Leaving the master switch in the ON
position will keep the subwoofer powered whenever the master power switch is
on.
Master Power Switch
The master power switch is located on the back panel of the subwoofer. If the unit
is to be left unused for an extended period of time, the master power switch
should be turned off to prolong the life of the subwoofer and conserve energy.
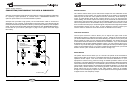
CONNECTING THE DECO HOME THEATER SYSTEM
CONNECTING THE DECO SATELLITES
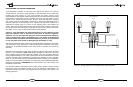
Velodyne recommends installing the DECO Satellite speakers with 16 AWG
(American Wire Gauge) or larger speaker wire. Always switch off all your equipment
before making any connections. Be very careful to observe polarity (see Figure 5
below) when connecting the positive (Red +) terminal on the receiver to the
positive (Red +) terminal on the speaker; and the negative (Black -) terminal on
the receiver to the negative (Black -) terminal on the speakers. Connecting
these wires improperly will adversely affect the sound quality of the speaker
system. Look carefully at the type of wire you are using. The wire you are using
may be identified with a different color, printing, ridges or colored thread marks
on one of the wire strands. By convention the marked (or colored) wire is
connected to the positive (Red) terminals. Make sure that all of the wire strands
are inserted into the terminals so that there are no loose strands. To connect the
speakers, remove approximately ½ of insulation from the end of each wire.
Twist the strands of each wire into a tight bundle, depress the terminal and
insert into the hole on the side of the terminal. The DECO Satellites are designed
to accept individual banana plugs. The banana plugs should be inserted into the
hole on the top of the gold plated terminal (see Figure 7 page 13 for typical
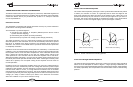
Figure 5. Wiring illustration for recommended polarity connections.
(Black-)
(Red +)
(No Stripe -)
(Stripe +)
Banana Plug Ports