


Quick Start Guide
TCS-C ceiling series
TCS-C series Quick Start Guide - Page - 3
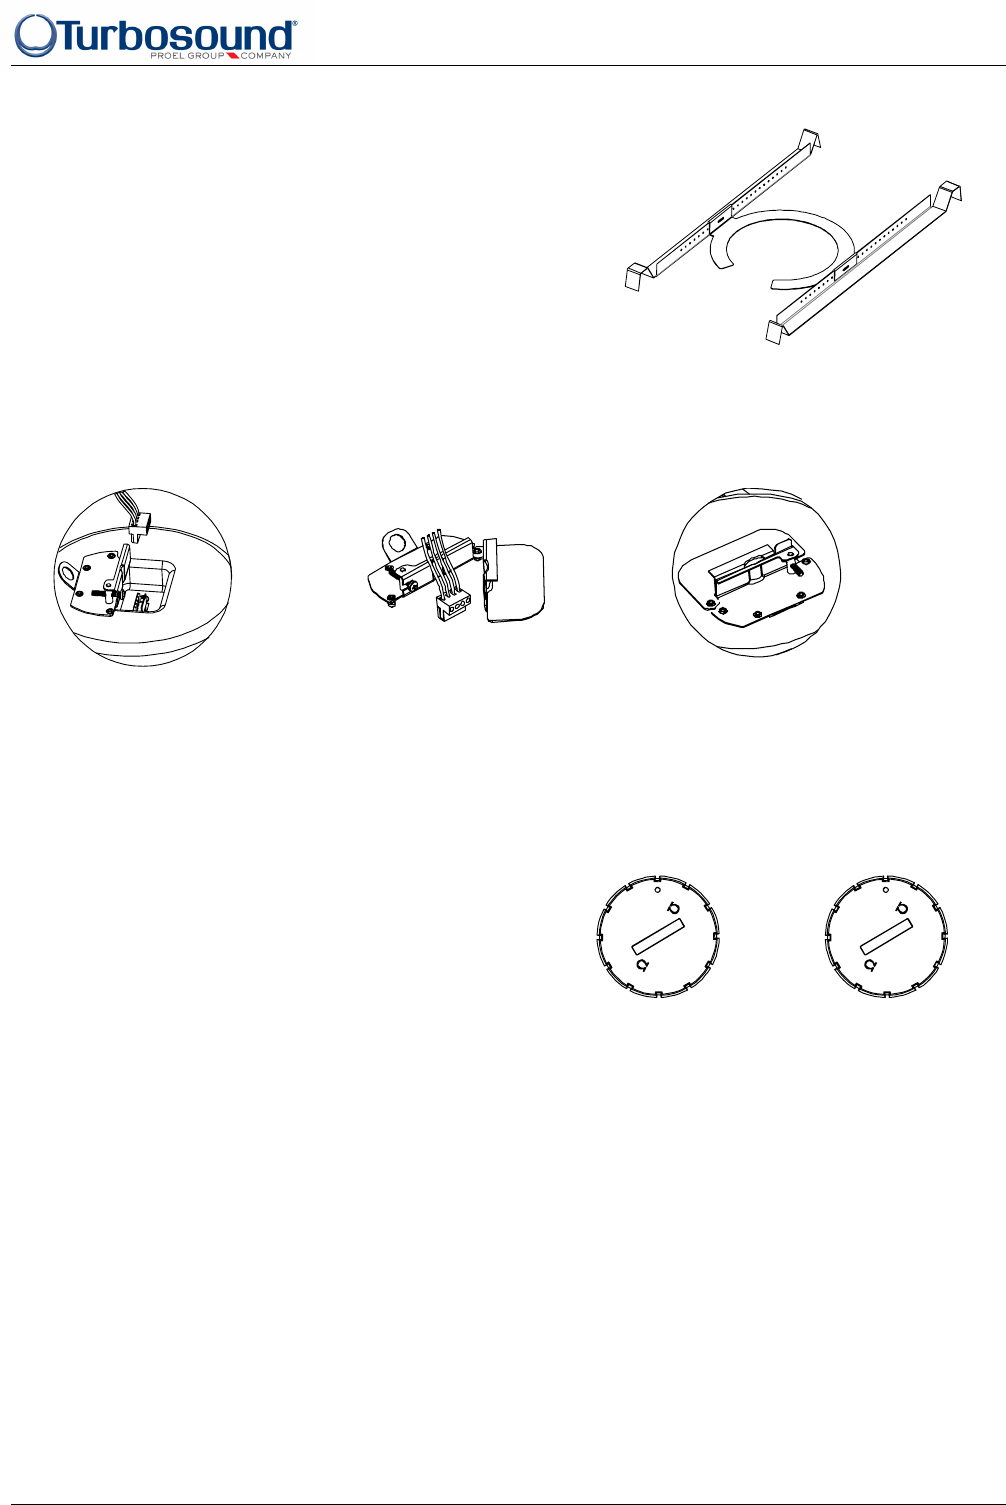
4. The mounting hardware consists of two tile rails and a ‘C’ plate
(these are supplied with the TCS-C35T, and as an optional accessory
for the TCS-C50T). Insert the tile rails through the hole in the ceiling
tile and align them parallel to each other on either side of the hole,
and with the ends positioned over the ceiling T grid. Insert the ‘C’
plate through the hole and snap the tabs onto the tile rails as shown.
Position directly over the hole in the ceiling tile and secure with the
fixing screws supplied. Note that the provision of multiple fixing
holes in the tile rails allows the speaker to be positioned away from
the centre of the tile if desired.
5. Plug the connector into the socket in the loudspeaker’s terminal cup. The connector is polarised to avoid the possibility
of mis-connection. The terminal cover also acts as the strain relief. Rotate the cover and tighten the retaining screw.
6. Connect the safety tab to a separate support point. Consult construction codes in your region.
7. Insert the speaker into the ceiling and secure the fixing arms. Offer the loudspeaker into the ceiling until the back of the
front baffle rim touches the ceiling tile. Turn the attachment screws to tighten the fixing arms. Note that the first 1/4 turn
rotates the arm outwards and subsequent turns tighten the tab down onto the ceiling tile. DO NOT OVERTIGHTEN.
8. Adjust the voltage tap selector for desired level. The selector is
located on the front baffle, and should be adjusted before fitting
the grille. In some installations it may be preferable to leave
grilles off until final adjustment of the tap selectors has been
completed for all loudspeakers.
9. Apply the logo badge to the grille in the desired location if required, and fit the loudspeaker grille by pressing the grille
firmly into place until it is flush with the rim.
Painting before Installation
The loudspeaker’s white finish matches most décor schemes and does not need further finishing. However where interior
design requires an alternative colour this can be easily accomplished. The loudspeaker can either be painted before
installation, or where the rim needs to be finished at the same time as the ceiling the rim can be painted after locating in
the ceiling. The speaker will accept almost any type of emulsion or oil-based paint. Two coats are recommended.
Clean the rim and grille with a light solvent such as white spirit. Do not use gasoline, kerosene, acetone, MEK, paint
thinner, harsh detergents or other chemicals, all of which may damage the loudspeaker. After cleaning, apply two coats of
paint, using a roller or brush, or by spraying.
Painting the Speaker with the Ceiling
Using the paint shield provided, paint the speaker and remove the shield. To paint the grille, first remove the logo and
grille cloth backing. It is advisable to spray the grille to avoid the mesh becoming clogged with paint from a roller or
brush, which may impair the sound quality. Replace the grille cloth and the logo.
3.75
7
.
5
7.5
1
5
3
0
1
5
1
0
0
V
7
0
V
30
1
6
1
6
7.5
1
5
15
3
0
6
0
3
0
60
1
6
1
0
0
V
7
0
V
1
6
TCS-50T TCS-35T