


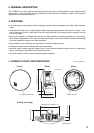


The F-2352SC ceiling speaker can be mounted in 6 different configurations:
4
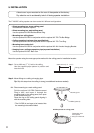
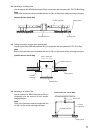
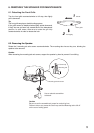
Step 1. Cut a ø200 mm (7
7
/8") hole in the ceiling.
Use the supplied paper pattern to position and
trace the hole.
Ceiling panel
ø200 ±5 mm (7
7
/8 ±
13
/64")
Mount the speaker using the most appropriate method for the ceiling panel or installation location.
5. INSTALLATION
A dust cover is pre-mounted on the rear of the speaker at the factory.
Pay attention not to accidentally take it off during speaker installation.
• Direct mounting to a strong ceiling panel
No additional hardware required.
• Direct mounting to a weak ceiling panel
Use the optional HY-RR2 Reinforcement Ring.
• Mounting to a ceiling frame
Use the optional HY-RR2 in conjunction with the optional HY-TB1 Tile Bar Bridge.
• Ceiling mounting in a larger than specified hole
Use the optional HY-RR2 in conjunction with the optional HY-TR1 Trim Ring.
• Mounting to an anchor bolt
Use the optional HY-RR2 in conjunction with the optional HY-AH1 Anchor Hanging Bracket.
• Hanging from a ceiling suspension pipe (exposed installation)
Use the optional HY-BC1 Back Can.
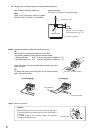
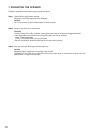
Mounting hole
HY-RR2 (optional)
HY-RR2 placed on ceiling panel
These tabs must
face upward,
away from the hole.
Step 2. Mount fittings to a ceiling or hanging pipe.
Tip: Skip this step when the ceiling is strong (no additional hardware needed).
2-1. Direct mounting to a weak ceiling panel
Fold the optional HY-RR2 Reinforcement
Ring in half* and insert it through the
mounting hole in the ceiling panel, then open
it with its tabs facing up.
Place the ring on the ceiling panel aligning it
with the mounting hole.
* The HY-RR2 is too large to be inserted into
the mounting hole unless folded.