


5
Preliminary operations
Unpack the unit and all accessories.
Please keep the packaging for future use
when transporting the device.
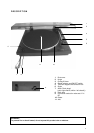
- Attach hinges (2) to the designated recesses
at dust cover (Fig. 1).
- Insert dust cover hinges into the respective
sockets.
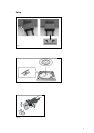
Belt and platter (Fig. 2)
The belt comes already looped around the
transmission area of the platter (10). A ribbon
has been attached to the belt so that no tools
are needed for its final installation.
Put platter onto axle (11) and turn it until cut-out
has come above the motor pulley. By means of
the ribbon lift off belt from platter and loop it
around the motor pulley while making sure the
belt sets in the centre of the pulley’s transmis-
sion area. Lastly, remove ribbon.
You can now put the mat onto platter.
Connection to mains
The supplied mains adaptor is to be connected
to socket (9). According to the voltage indicated
on the unit’s nameplate it has to be plugged into
a mains socket with either 230 V / 50 Hz or
115 V / 60 Hz for the primary side.
Connection to the amplifier or receiver
- Connect the audio leads (7) to the phono-
input (MM) of your amplifier or receiver
(red RCA-type plug = right channel, white
RCA-type plug = left channel).
- Connect ground wire (8) to the ground
connector on your amplifier.
Speed selection and start
This record player is started by selecting the
speed of either 33 or 45 rpm.
Manual start, cue control
- Select the required platter speed, 33 or 45 rpm,
by means of the switch (4), swivel the stylus
protection cap upwards, lift the tone arm with the
cueing lift lever (3).
- Now position tonearm over the lead-in groove
of the record. By means of cue control lever (3).
the tonearm can be smoothly lowered onto the
grooves and thus preventing damage to your
records.
- With the cue control lever the tonearm may also
be lifted up at any position, even for brief inter-
ruptions during playback. In such a case the
platter continues to rotate.
Stop
This record player is to be switched off by lifting the
tone arm with the cueing lever (3) and by moving the
tonearm back to its rest, whereupon switch (4) is
set to “0”.
Stylus DN 251 S
The stylus is subject to natural wear during normal
playback. Therefore, we recommend you to have
the stylus occasionally checked after approxi-
mately 300 playing hours. A worn or damaged
(splintered) diamond stylus is likely to chisel the
modulation from the grooves and thus damage
the record. Use only the dedicated (replacement)
stylus types recommended in the technical date
supplied with the cartridge. An imitated stylus may
also cause an audible loss in sound quality and
increased wear of records. Pull off the stylus in a
slanted downward movement. Insert the new sty-
lus in reverse order. (Fig. 3).