


C
ongratulations on your purchase of the THIEL PowerPoint
®
1.2 surface-mount loudspeaker. This
product is the result of a dedicated effort to provide very accurate and realistic sound reproduction.
We have used very high quality components and taken great care in the PowerPoint 1.2’s construction.
Properly set up and used with good associated equipment, the PowerPoint 1.2 will provide you with a
great deal of sonic enjoyment for many years.
Jim Thiel, Product Designer, THIEL Audio
SPEAKER PLACEMENT
The PowerPoint 1.2 can be placed in a wide variety of locations throughout the room on ceilings and walls. The speaker’s
wedge shaped cabinet and coaxial driver mounting allow the PowerPoint 1.2 to optimize the coverage area for a variety of
speaker placements and listener positions.
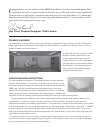
To achieve the best sonic results, the cabinet
should be oriented so that the drivers are
facing toward the center of the room. For
example: When used as a front right and left,
rear right and left, or center channel speaker,
the PowerPoint 1.2 can be mounted on the
ceiling with all of the speakers radiating
toward the center of the room.
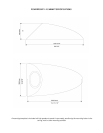
SURFACE MOUNTING INSTRUCTIONS
It is important that the PowerPoint 1.2 be mounted securely to prevent unwanted
vibration. The PowerPoint 1.2 is secured to its mounting surface with two screws,
one located along the rear edge of the cabinet, and one in the front located under the
THIEL logo. The logo is attached with removable adhesive and is removed by
pushing it from the speaker by inserting a small phillips screwdriver, or something
similar, through the cabinet’s mounting hole. A mounting template is included with
the speaker to assist in accurately positioning the mounting holes in the wall or other mounting surface.
Tape the template to the mounting surface in the desired position. Drill the two holes in the positions marked on the
template with a
1
⁄16" drill bit to a depth of 2 inches. Any holes in which a wall stud is encountered (where material is
continued to be drilled beyond a depth of approximately
1
⁄2") should be left as-is and the included #6 mounting screws should
be used for these holes. Any holes which are through only dry wall (where the drill “falls through” after the first
1
⁄2" of depth)
should be enlarged to
1
⁄4" with another drill bit and the included molly bolts should be used for these holes. To install the
molly bolts, insert the molly bolt into the wall and tighten the screw until the molly is secure with its flange tight against the
wall. Then remove the molly bolt screw.
Connect the speaker wires to the speaker, position the speaker in place and drive the two screws through the cabinet’s
holes and into the wall, using the appropriate type of screw for each hole (either a wood screw or a molly bolt). Replace the
logo by pressing it into the recess in the front of the speaker.
5-channel ceiling-mount installation