


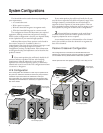

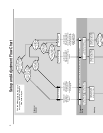
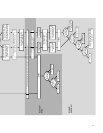


Hookup
If the subwoofer is being used with a passive crossover or
SmartSub Integrator, a balanced XLR interconnect cable is
connected from the unit’s subwoofer output to the
subwoofer’s Normal Input. If more than one subwoofer is
used, they are “daisy-chained” by connecting an additional
XLR interconnect cable from the Normal Output connector
of the first subwoofer to the Normal Input of the next
subwoofer.
If the Integrator is not being used, then an RCA
interconnect cable is connected from the processor’s
subwoofer output jack to the subwoofer’s LFE Input. If more
than one subwoofer is used, an additional cable is connected
from the LFE Output connector of the first subwoofer to the
LFE Input of the next subwoofer.
The subwoofer’s power cord must be plugged into an AC
outlet and the power switch turned to the “on” position.
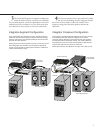
Setting the Surround Processor
Te ll the processor that you have a subwoofer.
If you are using a Passive Crossover or the Integrator
then the surround processor should be set to deliver the left/
right channel bass to the main speaker channels by telling it
that the main speakers are full-range (even if they are not).
If you are not using a Passive Crossover or Integrator and
the main speakers are not able to reproduce deep bass, you
can tell the processor that the front speakers are “small” so
that the main channel bass is redirected to the subwoofer.
If you are using the Integrator set the subwoofer channel
level in the processor to the same level as the left and right
channels and use the Integrator to adjust the LFE level. If
you are not using the Integrator use the processor’s
subwoofer level setting to adjust the LFE level.
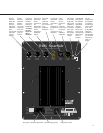
Control Settings
The LFE Level is functional only for the LFE input.
II
II
I
ff
ff
f
yy
yy
y
ou arou ar
ou arou ar
ou ar
e not using the LFE input, set this te not using the LFE input, set this t
e not using the LFE input, set this te not using the LFE input, set this t
e not using the LFE input, set this t
o minimumo minimum
o minimumo minimum
o minimum
(OFF).(OFF).
(OFF).(OFF).
(OFF). If you are using the LFE input then the subwoofer
level must be adjusted to achieve the proper balance with the
other speakers. It is usually more convenient to adjust the
subwoofer level with the processor’s subwoofer level control,
and in this case a good starting point for the level setting is
90. If the system’s processor cannot control subwoofer level,
then the subwoofer’s level adjustment is used. The level can
be adjusted “by ear” to achieve a pleasing balance so that the
low frequency sound effects are not too weak or too strong.
UU
UU
U
nfornfor
nfornfor
nfor
tunattunat
tunattunat
tunat
elel
elel
el
yy
yy
y
, ,
, ,
,
aa
aa
a
n SPL metn SPL met
n SPL metn SPL met
n SPL met
ee
ee
e
r cr c
r cr c
r c
aa
aa
a
nnot bnnot b
nnot bnnot b
nnot b
e used to ae used to a
e used to ae used to a
e used to a
djustdjust
djustdjust
djust
subwoofesubwoofe
subwoofesubwoofe
subwoofe
r levelr level
r levelr level
r level
due t due t
due t due t
due t
o differo differ
o differo differ
o differ
encenc
encenc
enc
es in bandwidthes in bandwidth
es in bandwidthes in bandwidth
es in bandwidth
betwbetw
betwbetw
betw
een the subween the subw
een the subween the subw
een the subw
oofer and the main speakoofer and the main speak
oofer and the main speakoofer and the main speak
oofer and the main speak
erer
erer
er
s.s.
s.s.
s.
The placement settings should be adjusted to correspond
to the placement of the subwoofer. Set the Side Wall Distance
to the distance from the side of the subwoofer to the side
wall and the Rear Wall Distance to the distance from the rear
of the subwoofer to the rear wall. The distance is marked in
meters, which is the distance in feet divided by 3.3. If a
distance is greater than maximum indication set the control
to Off (maximum). If the subwoofer is placed in a cabinet the
settings should correspond to the room wall distances, not
the distances to internal cabinet walls. If the subwoofer is
recessed into the wall so the front is flush with the wall, then
the rear control should be set to it’s minimum (negative)
setting.
If the norm/auto switch is turned to the “On” position
the subwoofer is always on, ready to reproduce a signal. If the
switch is set to the “Auto” position, the subwoofer’s amplifier
will automatically turn on when it detects a signal to
reproduce and stay on for approximately 1/2 hour after a
signal.
The unit is equipped with a control input that will turn
the unit on when a DC voltage between 5 and 25 volts is
applied, if the Auto/On switch is set to the “Auto” position.
Auto shutdown
The subwoofer is equipped with an automatic shutdown
feature that will turn off the output of the subwoofer if the
drivers, amplifier or rear panel get too hot or if the line
voltage is too low. This can occur if a very high input level
lasts too long or if the subwoofer has insufficient ventilation.
If the automatic shutdown is activated, subwoofer output
will be interrupted and the light color will change to yellow.
The unit will resume operation when conditions return to
safe levels.
If the unit shuts down often, this indicates that you
should improve its ventilation, turn down the system’s
volume control, turn down the subwoofer’s level control or
add an additional subwoofer.
Feet
The SS1 is supplied with four pointed, screw-in feet that
can be used to provide firmer coupling to the floor for
slightly better sound quality and to prevent the unit from
moving during use. Please be advised that their use can put
dents in hardwood floors. They are screwed into the bottom
of the unit, and should be individually adjusted until the unit
is firmly seated onto the floor without rocking. Then tighten
each of the back-nuts to lock the feet in place.
Setting up the Subwoofer
10