


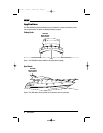
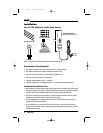
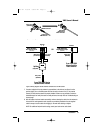

Figure 7. Inserting the FAKRA SMB connector into the plastic case.
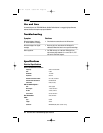
Figure 8. Wiring diagram shows antenna connections to an XM receiver.
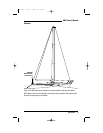
7. If needed, adjust the tilt so the antenna is perpendicular to the horizon (see figure 6 on the
previous page). Turn on the XM system and tune the radio to channel one (i.e., the preview
channel) to verify that the antenna is properly installed. If there are any problems, review the
installation steps and verify that each one was performed correctly. Also see Troubleshooting on
the next page.
8. After the system has been tested successfully, continue dressing the cable from the antenna to
the receiver for best appearance and complete any remaining installation. Use the supplied
cable tie wraps to secure cables from flagging in the wind and catching on objects.
NOTE: For additional help with cable routing, consult your local marine audio dealer.
XM5 Owner’s Manual
Installation 9
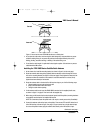
FAKRA Connector
Clip
Curry Case
(Satellite)
Cable from
XM5 Antenna
❶
❷
Assembled
XM5 Antenna
Cable with Case
❸
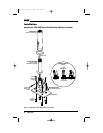
From TERK SIR5 Marine
Satellite Radio Antenna
Antenna
1 2
SIR5 Receiver
Dual-Antenna Inputs
(rear view)
SIR5 Receiver
Single-Antenna Input
(rear view)
Splitter
(Supplied)
White Case
(Terrestrial)
Curry Case
(Satellite)
TER
Curry Case
(Satellite)
SAT
From TERK SIR5
Marine Satellite
Radio Antenna
Antenna
OR
Curry Case
(Satellite)
XM5 OM 4/8/03 09:56 AM Page 9