


Use the Expander carefully. The modulated noise of the ground floor level is much more
audible than a higher ground floor level without such modulation.
The Expander’s threshold must be lower than the compressor’s threshold. If you raise it
too much, you might cut into low parts of the signal, such as reverb tails.
The Expander’s range parameter determines the width of the level range. Also, the target
Factor enables you to determine whether to apply different settings to all three bands,
and if so, just how different the settings should be!
66.. AAddjjuusstt tthhee OOuuttppuutt LLeevveell
We are almost finished – just one parameter left: the Digital Ceiling. Set this parameter
to a value lower than 0 dB to prevent unwanted clipping.
The most common value is -0.01 dB. With this setting, the maximum output level is -0.01
dB. No portion of your signal will be able to pass this absolute setting. Now you can be
absolutely sure that there is no clipping – and the difference from 0 dB will be
imperceptible.
If you want to further edit your settings, please make sure that you first switch the Digital
Ceiling back to 0 dB. Otherwise, you won’t be able to tell if there are internal clips!
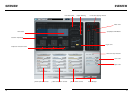
MASTER YOUR MIX WITH MASTER X3
19
To get a better impression of how the sound – as opposed to the output volume – is
influenced by Master X3, reduce the output level so the bypassed and processed signals
are equally loud – but don’t forget to bring the output level back up in the end!
The band levels in the upper display supply you with an additional tool for easily
adjusting the sound of your mix. Use them like a low, mid, treble EQ!
44.. AAccttiivvaattee tthhee LLiimmiitteerr
We’ve pumped up the volume and reduced the dynamics to optimize the sound and to
make it more compact and “punchy”.
But there’s something really nasty that can happen when you work with digital audio:
digital clipping. If you have more than one tiny sample clip, your whole master will be
worthless for serious use – such as putting the music on CD.
That’s why there is a Limiter block in Master X3. It ensures that you get only the levels
you want, and eliminates the ones that would not only spoil your day but also your
whole mix!
You should use the Limiter carefully, as a limiter is always a somewhat “drastic” tool to
apply to your audio. Just a couple dB should be enough to limit strong peaks. Softclip
will help the limiter work even more smoothly.
For our example we have chosen a threshold of -4 dB. The Attack time is short (50 ms),
so the Limiter is capable of preventing clips. The release time is set to a value that
avoids unwanted pumping (0.3 s).
Set the target factor in the same way you set the compressor. Trust your ears (and the
Consecutive Clips meters) to judge whether a band needs more limiting.
55.. EExxppaanndd!!
By compressing the signal we made it sound louder. However, an unwanted side effect is
that the ground floor level is also brought up - which may cause you to remark: “Where
did all that noise come from?”. The noise will be most evident in the pauses.
The Expander is one possible cure for this. (Obviously, the Expander can’t replace
broadband noise reduction – but it will reduce audible noise when applied to vocal
tracks, for example.)
MASTER YOUR MIX WITH MASTER X3
18