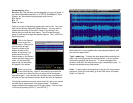
EQ - If you’d like to process EQ on your song, select the part you’d
like to affect. (To EQ the whole song, just hit Apple “A” to select the
whole region.) Go to the Plug-Ins menu and drag down to Premiere;
when the side menu appears drag to SFX Machine Lite. Click on
Simple Graphic EQ in the second column of the processing screen.
Audition your EQ settings by pressing “Preview.” Preview will play a
couple seconds of audio with your EQ curve. Once you like what you
hear, click on “Process” and Peak will apply the EQ to the entire area
you selected.
Normalization - If you recorded the audio too quietly, you can
digitally boost the volume of the recording. Again, select the area
you want to affect, and then select the DSP menu and drag down to
Normalize. Peak LE will allow you to select what you want the
maximum volume to reach. (Because some consumer audio players
distort signals that approach the maximum volume, we recommend
keeping the maximum down around 80% to 95% depending on what
the average volume is.
Once you’ve finished all of this, save your file. You’ve just mastered
your song!
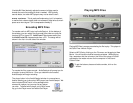
Assembling Audio CDs
To start assembling your CD, boot up Jam and simply drag and drop
all the song files into the Jam window.
The songs you have selected for this CD will appear in the window,
along with pause between tracks, time the track starts, and the track
length. You can change the order simply by dragging the song files
around.
There are some powerful real-time (non-destructive) processing
features in Jam that make assembly of professional sounding CDs a
snap. You’ll notice there is a column for Gain on each song. If your
songs are playing back at different volumes because of varied levels
during recording, you can make fine adjustments here.
Also, if you are trying to have continued play from one track to
another, such as with live recordings, you can do a crossfade in the
Xfade column. For this, this pause between tracks has to be set to
zero. There are different gain curves that you can experiment with to
make the transition as smooth as possible. (The crossfades are
represented by two curves; each curve represents channel levels
over the length of the crossfade.)