


At the loudspeaker end connect the cables labelled Left LF+ and Left LF- to the left hand loudspeaker
LF terminals, ensuring that you note the polarity markings on the cable sheathing.
Then proceed to connect the Left HF+ and Left HF- to the HF terminals on the same loudspeaker.
* Repeat this process to connect the right hand loudspeaker to the amplifier right channel output, once
again ensuring that polarity is correct throughout.
* Switch the amplifier on with the volume control set at its lowest setting. Select a favourite source and
slowly turn up the volume to a low level. Check that bass and treble information is being reproduced
from both speakers- if not, switch off the amplifier and recheck the connections.
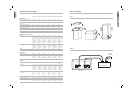
BI-AMPING
Bi-Amping extends the principle of bi-wiring one stage further. In this connection option separate power
amplifiers are used for bass and treble signals in each loudspeaker. Four mono (or two stereo) amplifiers
of the same type are required for a stereo pair of loudspeakers. Ensure that the links between the
loudspeaker terminals are removed and that correct polarity is maintained throughout.
If two stereo amplifiers are used, it is recommended that one amplifier supply bass information to left
and right loudspeakers and the other, the treble information. (See figure 6)
GRILLES
Special acoustically transparent material is used on the grilles. However, for ultimate fidelity the enthusiast
will appreciate the slight improvement in clarity and detail that is achieved by removing the grilles
during listening.
CARE OF THE CABINET
Vinyl finished enclosures normally require no more than a wipe with a dry polishing cloth. Fingerprints
or other more stubborn marks need only a gentle wipe with a slightly damp cloth.
Real wood veneer cabinets should only be cleaned with a dry cloth or with a light application of quality
non-silicon furniture polish. It should be remembered that as a natural substance all wood products
will change colour when exposed to the UV content of ambient light. Light veneer will darken appreciably
to a rich natural patina; it is advisable to remove the front grille for the first few weeks of use to ensure
an even colouration overall.
HOME CINEMA 5.1
Unlike other forms of encoded surround audio, 5.1 offers full bandwidth capability for the surround
and centre channels, with the ability to treat the subwoofer as a single discreet channel for special
effects playback or, for music applications, as a dedicated low frequency instrument channel. This
places new demands on the surround and centre channel loudspeakers in both the mixing environment
and the playback environment.
The 5.1 format allows the mix engineer in the recording studio to assign audio information to one or
more discreet channels of playback; providing very vivid and exacting localisation for the apparent
sound sources in the listening environment. To reliably recreate that accurate localisation during
playback, the selection and location of loudspeakers becomes the single most critical issue next to
the talent of the mix engineer in the studio.
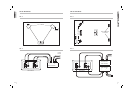
THE SYSTEM
A fully operational 5.1 system consists of two main front loudspeakers, two rear effects speakers at
the rear (usually wall mounted) and a centre channel. The subwoofer provides the .1 part of the system.
(See figure 5)
6
SCREENING
Loudspeaker drive units contain large magnets. These are capable of generating a substantial magnetic
field extending a considerable distance beyond the sidewalls of the speaker enclosure. This field can
cause picture distortion if the speakers are placed too close to the TV. However, to avoid these colour
fringing effects all Mercury models are fully shielded.
FRONT SPEAKERS
The main speaker pair provides much of the delivery of the front soundstage; they should therefore
be large enough to handle the power output and dynamics required. Stand mounted speakers can
be used for this purpose but the power handling and extra bass extension achievable from floor standing
models will add greatly to the overall assurance of the performance. The speakers should be positioned
either side of the TV or projection screen placed in line with the screen surface.
CENTRE CHANNEL SPEAKERS
As the main effects speaker for the front soundstage, the critical factor in its performance is placement.
In all cases the centre channel speaker should be placed as near to the TV screen as possible; effective
shielding will allow placement on top of the TV itself. If the shape of the top of the TV casing will not
allow a stable placement it can be shelf mounted just above. The viewing position when seated
determines the ideal mounting height, but in all cases this should be as close as possible to ear height.
As with the main speakers the front baffle panel should be as near as possible in line with the screen
surface.
REAR EFFECTS SPEAKERS
The integrity of the special effects soundstage created by the source material will be compromised if
the speakers are installed on the sidewalls, for that reason they should always be placed behind the
main viewing position.
The placement of floor standing speakers at the rear should mirror as near as possible the location
of the front pair and 0.5 metres (20 inches) from the rear wall. Wall-mounted loudspeakers should
be shelf or bracket mounted 1.5 to 4.5 metres (5ft to 15ft) apart with a height mounting height range
of 1.5 to 2 metres (5ft to 7ft).
SUBWOOFER
As the subwoofer only produces low frequency, therefore monaural information, it is difficult to detect
its location by ear. It could as a result be situated anywhere in the room, but optimum performance
will be gained by locating the subwoofer between the main stereo pair of speakers. Bass output will
increase when placed next to a wall or in a corner so use the subwoofer volume control to balance
the output with the rest of the system.
For best results on a carpeted floor, screw the spikes provided into the threaded inserts underneath
the cabinet, and adjust until level then tighten the lock nuts firmly but without undue force. On a
polished wooden floor use the discs, included in the accessory pack, under the spike points to prevent
damage to the surface.
7