


TIMER MODE
Your player is equipped with a Timer Mode. This
allows the player to automatically play a disc when
powered on from the mains via the use of an exter-
nal timer. It is switched off by default at the factory.
To turn this on follow the instructions below using
Diagram 3
.
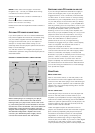
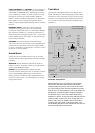
DIAGRAM 3: TIMER OPTION
FAST FORWARD and REWIND: To move rapidly to
a particular section of music you can use the FAST
FORWARD or REWIND keys, depending, obviously,
upon whether you wish to access a section not yet
reached or one that you have passed. While the
player is in Play mode you will hear music playing at
high speed. To move quickly through the disc in
silence, press PAUSE before pushing the FF or REW
buttons.
NUMERIC KEYS: These are used for entering
selections in Program mode or for starting Play
mode from a particular track. For example, loading a
disc and then pressing “7” will cause the player to
start playing the disc beginning at track 7. To access
tracks greater than 9, first press “0” followed by the
track number required.
VOLUME: The volume buttons will operate the
volume function on any remote control amplifier that
accepts RC5 commands. They are provided solely
for your convenience, as there are no volume control
functions on the CD player
HIDDEN MODES
These are only accessible with the use of an RC5
handset with the appropriate keys (Not the supplied
handset).
SHUFFLE: Press SHUFFLE followed by PLAY to
listen to tracks in a random order. To cancel Shuffle
mode, press SHUFFLE again.
INTRO: Press INTRO and the player will scan
through the disc playing the first 10 seconds of each
track. Press INTRO while in Play mode and the
player will scan through the disc playing the first 20
seconds of each track. To cancel either Intro mode
simply press PLAY.
Before attempting to re-configure Timer Mode,
disconnect the mains lead at the wall socket.
Having made your player safe, remove the cover
by unscrewing the five screws located on the rear
and the four on the underside. The cover slides off
backwards. Locate the yellow jumper located in
the bottom right corner of the main PCB using
Diagram 3. above. To set the Timer ON remove the
yellow jumper or place it in such a way that it is
held by only one pin. Replace the cover and re-
connect the mains lead to the wall socket. The
Timer Mode should now be operational via the use
of an external mains power timer.
View of bottom right
corner of main PCB
Main system micro
Timer jumper
Front Panel