Important: The minimum total impedance when operating the 350x is 2 ohms. This means you can
safely use:
a) A single 8 ohm cabinet
b) A single 4 ohm cabinet
c) Two 8 ohm cabinets (total: 4 ohms)
d) Three 8 ohm cabinets (total: 2.6 ohms)
e) Two four ohm cabinets (total: 2 ohms) **
**Running the amplifier constantly at 2 ohms, while technically acceptable, will cause the amp to run
hotter than usual, and will cause heat-related wear on components sooner than normal.
More details are available in the “Speaker Outputs” section of this manual, and we strongly recommend
that you read the entire manual. However, this should be enough information to get you started.
Turning The Unit On
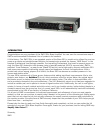
Remove the AC cable from the accessory pack and connect it from the amplifier to a standard wall outlet.
Make sure that the both the Gain and Master Volume controls are set to the minimum position. Locate the
power switch on the right side of the front panel and turn the amplifier on. The power switch should then
illuminate in red. Upon powering up, don’t be surprised if you hear a small pop. This is absolutely normal.
(Eliminating this “power on transient” would require a component called a relay. SWR chose not to incorpo-
rate this type of component due to the fact that relays degrade signal quality and often fail, causing the
unit to have no output and requiring a trip to a local service center.)
Getting Sound Out Of The 350x
Plug your instrument into the desired input jack (please refer to “Front Panel Features” for more detail).
Turn your instrument’s volume up to at least 75% of maximum and slowly adjust up the Gain control. Keep
playing and turning the Gain control up until you see the Preamp Clip LED turn red. Then back off the Gain
Control about one large hash mark on the dial. Now turn up the Master Volume control to an equal level.
You should now hear the sound of your instrument amplified through the 350x into your speaker cabinet(s).
350x • FRONT PANEL FEATURES
Input Jacks
Both input jacks accept a standard 1/4" phone plug and both inputs can be used at the same time. Since
the two inputs are totally independent, no loss in volume or tone will occur by using two instruments simul-
taneously. However, the main applicational use for the two separate input jacks is their difference in level,
as the Passive/Active input has five times more gain than the Active input. In other words, it’s not neces-
sarily intended as a “submixer” for two instruments, but no harm will come from having two instruments
plugged in at once. Please read below for more details.
Passive/Active Input Jack
This input jack is designed to accommodate both “passive” instruments and most “active” instruments. A
passive instrument has no built-in preamp and does not use a battery, while an active bass utilizes a battery-
operated preamp for gain, tone controls, or both. The Passive/Active Input will work with all instruments hav-
ing a maximum output of less than 1 volt RMS. Some active pickups such as EMG, Bartolini, etc., use bat-
teries for operation and will work perfectly using this input. Instruments made by MTD, Sadowsky, Modulus,
etc., have active electronics that are suited for use in the Passive/Active input.
Generally speaking, try this input first. If you hear a small amount of distortion and the preamp clip LED is
not activated, try using the Active input jack. If the Active input does not correct any audible distortion,
check the battery in your bass.
Note: If you would like to overdrive the first TUBE stage, this can be accomplished by using an
external preamp between your instrument and the Passive/Active input. To obtain optimum sound
when trying this, make sure the preamp clip LED is not activated. If this occurs, turn down your
Gain control until the LED does not light. The first preamp tube stage is NOT monitored by the pre-
4 • 350x OWNER’S MANUAL


