


2
+
g
3
2
1
4
8
13
14
15
17
12
18
20
5
1
6
7
9
10
11
192116
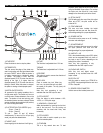
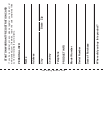
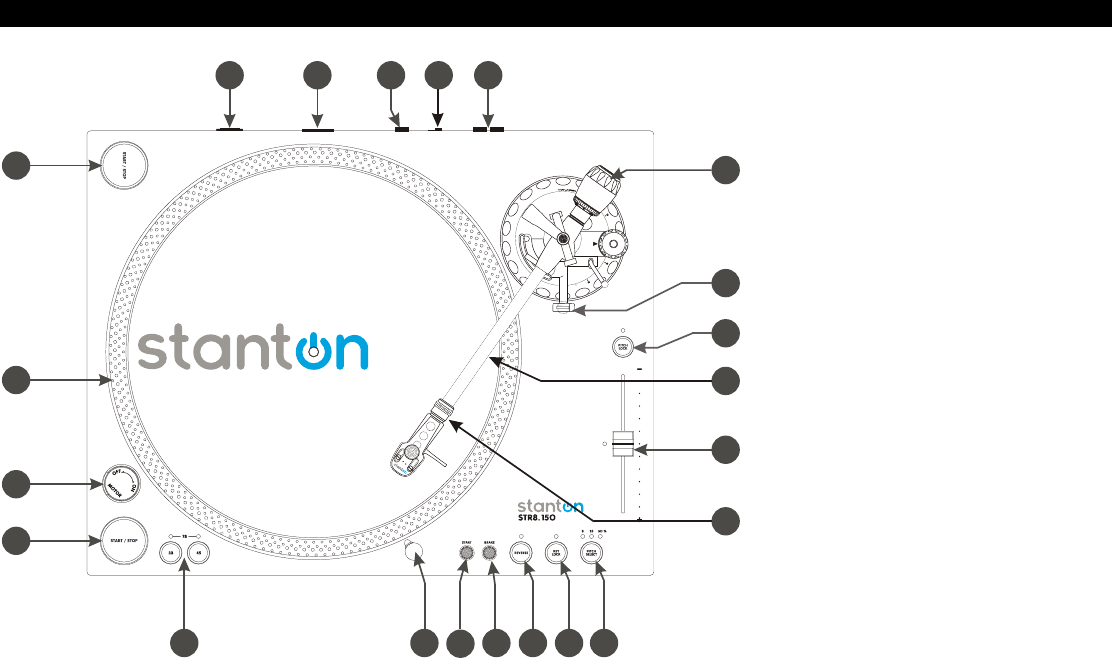
PART NAMES & FUNCTIONS
1) START/STOP
Press this button to start or stop the platter.
2) STROBE DOTS
The dots around the edge of the platter are
used in conjunction with the light located inside
the motor ON/OFF switch. While the platter is
in rotation, the dots help to indicate the speed
of rotation. The speed is lower than the
displayed speed (33,45,78) when the dots are
flowing to the right. It is higher than the
displayed speed (33,45,78) when the dots are
flowing to the left. When the strobe is stopped,
the platter is rotating at the displayed speed.
3) MOTOR ON/OFF SWITCH
As opposed to fully analog turntables, this is
not the power switch. This switch only turns on
or off the motor. Rotate clockwise to turn on the
motor. The platter will not start spinning until
the start/stop button has been pressed. Rotate
counter-clockwise during playback (off position)
for a slow winding down effect.
4) PLATTER REVOLUTION SPEEDS (rpm)
33 rpm - Press 33
45 rpm - Press 45
78 rpm - Press 33 and 45 buttons
simultaneously. To return to 33 or 45-rpm play
mode, just press the desired button.
5) TARGET LIGHT
Insert target light to the deck and it will light up.
6) START
The Start time is adjustable from 0.2~6 sec.
7) BRAKE
The Brake time is adjustable from 0.2~6 sec.
8) REVERSE
This button is used to reverse the direction of
the platter rotation.
9) KEY LOCK
Press to enable key lock. When key
lock is on, the pitch slider will only affect
the speed of the platter. The key (tone) will
remain at 0%
Note: Key lock processing is only
available when the LINE output is used.
10) PITCH SELECT
Press the button to switch between +/-8%,
+/-25%, or +/-50% pitch range.
11) HEADSHELL LOCKING NUT
Attach the headshell by inserting into the front
end of the tone arm. Turn the locking nut
clockwise with the head shell firmly held
horizontally.
12) PITCH SLIDER
The pitch slider is used to speed up or slow
down the turntable platter.
13) TONE ARM
This is a fully manual tone arm. To start
playback, gently place the stylus on the record
using the headshell finger support. Do not drop
the stylus onto the record as it may cause
damage to the diamond tip and to the record.
14) PITCH ON/OFF
The ON setting will allow use of the pitch adjust.
When set of OFF, the pitch control will be
locked at 0%.
15) TONE ARM BASE
The tone arm base includes the height
adjustment and tone arm rest. See ìtone arm
and cartridge settingsî for proper adjustments.
16) POWER SWITCH
This switch turns the power on or off, including
the motor and audio signal.
17) COUNTERWEIGHT
Use this to balance the tone arm and to adjust
the stylus pressure. See ìtone arm and
cartridge settingsî for proper adjustments.
18) LINE OUT L & R
This is the standard analog output (RCA jacks)
which can be connected either to a phono or
line input on any DJ mixer, depending on the
setting of the phono / line selector.
Note: Key lock processing is only
available when the LINE output is used.
19) PHONO/LINE SWITCH
Note: Key lock and digital output
processing is only available when the LINE
output is used.
20) DIGITAL OUT
Use this output to connect your STR8-150 to
any SPDIF in equipped digital device such as a
CD-R or Computer.
21) POWER CORD CONNECTOR
Used to connect the included power cord.