


INTRODUCTION
Congratulations on purchasing SpeakerCraft’s CRS3 architectural loudspeaker. The CRS3 features a small footprint allowing
them to blend seemlessly with most common in-ceiling lighting fixtures.
SPEAKER PLACEMENT
When following the below recommendations, please keep in mind that placement is always in the ceiling. SpeakerCraft
recommends the use of a qualified custom installation specialist when installing your CRS3 speakers. If you need assistance
in locating an installer, please contact SpeakerCraft at 1-800-448-0976.
1. Determine Your Primary Listening Area
The area where you will most likely be sitting when listening to your speakers is your primary listening area.
2. Checking for Obstructions
Before confirming the placement of the speakers, you should carefully consider the location of ceiling joists, electrical,
plumbing and other fixtures that may get in the way. If you are installing the speakers into an existing ceiling, you can
locate obstructions by noting the placement of fixtures and, if possible, gaining access to an attic or crawl space for fur-
ther analysis. A good stud-finder, found at any building supply store, will help you determine where the joists are located
in the ceiling.
1
INSTALLATION CONSIDERATIONS
Prior to the actual installation of the speakers, it will be necessary to run cables to the speaker location. See your Authorized
SpeakerCraft dealer for more information on cable installation. After the cable has been installed, you are ready to mount
the speakers.
INSTALLATION PREPARATION - FINISHED CEILING
When the speakers will be installed into a finished ceiling, please follow these instructions carefully:
1. Determine Placement
Determine where in the ceiling the speakers will be placed using the recommendations under SPEAKER
PLACEMENT. Pay careful attention to the section on avoiding obstructions.
2. Locate Obstructions
Find the joists nearest the desired speaker mounting location. The use of a good stud-finder tool is highly recommended
for this procedure. Make sure that there are no joists or obstructions where you plan to install the speaker. Read “Checking
for Obstructions” under the section SPEAKER PLACEMENT.
3. Trace Template
Place the cut-out template at the location you have decided to place the speaker. Use a few pieces of tape or small
tacks to hold the template in place. Trace an outline on the ceiling with a pencil.
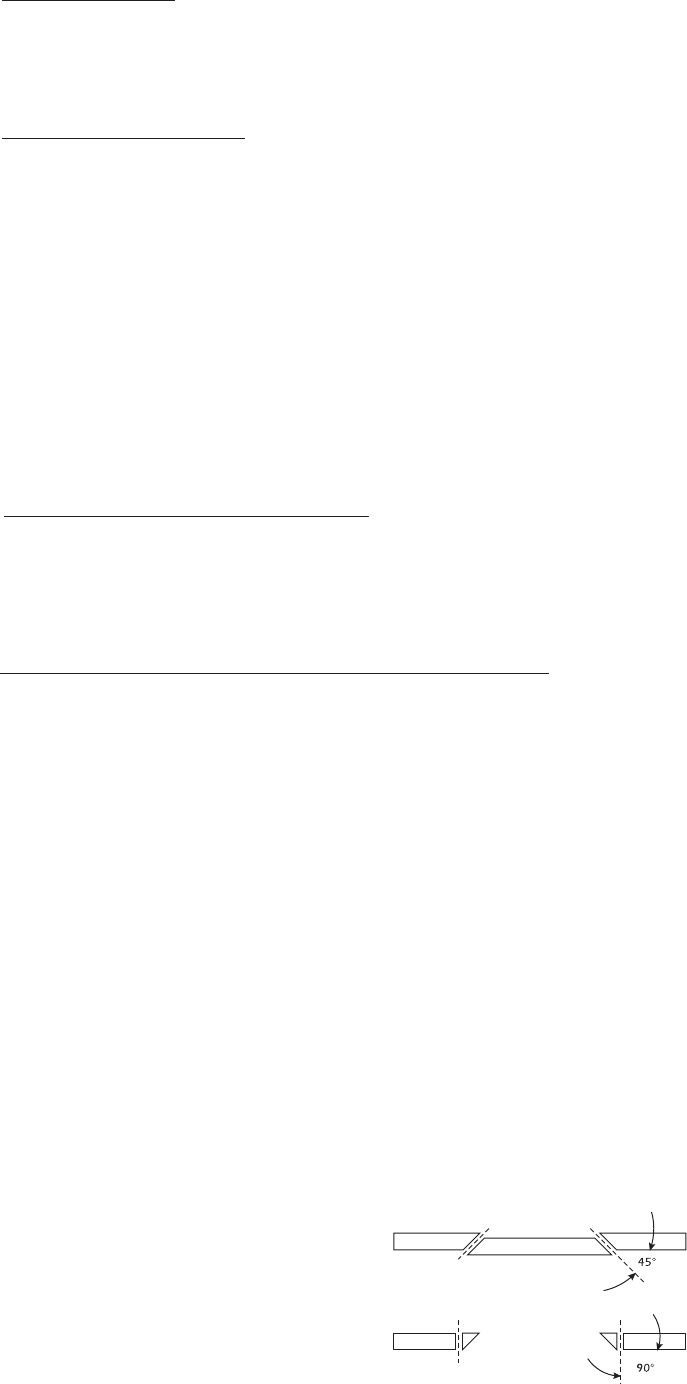
4. Cut the Hole
CAUTION: This is the most important part of the entire installation. If you are not certain whether or not an obstruction exists
behind the desired mounting area, you should start by cutting a small hole in the center of your penciled mounting hole
with a drywall saw. Cut at a 45˚ angle towards the inside of the hole (See Figure 1). Cutting the small hole at this angle
will make drywall repair much easier as the piece cut out can be installed neatly back into the hole. Once you have
determined there are no obstructions in your desired mounting location, start cutting the finished hole at a 90˚ angle to
the ceiling surface.
SIDE VIEW OF CEILING
First Cut
Second Cut
Figure 1