


To change the display to the
daylight saving time
(summer time) indication
1 Press MENU to show the menu display.
2 Press SEL
or
to select “DST,” then
press ENTER.
3 Press SEL
or
to select “ON,” then
press ENTER.
“
” appears and the time indication changes
to summer time.
To deactivate the DST function, select “OFF” in
step 3.
Playing the radio
–Manual tuning
1 Press RADIO/BAND to turn on the radio
and select the AM or FM band.
2 Press TUNE + or – to tune in to a desired
frequency.
3 Adjust the volume using VOLUME + or
–.
–Preset tuning
You can preset 20 stations each for AM and FM.
Presetting a station
1 Follow steps 1 and 2 in “Manual tuning”
to tune the frequency you wish to preset.
2 Press and hold ENTER for a few seconds.
The display changes as follow:
The next preset number from the most recent
preset is displayed (but if the last preset
number was 20, 20 is displayed).
3 Press PRESET + or – to select the preset
number, then press ENTER.
The frequency is stored with the selected
preset number and you will hear a beep.
To preset another station, repeat these steps.
Note
If you try to store another station with the same
preset number, the previously stored station will
be replaced.
Tuning in to a station
1 Press RADIO/BAND to turn on the radio
and select the AM or FM band.
2 Press PRESET + or – to select the desired
preset number.
3 Adjust the volume using VOLUME + or
–.
–Scan tuning
The unit will automatically scan the selected
band.
In HD scan, HD Radio stations are scanned.
1 Press RADIO/BAND to turn on the radio
and select the AM or FM band.
2 Press MENU to show the menu display.
3 Press SEL
or
to select “SCAN” or
“HD SCAN,” then press ENTER.
Scanning of the selected band starts.
When a station is received, scanning pauses
for 3 seconds and then continues.
4 When the unit tunes in to the desired
station, do any of the following
operations to stop scanning.
– Press ENTER on the unit or remote
commander.
– Press
SCAN or HD SCAN on the remote
commander.
5 If necessary, press TUNE + or – to tune in
to the station more precisely.
6 Adjust the volume using VOLUME + or
–.
Tip
You can scan for stations directly by pressing
SCAN or HD SCAN on the remote commander.
AC power cord
Changing the display
mode and settings
To change the display mode
Press DISPLAY on the remote commander.
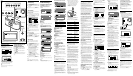
The display changes as follows:
When an analog radio station is
received
Field strength level indicator
Preset number
Band
Frequency
Current time
When you tune in a station by selecting a preset
number.
When an analog FM broadcast that
supports RBDS (Radio Broadcast Data
System) is received
When text information is received
Field strength level indicator
Preset number
Band
Station name
Name of station currently tuned in.
Frequency
Text information
Text information transmitted from station.
Current time
When you tune in a station by selecting a preset
number.
Note
The display item differs depending on the content
of a broadcast or the station.
When an HD Radio station is received
HD indicator
HD indicator Reception status
Stays lit
Strong HD signal, digital
reception*
Flashes
Weak HD signal, analog
reception
Not displayed
No HD signal, analog
reception
* The HD indicator flashes momentarily at
first, and then stays lit.
Field strength level indicator
Preset number*
Current station’s call letters
Band
Station name and information
Title/Artist name
Sub channel (FM only)
Appears when the HD Radio station
broadcasts multiple programs.
Press
TUNE + or – to select a sub channel.
Frequency
Current time
Text information
When you tune in a station by selecting a preset
number
Note
The display item differs depending on the content
of a broadcast or the station.
To change the display
settings (BRIGHTNESS/
CONTRAST)
1 Press MENU to show the menu display.
2 Press SEL
or
to select
“BRIGHTNESS” or “CONTRAST,” then
press ENTER.
3 Press SEL
or
to select the setting or
to adjust the level, then press ENTER.
BRIGHTNESS:
The brightness of the display is selected
from “HIGH,” “MIDDLE” or “LOW.”
CONTRAST:
The contrast of the display can be adjusted
by 11 levels.
Note
If you do not set the menu within 10 seconds, the
setting mode is completed.
Tip
You can adjust “BRIGHTNESS” directly by
pressing BRIGHT on the remote commander.
Playing an iPod
You can enjoy iPod audio by connecting to this
unit. To use an iPod, refer to the user’s guide of
your iPod.
Notes
The connector of the unit is exclusively for use
with iPod. When you use the device that does
not match the connector, connect it to the
AUDIO IN terminal of this unit with the
supplied audio connecting cable.
Sony cannot accept responsibility in the event
that data recorded on an iPod is lost or
damaged when using an iPod connected to this
unit.
For details of environmental conditions for
operating your iPod, check the website of Apple
Inc.
Setting the clock
1 Plug in the unit.
The display will flash “AM 12:00.”
2 Press MENU to show the menu display.
3 Press SEL
or
to select “TIME SET,”
then press ENTER.
The hour will start to flash in the display.
4 Press SEL
or
until current hour
appears in the display, then press ENTER.
The hour is set and the minutes start to flash.
5 Repeat step 4 to set the minute.
Note
If you do not set the menu within 65 seconds, the
setting mode is canceled.
1 Attach the Apple iPod Universal Dock
Adapter (not supplied) to your iPod and
insert into the connector of the unit. If
you are using an iPhone, attach the
supplied universal dock adapter for
iPhone before inserting into the
connector.
2 Press iPod .
The iPod begins to play automatically.
You can operate the connected iPod by this
unit or the iPod buttons.
3 Adjust the volume using VOLUME + or
–.
To Press
Turn off the iPod
POWER, or press
and hold iPod
Pause playback
iPod
To resume play,
press it again.
Go to the next track
Go back to the previous
track
*
Locate a point while
listening to the sound
(forward) or
(backward)
while playing and
hold it until you
find the point.
Locate a point while
observing the display
(forward) or
(backward)
in pause and hold
it until you find
the point.
Go back to the previous
menu
MENU**
Select a menu item or a
track for playback
/**
Execute the selected menu
or begin playback
ENTER**
* During playback, this operation goes back to
the beginning of the current track. To go back
to the previous track, press twice.
** These operations are available only when using
the supplied remote commander.
Notes
When inserting an iPod into the unit, be sure to
use the universal dock adapter supplied with
your iPod or commercially available from
Apple Inc.
When inserting an iPhone into the unit, be sure to
use the universal dock adapter supplied with the
unit or commercially available from Apple Inc.
When placing or removing the iPod, handle the
iPod in the same angle as that of the connector
on this unit and do not twist or bend the iPod
to prevent connector damage.
Do not carry the unit with an iPod set on the
connector. Doing so may cause a malfunction.
When placing or removing the iPod, brace the
unit with one hand and take care not to press
the controls of the iPod by mistake.
Before disconnecting the iPod, pause playback.
To use the unit as a battery charger
You can use the unit as a battery charger.
The charging begins when the iPod is placed on
the connector.
The charging status appears in the iPod display.
For details, see the user’s guide of your iPod.
Note
Charging for connected iPod is not available
when you are listening to the radio at volume
level 25 or more.
On copyrights
iPod is a trademark of Apple Inc., registered in
the U.S. and other countries.
iTunes is a registered trademark of Apple Inc.
iPhone and iTunes Tagging are trademarks of
Apple Inc.
All other trademarks and registered trademarks
are of their respective holders. In this manual,
™
and
®
marks are not specified.
Using iTunes Tagging
You can save the name of a song which is
broadcast on an HD Radio station to this unit
with a few easy steps.
After transferring the song information to the
connected iPod using this unit, sync your iPod to
your computer. These songs will show up in a
“Tagged” playlist in iTunes, enabling easy preview
or purchase of the songs.
For details about iTunes Tagging and the latest
iTunes Tagging compatible models, check the
iTunes website at - http://www.apple.com/itunes/
For the details on purchasing a song using the
“Tagged” information, check the iTunes website
at - http://www.apple.com/support/itunes/
To get song information
The Tag indicator lights up when song
information is broadcast on an HD Radio station.
1 Press Tag while the Tag indicator lights.
The Tag indicator starts blinking and the unit
starts retrieving the song information. After
getting the song information, the unit starts
saving the data and “Tagged” appears in the
display during the save.
The Tag indicator goes off after the unit completes
saving the song information.
The Tag indicator lights up again at the beginning
of the next song.
Notes
If the song information is not included in the
HD Radio station broadcast, the Tag indicator
does not light up.
It takes approx. 10 seconds maximum to
retrieve song information.
If the AC power cord is unplugged during song
information retrieving, the information will
disappear.
If Tag is pressed right after the beginning of a
song, the unit may retrieve the information of
the previously broadcast song as well as the
current song.
If Tag is pressed right before the ending of a
song, the unit may retrieve the information of
the current song and the next broadcast song as
well.
The maximum number of tagged songs that
you can save to this unit is 50. If you press Tag
when 50 tagged songs are already saved,
“Storage Full” appears in the display and
retrieving of song information cannot be
completed.
To transfer retrieved song
information
You can transfer song information retrieved to an
iPod using this unit.
For details of compatible iPod models, see
“Compatible iPod models.”
1 Place your iPod into the connector of the
unit.
The unit automatically starts transferring the
saved song information, and “Tagged” appears in
the display and starts blinking during the transfer.
If an iPod is inserted into the unit during tagged
song retrieval, the unit immediately starts
transferring the data to the iPod, after the data is
saved.
Once the unit completes transferring tagged song
information to the iPod, the saved data will be
erased from the unit.
Notes
Do not remove the iPod while “Tagged” is
blinking in the display. The unit cannot transfer
song information if the iPod is removed.
If the connected iPod is not compatible for
iTunes Tagging, song information will not be
transferred even after this unit saves the data.
The message “Tagging is not Supported by this
iPod” appears in the display.
If the connected iPod does not have enough
free space in the memory, song information will
not be transferred even after this unit saves the
data. The message “iPod Full” appears in the
display.
To delete unnecessary song
information
You can delete unnecessary song information
using this unit.
1 Press MENU to show the menu display.
2 Press SEL or to select “Tag
DELETE,” then press ENTER.
3 Select “Yes” or “No,” then press ENTER.
Yes: Deletes all the retrieved data.
No: Cancels the delete operation and ends this
delete menu.
Note
The song information once deleted cannot be
restored.
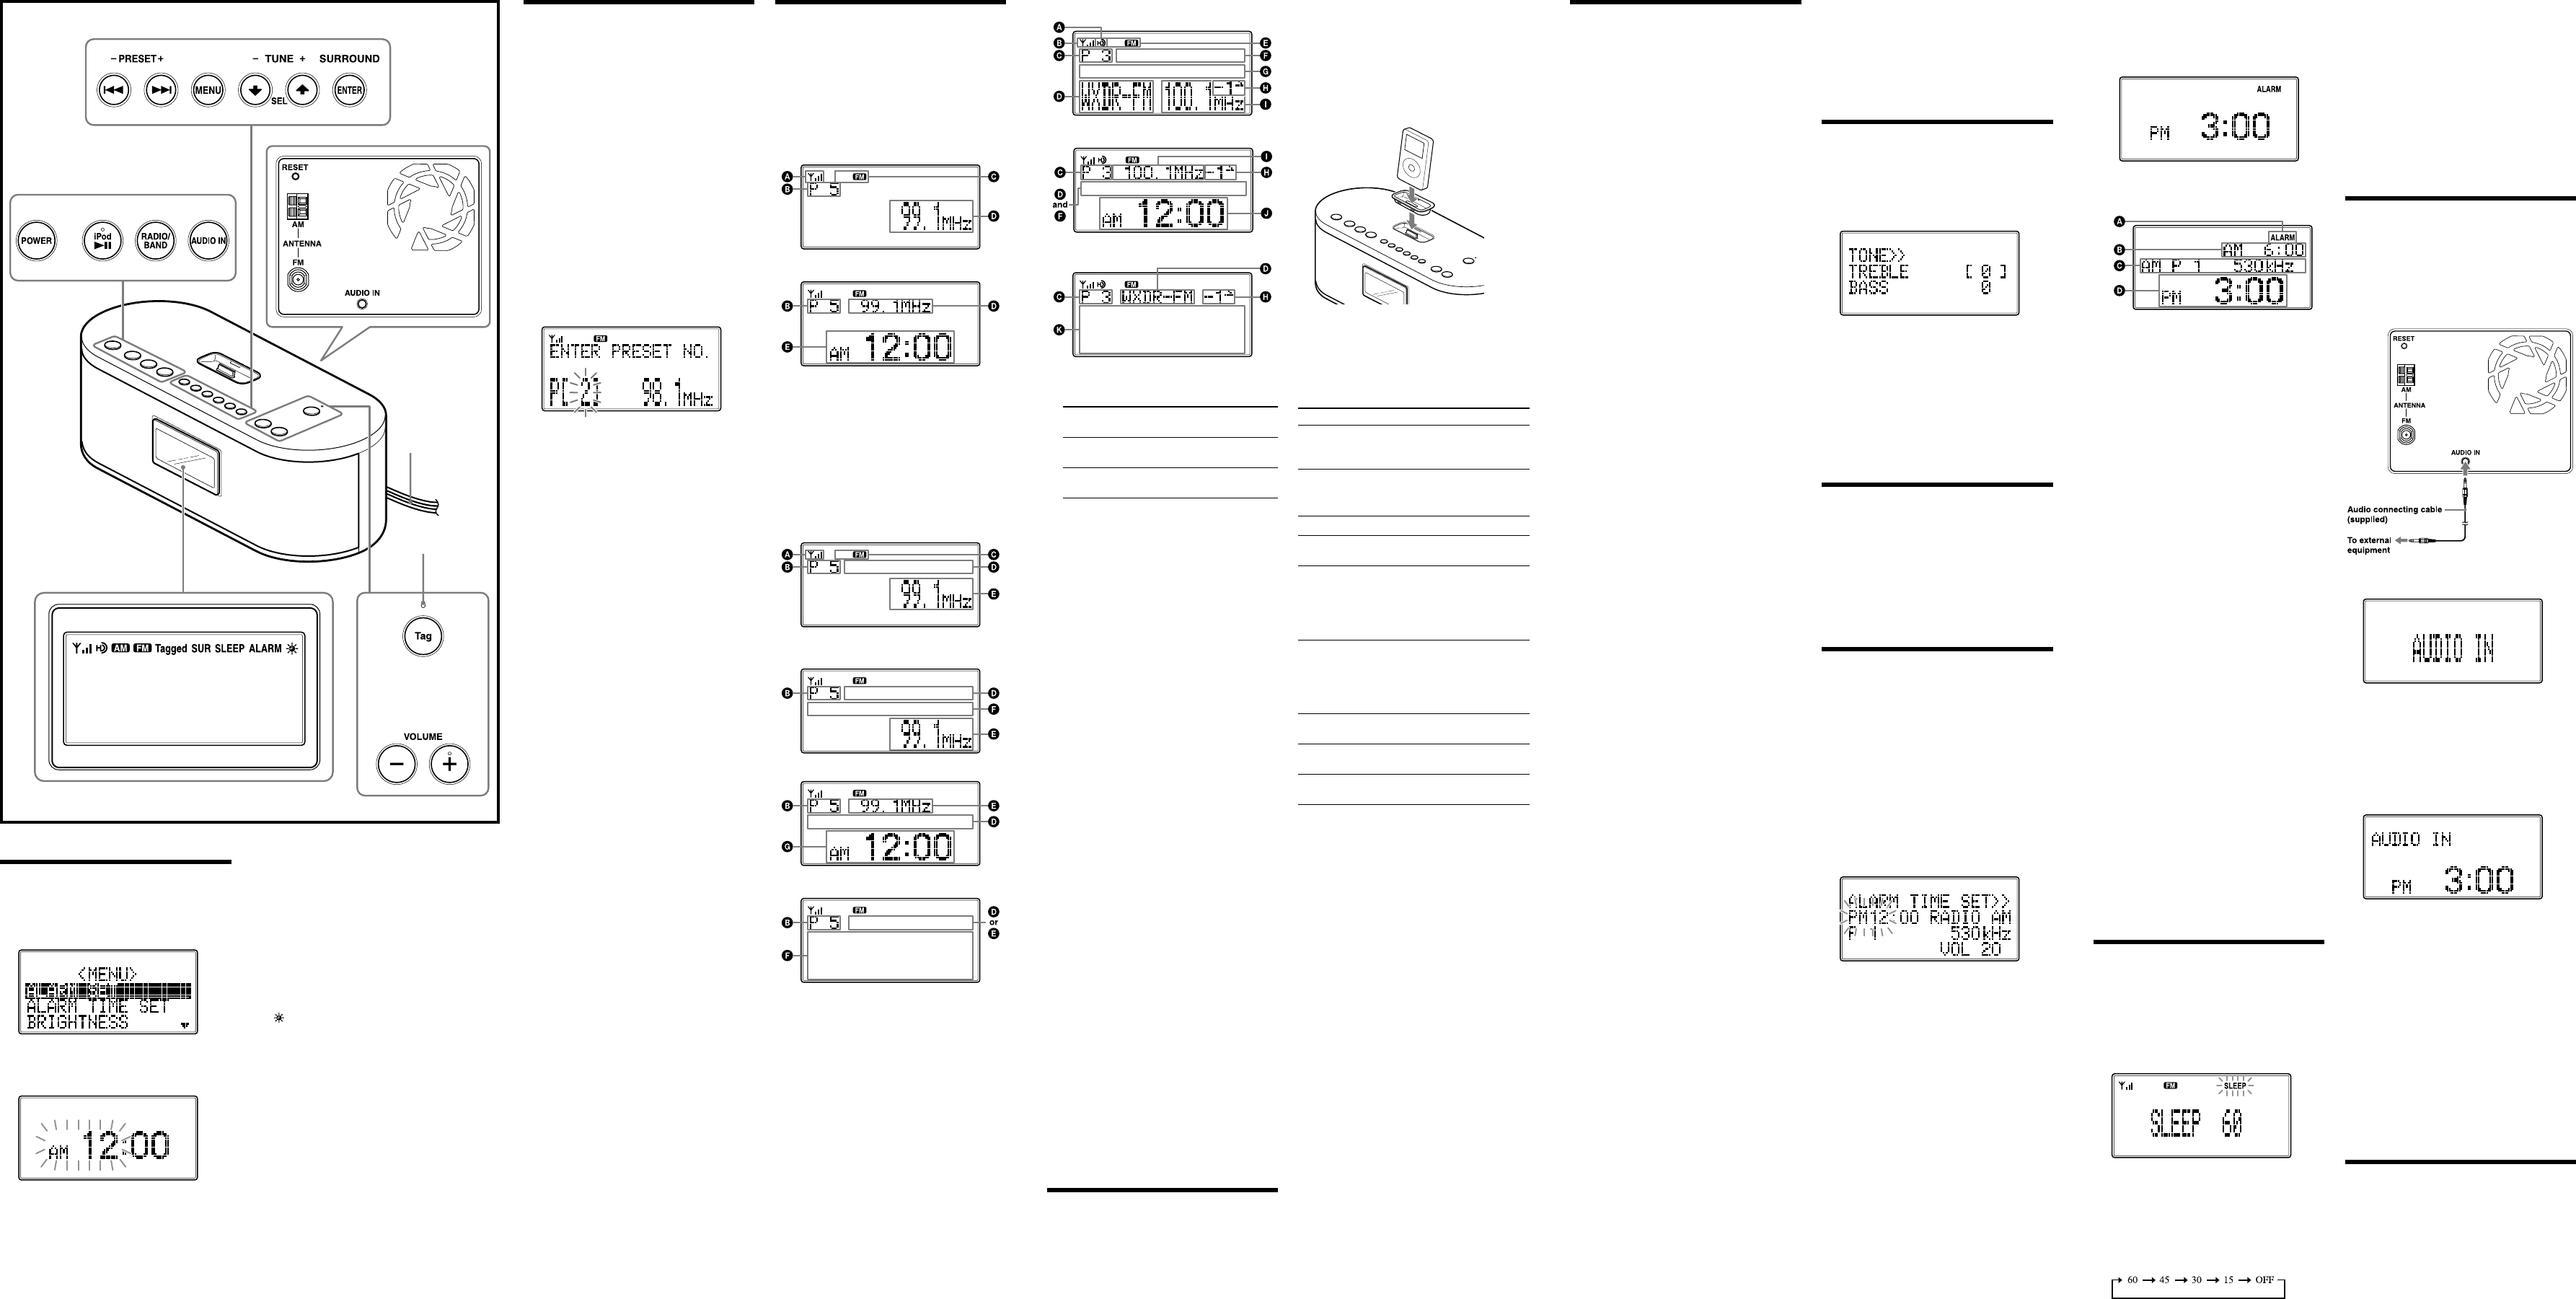
Adjusting the tone
1 Press POWER to turn on the unit.
2 Press MENU to show the menu display.
3 Press SEL
or
to select “TONE”, then
press ENTER to show the setting display.
4 Press SEL or to adjust “TREBLE,”
then press ENTER.
5 Press SEL or to adjust “BASS,” then
press ENTER.
Tips
The adjustable range of “TREBLE” and “BASS”
is from –6 to +6.
You can adjust “TONE” directly by pressing
TONE on the remote commander.
Listening to surround
sound
1 Press SURROUND.
“SURROUND” appears in the display.
Every time you press the button, the menu of
“ON” or “OFF” appears in the display in turn.
When the surround sound is on, “SUR”
appears in the display.
Setting the alarm
You can set the unit to turn on automatically at a
preset time. The alarm can be set, even if the unit
is off.
To adjust the hour and minute, see “Setting the
clock.”
To set the alarm time
1 Press MENU to show the menu display.
2 Press SEL
or
to select “ALARM
TIME SET,” then press ENTER.
The hour sign starts flashing.
Example of display when unit is off
3 Press SEL
or
to set the hour, then
press ENTER.
The minute sign starts flashing.
4 Press SEL
or
to set the minutes, then
press ENTER.
The source sign starts flashing.
5 Press SEL
or
to select the source
from “RADIO AM,” “RADIO FM,”
“iPod,” “AUDIO IN” or “BUZZER,” then
press ENTER.
If you select “RADIO AM” or “RADIO FM”,
press SEL or to select the preset number,
then press ENTER.
6 Press SEL
or
to set the volume, then
press ENTER.
When using iPod touch/iPhone
To use music stored in an iPod touch/iPhone to
wake up, put the iPod touch/iPhone into the unit
first, follow the steps above to set alarm time, and
then select the desired music.
To set the alarm
1 Press MENU to show the menu display.
2 Press SEL
or
to select “ALARM SET,”
then press ENTER.
3 SEL
or
to select “ON,” then press
ENTER.
“ALARM” appears in the display.
Example of display when unit is off
If you press DISPLAY on the remote
commander while the display above appears,
the display changes to the following.
To return to the previous display, press
DISPLAY on the remote commander again.
ALARM indicator
Alarm setting time
Alarm setting (Source, Frequency, etc.)
Current time
To deactivate the alarm function, SEL
or
to
select “OFF” in step 3.
To stop the alarm
Press POWER on the unit or remote commander.
Tips
To enter “ALARM TIME SET” mode directly,
press and hold ALARM on the remote
commander for 2 seconds.
You can activate or deactivate the alarm
function directly by pressing ALARM on the
remote commander.
Notes
If you do not set the menu within 10 seconds,
the setting mode is canceled.
If you do not operate the unit for 60 minutes
after the alarm sounds, the power is turned off.
If you select “AUDIO IN” as source in “ALARM
TIME SET,” start playback on the external
equipment. You cannot control the external
equipment from this unit.
If you select “iPod” without connecting an iPod
to this unit, the alarm source will switch to
“BUZZER” automatically.
Make sure the iPod is installed correctly after
setting the iPod alarm.
Notes on using iPod touch/iPhone
If you set the iPod alarm while iPod touch/
iPhone music is playing, and then turn the unit
power off, when the alarm time comes on, the
alarm music will resume from the point where
the power was turned off.
Even if the iPod alarm setting is complete, if
you turn the iPod touch/iPhone power off
before the unit, the alarm source will switch to
“BUZZER” automatically.
Setting the sleep timer
You can enjoy falling asleep to the radio using the
built-in sleep timer that turns off the radio
automatically after a preset duration.
1 Press SLEEP on the remote commander.
“SLEEP” and the digits for the sleep timer
duration appear.
If you press SLEEP on the remote commander
while the unit is turned off, the unit is turned
on.
2 Press SLEEP on the remote commander
repeatedly to select the desired sleep
timer setting.
Each press changes the setting time as follows:
A beep sounds when the display returns to
“SLEEP 60.”
After about 4 seconds, “SLEEP” lights in the
display when the duration time is set.
The unit automatically turns off when the
duration time is passed.
To change the sleep timer setting
You can press SLEEP on the remote commander
repeatedly to select the desired sleep timer setting
even after the sleep timer has been activated.
To deactivate the sleep timer
Press POWER to turn off the unit before the
setting time has elapsed, or press SLEEP on the
remote commander repeatedly to set the sleep
timer to “SLEEP OFF” in step 2.
Note
These operations are available only when using
the remote commander.
Listening to external
equipment
1 Connect the AUDIO IN jack of the unit
to the line out jack or headphone jack of
the external equipment using the audio
connecting cable (supplied).
2 Press AUDIO IN to turn on the unit.
“AUDIO IN” appears in the display.
3 Play the equipment connected to the
AUDIO IN jack.
4 Adjust the volume using VOLUME + or
–.
Tip
To display the current time, press DISPLAY on
the remote commander.
To return to the radio
Press RADIO/BAND.
The band (AM or FM) is shown in the display.
Notes
Refer also to the connected equipment’s manual.
The supplied audio connecting cable may not
be used with some external equipment. In this
case, use a cord suitable for the external
equipment you are using.
When you listen to the radio with external
equipment connected, turn off the connected
equipment to prevent noise. If noise occurs,
even when the equipment is turned off,
disconnect and place the external equipment
away from the unit.
Resetting the unit
The RESET button is located on the rear of the
unit.
Press this button with a pointed object if the radio
fails to function properly. The clock settings and
stations you have preset, etc., will revert to the
factory preset.
Note
The song information stored in this unit will not
be erased by pressing the RESET button.
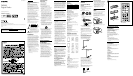
The iPod and VOLUME + buttons have a tactile dot.
Tag indicator