


27
Adjusting the recording
level manually
The sound level is adjusted automatically
while recording. If necessary, you can set
the recording level manually during both
analog and digital recording.
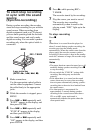
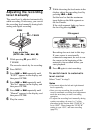
1 While pressing X, press REC •
T MARK.
The recorder stands by for recording.
2 Press MENU.
3 Press . or > repeatedly until
“R-SET” appears in the display, and
then press ENTER.
4 Press . or > repeatedly until
“RecVol” appears in the display, and
then press ENTER.
5 Press . or > repeatedly until
“Manual” appears in the display, and
then press ENTER.
6 Play the source.
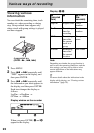
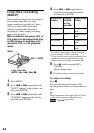
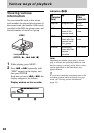
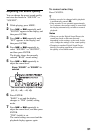
7 While observing the level meter in the
display, adjust the recording level by
pressing . or >.
Set the level so that the maximum
input lights up the fifth segment on
the level meter.
If the sixth segment lights up, lower
the level by pressing ..
Recording does not start in this step.
If your source is an externally
connected component, be sure to cue
the source to the beginning of the
material to be recorded before you
start playback.
8 Press X again to start recording.
To switch back to automatic
level control
Select “Auto” in step 5.
Notes
• You cannot adjust the left and right channel
levels separately.
• Once you stop recording, the recorder will
revert to automatic recording level adjustment
mode the next time you start a recording
operation.
• To adjust the recording level manually during
synchro-recording, do steps 1 to 7 of the
procedure in this section with “SYNC-R” is
set to “OFF”. Then change the “SYNC-R”
setting to sync “ON”, and start recording
(page 23).
REC • T MARK
MENU
X
4-way control key
(ENTER • N, ., >, x)
fifth segment