


12
Other functions
Changing the sound settings
Adjusting the sound
characteristics — BAL/FAD/SUB
You can adjust the balance, fader, and subwoofer
volume.
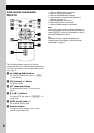
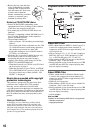
1 Press (S ELECT) repeatedly until
“BAL,” “FAD” or “SUB” appears.
The item changes as follows:
LOW*
1
t MID*
1
t HI*
1
t
BAL (left-right) t FAD (front-rear) t
SUB (subwoofer volume)*
2
t AUX*
3
*1 When EQ3 is activated (page 12).
*2 When the audio output is set to “SUB”
(page 12).
“ATT” is displayed at the lowest setting, and can
be adjusted up to 20 steps.
*3 When AUX source is activated (page 15).
2 Rotate the volume control dial to
adjust the selected item.
After 3 seconds, the setting is complete and
the display returns to normal play/reception
mode.
With the card remote commander
In step 2, to adjust the selected item, press <, M, ,
or m.
Customizing the equalizer curve
— EQ3
“CUSTOM” of EQ3 allows you to make your
own equalizer settings.
1 Select a source, then press (EQ3)
repeatedly to select “CUSTOM.”
2 Press (S ELECT) repeatedly until
“LOW,” “MID” or “HI” appears.
3 Rotate the volume control dial to
adjust the selected item.
The volume level is adjustable in 1 dB steps,
from –10 dB to +10 dB.
Repeat steps 2 and 3 to adjust the equalizer
curve.
To restore the factory-set equalizer curve,
press and hold (SELECT) before the setting
is complete.
After 3 seconds, the setting is complete and
the display returns to normal play/reception
mode.
Tip
Other equalizer types are also adjustable.
With the card remote commander
In step 3, to adjust the selected item, press <, M, ,
or m.
Adjusting setup items — SET
1 Press and hold (SELECT).
The setup display appears.
2 Press (SELECT) repeatedly until the
desired item appears.
3 Rotate the volume control dial to
select the setting (example “ON” or
“OFF”).
4 Press and hold (SELECT).
The setup is complete and the display returns
to normal play/reception mode.
Note
Displayed items will differ, depending on the source
and setting.
With the card remote commander
In step 3, to select the setting, press < or ,.
The following items can be set (follow the page
reference for details):
“z” indicates the default settings.
CLOCK-ADJ (Clock Adjust) (page 5)
CT*
1
(Clock Time)
To set “CT-ON” or “CT-OFF” (
z) (page 10, 11).
BEEP
To set “BEEP-ON” (z) or “BEEP-OFF.”
AUX-A*
2
(AUX Audio)
To turn the AUX source display “AUX-A-ON”
(
z) or “AUX-A-OFF” (page 15).
A.OFF (Auto Off)
To shut off automatically after a desired time
when the unit is turned off: “A.OFF-NO” (
z),
“A.OFF-30S (Seconds),” “A.OFF-30M
(Minutes)” or “A.OFF-60M (Minutes).”
REAR/SUB*
2
To switch the audio output.
– “REAR-OUT” (
z): to output to a power
amplifier.
– “SUB-OUT”: to output to a subwoofer.
DEMO*
2
(Demonstration)
To set “DEMO-ON” (z) or “DEMO-OFF.”