


/Operating Instructions/Mode d’emploi/
Bedienungsanleitung/Manual de instrucciones/
Gebruiksaanwijzing/Bruksanvisning/
Istruzioni per l’uso/Manual de instruções/
Shotgun Microphone
Microphone de type shotgun
ECM-CG50
4-259-565-01 (1)
3
3
3
* SLT-A55V NEX-VG10
OFF/NORM LOW CUT
ON
NORM
LOW CUT
OFF
OFF ON
a
3
OFF
1
OFF
2
OFF ON
©2010 Sony Corporation Printed in Japan
*
(* )
1
OFF
2
-2
-2
3
4
5
6
ON ON
1
ECM-CG50
( ) 8
3
3
0.5 mW
ø3.5 L 35 cm
OFF NORM LOW CUT
900 25
ø21 mm 261 mm
85 g
1 1
1 1 1
JIS C-5502-01991
40 Hz 20 kHz
-48 dB/Pa 4 dB
18 dBspl
100 dBspl
80 dB
0 40
-20 +60
is shotgun microphone (referred to below as “microphone”) is for use with a
Sony video camera recorder and digital still camera with a microphone input jack
and plug-in power operation (referred to below as “camera”). is microphone is
powered by an alkaline AA dry battery.
Owner’s Record
e model and serial numbers are located on the bottom. Record the serial number
in the space provided below. Refer to these numbers whenever you call upon your
Sony dealer regarding this product.
Model No. ECM-CG50 Serial No.
< Notice for the customers in the countries applying EU Directives >
e manufacturer of this product is Sony Corporation, 1-7-1 Konan Minato-ku
Tokyo, 108-0075 Japan. e Authorized Representative for EMC and product safety
is Sony Deutschland GmbH, Hedelnger Strasse 61, 70327 Stuttgart, Germany.
For any service or guarantee matters please refer to the addresses given in separate
service or guarantee documents.
For the Customers in Europe
Disposal of Old Electrical & Electronic Equipment (Applicable in
the European Union and other European countries with
separate collection systems)
is symbol on the product or on its packaging indicates that this
product shall not be treated as household waste. Instead it shall
be handed over to the applicable collection point for the recycling
of electrical and electronic equipment. By ensuring this product
is disposed of correctly, you will help prevent potential negative
consequences for the environment and human health, which could
otherwise be caused by inappropriate waste handling of this product.
e recycling of materials will help to conserve natural resources.
For more detailed information about recycling of this product, please
contact your local Civic Oce, your household waste disposal service
or the shop where you purchased the product.
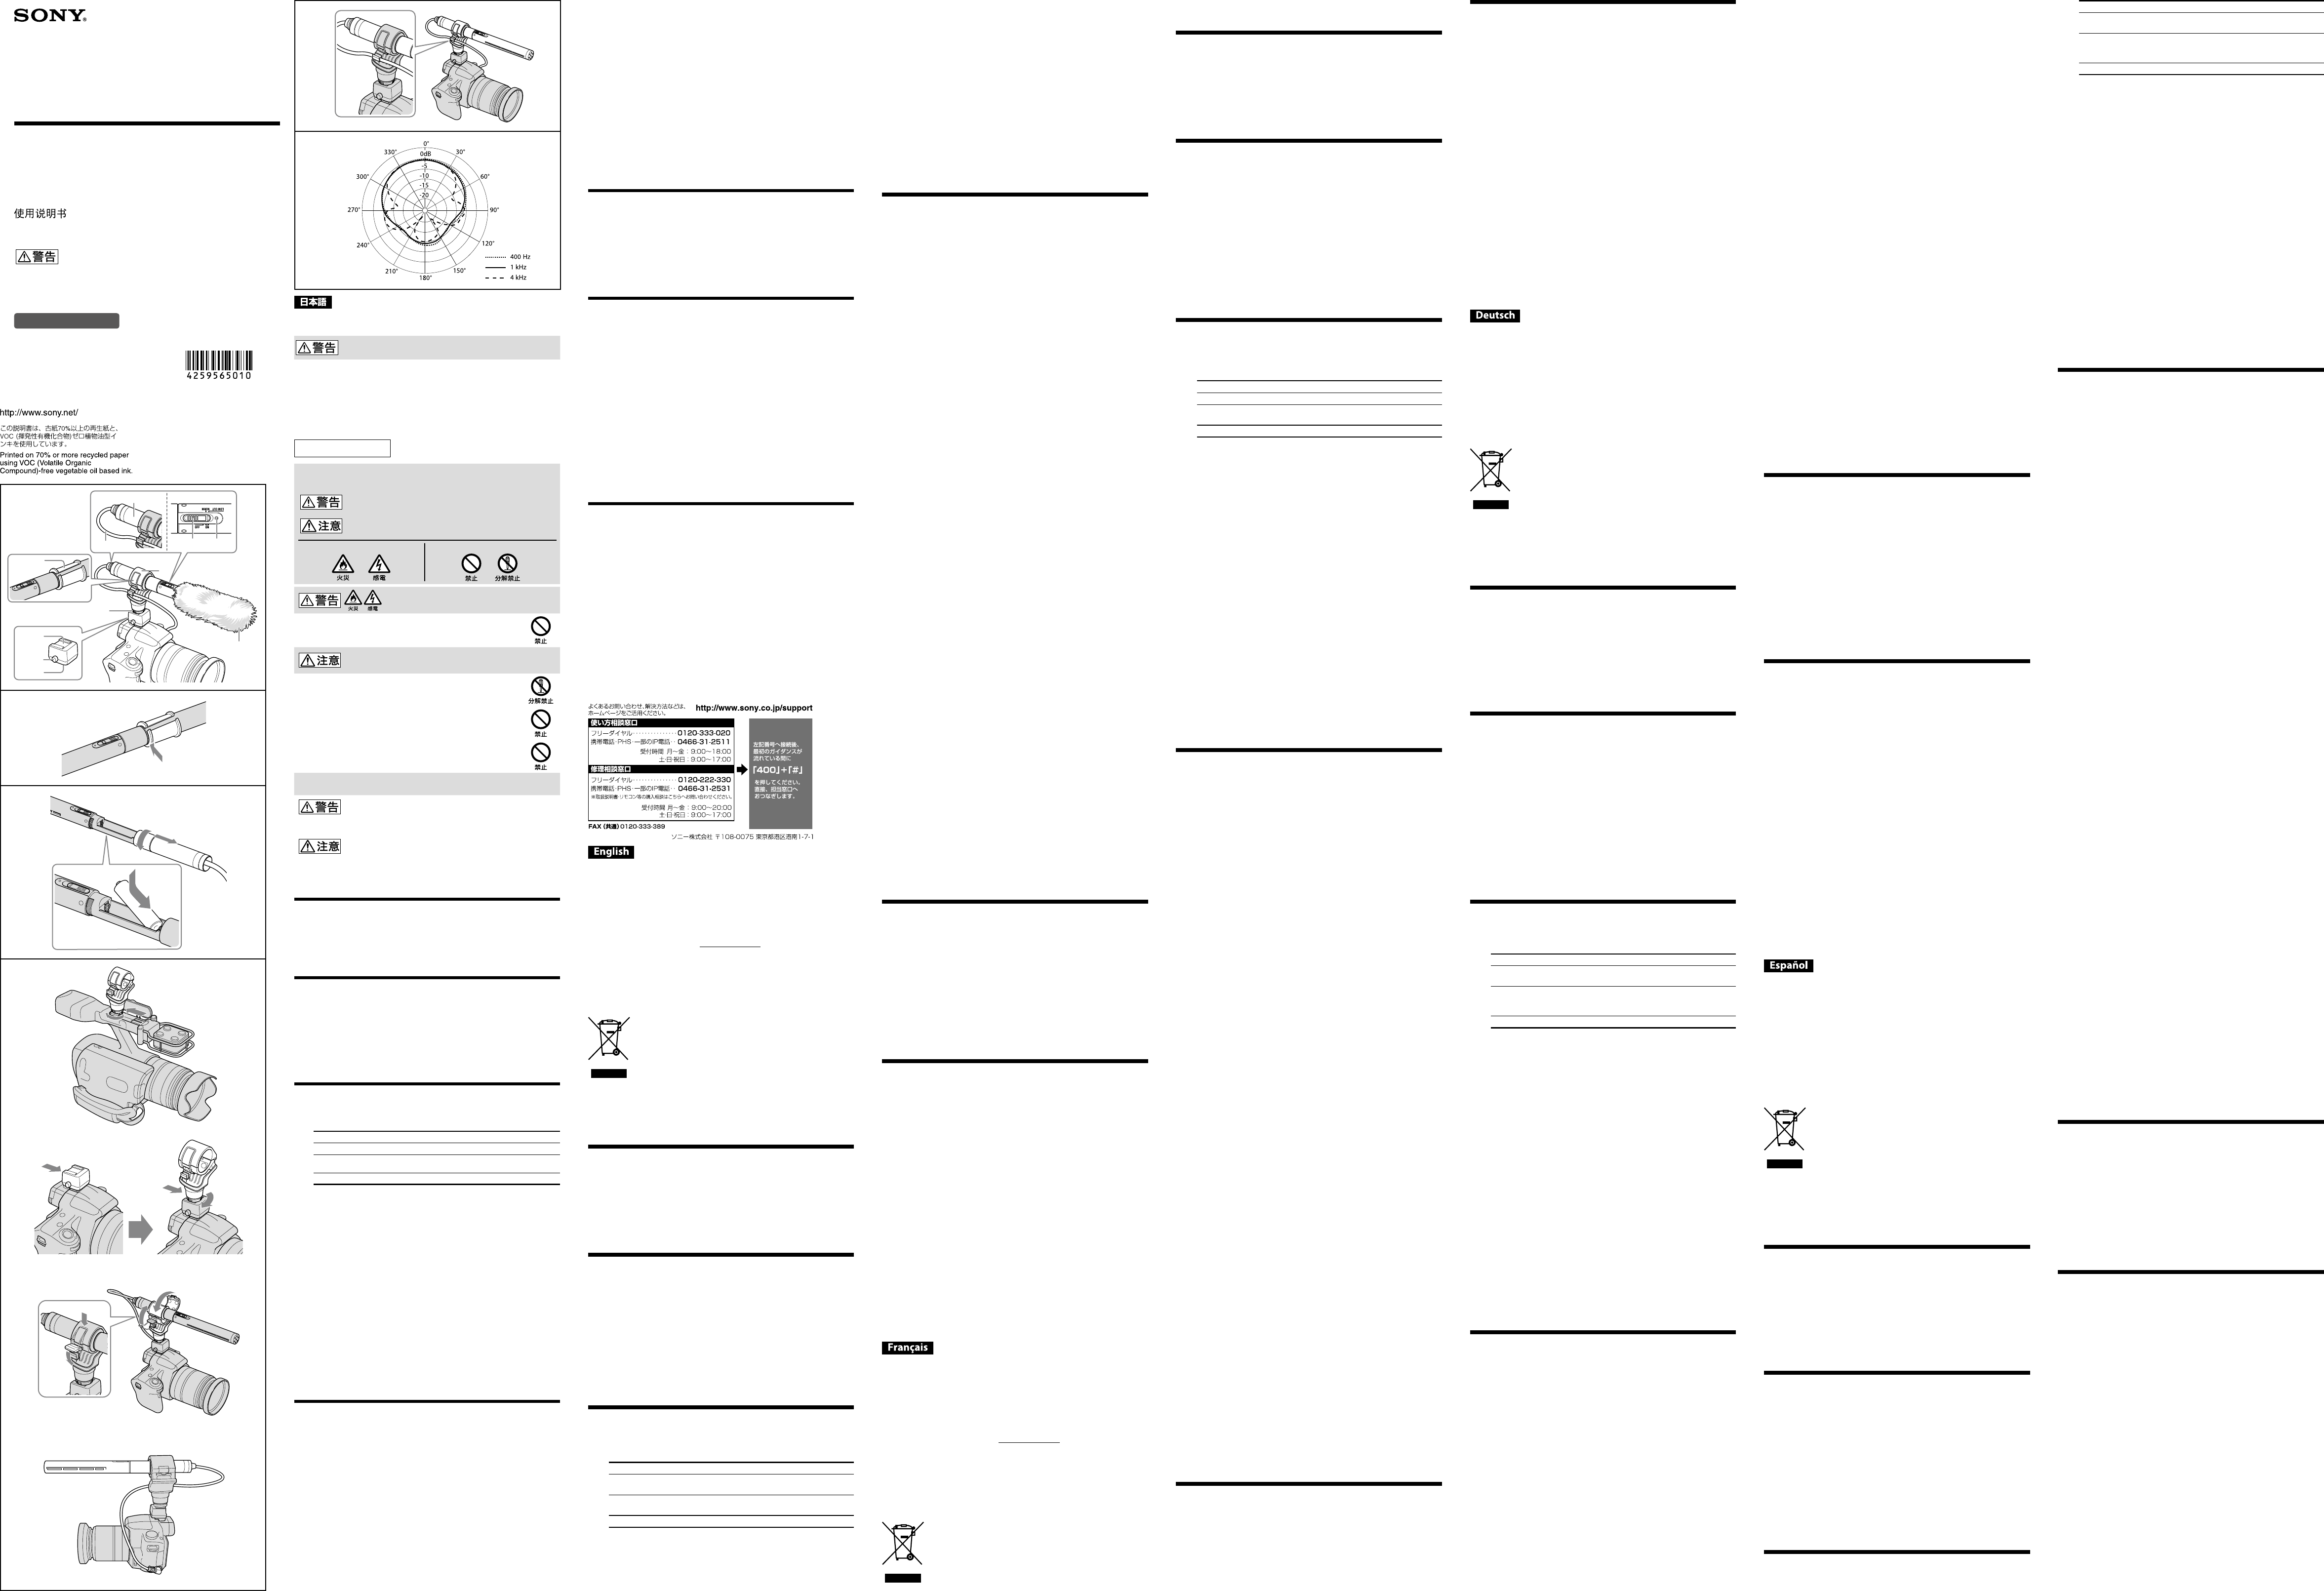
Features
Sharp directivity microphone with minimum sensitivity to ambient noise
e microphone’s sharp directivity enhances narrow range and middle distance
recording when connected to your camera (See illustration
).
Powered by a combination of an AA alkaline dry battery and plug-in
power operation
e power is supplied from the microphone input jack of your camera or an AA
alkaline dry battery (referred to below as “battery”).
Shock mount microphone holder supplied
e supplied microphone holder that reduces the noise from the vibration when
you attach the microphone to the camera.
Notes on Use
e microphone is a delicate device. Do not drop it or subject it to excessive
shock.
During movie recording, operation noises or beeps from the camera or lens may
be recorded. You can prevent noise from the lens by using in manual focus mode.
Avoid extended use or storage in high humidity or at high temperature.
Do not let the microphone get wet with rain or seawater when using outside.
e microphone does not have dust-proof or splash-proof specications.
Wipe any dirt from the microphone with a dry cloth.
If acoustic feedback occurs during use (a howling sound is heard from the
speakers), point the microphone away from the speakers or increase the distance
between the microphone and the speakers.
Be careful not to drop or tip your camera over by catching the connecting cord on
a nearby object when attaching the microphone.
Test record with this microphone to make sure that sound is recorded properly
beforehand.
Names and Functions of Parts (See illustration
)
* e camera illustrated here is the SLT-A55V/NEX-VG10.
Microphone body
Slide switch (Power OFF/NORM (Normal)/LOW CUT (Low-cut))
Set the switch according to the sound source.
ON e power turns on.
NORM To pick up sound naturally from low-tone range to high-
tone range.
LOW CUT To cut low-tone range eectively to reduce noise from
wind, vibration or air conditioning.
OFF e power turns o.
Battery check lamp
If the battery has enough power, when the slide switch is switched from OFF
to ON, the battery check lamp ashes momentarily to indicate the remaining
battery level.
Notes
When the power is supplied by the plug-in power, the battery check lamp
does not ash.
When the battery check lamp ashes dimly or does not ash at all, replace the
battery with a new one.
Plug-in power compatible models can be powered with the microphone input
jack.
Connecting cord
Connect the output jack of the microphone to the microphone input jack of
your camera.
Grip
Microphone holder
Insert the microphone to attach to the camera.
Lock knob
Use the lock knob to x the shoe adaptor.
Microphone spacer
Attach to the microphone to attach it to the microphone holder.
Shoe adaptor
Use the shoe adaptor when using the microphone with a Sony α camera.
Accessory shoe
Auto-lock foot
Lock release button
Wind screen
Place on the microphone to reduce the popping noise caused by wind or
breathing.
Notes
If the wind screen gets wet with rain, remove from the microphone and dry in
shade.
Attaching the microphone
Attaching the microphone spacer to the microphone
(See illustration
)
Attach the microphone spacer along the line on the grip of the microphone
(
a
)
.
Attach the microphone spacer at the correct position on the grip to catch the sound
properly.
Inserting/Removing the battery (See illustration
)
When using a camera that is not compatible with the plug-in power, be sure to insert
a new battery. When using a camera that is compatible with the plug-in power, you
do not need to insert a battery in the microphone.
For how to check whether your camera is compatible with the plug-in power, refer
to the instruction manual of your camera.
Notes
Use an size AA alkaline dry battery. If you use another battery (manganese dioxide
battery, Ni-MH rechargeable battery etc.), the microphone may not operate
correctly. We recommend using a Sony battery to maximize the microphone’s
specications, performance and operating time etc.
Before an important recording, replace the battery with a new one.
Be sure to set the power of the microphone to OFF and disconnect the connecting
cord before attaching or removing the battery.
1 Check that the connecting cord is disconnected. Then rotate the grip
and pull it as illustrated.
e grip cannot be fully separated from the microphone body. Do not pull it by
force.
2 Insert the battery.
When inserting the battery, insert its
side rst, and then insert its
side.
Remove the battery by the reverse procedure.
Notes
To remove the battery from the microphone, catch the
side of the battery with
your nail.
Battery replacement period
If the battery has enough power, switching the slide switch from OFF to ON causes
the battery check lamp to ash momentarily to indicate the remaining battery level.
If the battery check lamp ashes dimly or does not ash at all, replace the battery
with a new one.
Notes on battery
Mishandling of the battery may cause it to leak or rupture. Always observe the
following.
Install the battery with the correct
and
orientation.
Do not attempt to recharge the battery. It is not rechargeable.
Remove the battery if the microphone is not to be used for a long period of time.
If the battery leaks*, carefully wipe away any electrolyte from the battery
compartment and then install a new battery. (If the battery leaks, you need to
repair the microphone.)
Attaching the microphone to the camera
(See illustration
)
1 Turn o the power of the camera.
Before using the microphone, be sure to close the built-in ash of the camera.
When using the microphone with a camera that has a built-in ash with auto
ash function, set the auto ash function to OFF.
2 Attach the microphone holder to the shoe of the camera.
If you attach the shoe adaptor to the microphone holder, it can be attached to a
camera that has an Auto-lock Accessory Shoe. Use the shoe adaptor as necessary
depending on the shape of the shoe on your camera.
When using the camera with an accessory shoe
(See illustration
-2
)
Slide the microphone holder fully onto the accessory shoe of the camera and
rotate the lock knob fully to x it.
When using the camera with an Auto-lock Accessory Shoe
(See illustration
-2
)
Slide the shoe adaptor fully onto the Auto-lock Accessory Shoe of the camera.
en slide the microphone holder fully onto the shoe adaptor and rotate the
lock knob to x it.
3 Attach the microphone to the microphone holder.
Release the buckle of the microphone holder and attach the microphone. Fit the
microphone spacer attached to the microphone onto the microphone holder.
Attach the microphone with its power/low-cut switch facing upwards to obtain
the correct pickup pattern.
4 Decide the position of the microphone and lock the buckle of the
microphone holder.
5 Connect the connecting cord to the microphone input jack of the
camera.
6 Fit the extra connecting cord into the cord clamp.
When tting the connecting cord into the cord clamp, put the cord round the
lens side.
Using the microphone
Aer turning on the power of the camera, set the slide switch of the microphone to
ON and use it in the desired mode.
Notes
Do not use force to rotate the lock knob or attach the shoe. Doing so may
cause damage.
Do not hold the camera by the microphone or microphone holder
attached to the camera.
If you switch the mode during recording, noise may be recorded.
Attaching the wind screen
Attach the wind screen to prevent the sound of wind being recorded as noise.
Removing the microphone from the camera
Remove the microphone from the camera by following the attaching procedure in
reverse.
If the shoe adaptor is attached to the camera, slide the shoe adaptor while pressing
the lock release button on it.
Specications
Type Electret condenser microphone
Power supply Combination of AA alkaline dry battery and
plug-in power
Recommended battery Size AA alkaline dry battery (sold separately)
Power consumption Approx. 0.5 mW
Output jack ø 3.5 gold coating L type stereo mini plug
cable length Approx. 35 cm (13 7/8 in.)
Switch Power OFF / NORM (Normal) / LOW CUT
(Low-cut)
Continuous operating time 900 hours or more
(Using at 25 ºC (77 ºF))
Dimensions Approx. ø 21 mm × 261 mm
(Ø 27/32 in. × 10 3/8 in.)
(excluding cord)
Mass Approx. 85 g (3 oz.) (excluding battery)
Directivity Sharp directivity
Included items Shotgun microphone (1), Wind screen (1),
Shock Mount Microphone Holder (1),
Microphone spacer (1), Shoe adaptor (1), Set
of printed documentation
Frequency response 40 Hz ~ 20 kHz
Sensitivity -48 dB/Pa ±4 dB
Signal-to-noise ratio 18 dBspl (Average)
Maximum input sound pressure level 100 dBspl or more
Dynamic range 80 dB or more
Operating temperature 0 °C to 40 °C (32 °F to 104 °F)
Storage temperature -20 °C to +60 °C (-4 °F to +140 °F)
Design and specications are subject to change without notice.
Ce microphone de type shotgun (appelé ci-dessous le « microphone ») est destiné
aux caméscopes et appareils photo numériques Sony (appelés ci-dessous la
« caméra ») pourvus d’une prise d’entrée de microphone et à alimentation PIP (Plug-
in-Power). Ce microphone est alimenté par une pile sèche alcaline AA.
Aide-mémoire
Les numéros de modèle et de série se situent sous l’appareil. Prendre en note le
numéro de série dans l’espace prévu ci-dessous. Se reporter à ces numéros lors des
communications avec le détaillant Sony au sujet de ce produit.
Modèle no ECM-CG50 No de série
< Avis aux consommateurs des pays appliquant les Directives UE >
Le fabricant de ce produit est Sony Corporation, 1-7-1 Konan Minato-ku Tokyo,
108-0075 Japon. Le représentant agréé pour la compatibilité électromagnétique et
la sécurité du produit est Sony Deutschland GmbH, Hedelnger Strasse 61, 70327
Stuttgart, Allemagne. Pour toute question relative à la garantie ou aux réparations,
reportez-vous à l’adresse que vous trouverez dans les documents ci-joints, relatifs à
la garantie et aux réparations.
Pour les clients en Europe
Traitement des appareils électriques et électroniques en n de
vie (Applicable dans les pays de l’Union Européenne et aux
autres pays européens disposant de systèmes de collecte
sélective)
Ce symbole, apposé sur le produit ou sur son emballage, indique
que ce produit ne doit pas être traité avec les déchets ménagers. Il
doit être remis à un point de collecte approprié pour le recyclage des
équipements électriques et électroniques. En s’assurant que ce produit
est bien mis au rebut de manière appropriée, vous aiderez à prévenir
les conséquences négatives potentielles pour l’environnement et la
santé humaine. Le recyclage des matériaux aidera à préserver les
ressources naturelles.
3, 4
2
5
-
a
1
2
6
Pour toute information supplémentaire au sujet du recyclage de ce
produit, vous pouvez contacter votre municipalité, votre déchetterie
ou le magasin où vous avez acheté le produit.
Caractéristiques
Microphone à directivité précise peu sensible au bruit ambiant
La directivité précise de ce microphone permet des enregistrements du son de
meilleure qualité à angle aigu et à distance moyenne lorsque le microphone est
raccordé à votre caméra (Voir l’illustration
).
Alimentation par une pile sèche alcaline AA et alimentation PIP
L’alimentation est fournie par la prise d’entrée microphone de votre caméra ou par
une pile sèche alcaline AA (appelée ci-dessous la « pile »).
Support de microphone antivibration fourni
Le support de microphone fourni réduit le bruit dû aux vibrations lorsque le
microphone est rattaché à la caméra.
Remarques sur l’emploi
Le microphone est un appareil délicat. Ne le laissez pas tomber et ne le soumettez
pas à des chocs.
Pendant la prise de vue, les bruits de fonctionnement ou les bips de l’appareil
photo ou de l’objectif peuvent être enregistrés. Le bruit de l’objectif peut être évité
en utilisant le mode de mise au point manuelle.
Évitez de l’utiliser ou de l’exposer trop longtemps à une humidité ou une
température élevée.
Veillez à ce qu’il ne soit pas mouillé par la pluie ou l’eau de mer lorsqu’il est utilisé
à l’extérieur.
Le microphone n’est pas étanche à la poussière ou aux projections d’eau.
Nettoyez le microphone avec un chion sec lorsqu’il est sale.
Si de la rétroaction acoustique se produit pendant l’enregistrement (hurlement
provenant des enceintes), écartez le microphone des enceintes ou augmentez la
distance entre le microphone et les enceintes.
Veillez à ne pas faire tomber ou renverser la caméra en accrochant le cordon de
liaison à un autre objet proche lorsque vous raccordez le microphone.
Faites des essais avec le microphone pour vous assurer que le son est enregistré
correctement.
Noms et fonctions des éléments (Voir l’illustration
)
* La caméra illustrée ici est la SLT-A55V/NEX-VG10.
Corps du microphone
Commutateur (Alimentation OFF/NORM (Normal)/LOW CUT (Coupure
du grave))
Réglez le commutateur selon la source sonore.
ON Le microphone est allumé.
NORM Prise de son naturelle du grave à l’aigu.
LOW CUT Coupure du grave ecace pour réduire le bruit du vent,
des vibrations, d’un climatiseur, etc.
OFF Microphone hors service.
Témoin de contrôle de la pile
Si la pile est susamment chargée lorsque la position du commutateur
est changée de OFF sur ON, le témoin de contrôle de la pile clignote
momentanément pour indiquer le niveau de charge restant.
Remarques
Lorsque l’alimentation est fournie par la prise de microphone, le témoin de
contrôle de la pile ne clignote pas.
Quand le témoin de contrôle de la pile clignote faiblement ou ne clignote pas
du tout, remplacez la pile par une neuve.
Les modèles à alimentation PIP peuvent être alimentés par la prise d’entrée
microphone.
Cordon de liaison
Reliez la prise de sortie du microphone à la prise d’entrée microphone de
votre caméra.
Poignée
Support de microphone
Insérez le microphone ici pour le xer à la caméra.
Bouton de blocage
Utilisez le bouton de blocage pour xer l’adaptateur de grie.
Entretoise de microphone
Rattachez-la au microphone avant de mettre le microphone dans le support de
microphone.
Adaptateur de grie
Utilisez l’adaptateur de grie lorsque vous utilisez le microphone avec une
caméra Sony α.
Grie porte-accessoire
Pied à verrouillage automatique
Bouton de déblocage
Bonnette antivent
Posez-la sur le microphone pour réduire le bruit de soue causé par le vent ou la
respiration.
Remarques
Si la bonnette antivent devait être mouillée par la pluie, retirez-la du microphone
et laissez-la sécher à l’ombre.
Fixation du microphone
Rattachement de l’entretoise de microphone au
microphone. (Voir l’illustration
)
Rattachez l’entretoise de microphone au niveau de la ligne sur la poignée du
microphone
(
a
)
.
Mettez l’entretoise à la bonne position sur la poignée pour que le son soit capté
correctement.
Mise en place et retrait de la pile (Voir l’illustration
)
Lorsque vous utilisez une caméra sans alimentation PIP, insérez une pile neuve.
Lorsque vous utilisez une caméra avec alimentation PIP, vous n’avez pas besoin
d’insérer de pile dans le microphone.
Reportez-vous au mode d’emploi de votre caméra pour savoir si elle présente ce type
d’alimentation ou non.
Remarques
Utilisez une pile sèche alcaline AA. Si vous utilisez un autre type de pile (pile
au dioxyde de manganèse, pile rechargeable Ni-MH, etc.) le microphone ne
fonctionnera pas correctement. Il est conseillé d’utiliser une pile Sony pour tirer le
meilleur parti des caractéristiques techniques, des performances et de l’autonomie
du microphone.
Avant un enregistrement important, remplacez la pile par une neuve.
Veillez à régler l’alimentation du microphone sur OFF et à débrancher le cordon
de liaison avant d’insérer ou de retirer la pile.
1 Assurez-vous que le cordon de liaison est débranché. Tournez
ensuite la poignée et tirez-la de la façon illustrée.
La poignée ne peut pas être détachée du corps du microphone. Ne tirez pas
dessus en forçant.
2 Insérez la pile.
Lorsque vous insérez la pile, insérez d’abord le côté
puis le côté
.
Retirez la pile en procédant à l'inverse.
Remarques
Pour retirer la pile du microphone, saisissez le côté
de la pile avec l’ongle.
Quand remplacer la pile
Si la pile est susamment chargée, le témoin de contrôle de la pile clignote
momentanément pour indiquer le niveau de charge restant lorsque la position du
commutateur est changée de OFF à ON. Si le témoin de contrôle de la pile clignote
faiblement ou ne clignote pas du tout, remplacez la pile par une neuve.
Remarques sur la pile
La pile risque de fuir ou d’éclater si elle n’est pas manipulée correctement. Prenez
toujours les précautions suivantes.
Installez la pile dans le bon sens
et
.
N’essayez pas de recharger la pile. Elle n’est pas rechargeable.
Retirez la pile si le microphone ne doit pas être utilisé pendant un certain temps.
Si la pile devait fuir*, essuyez soigneusement toute l’électrolyte dans le logement de
pile et installez une nouvelle pile. (Si la pile fuit, le microphone devra être réparé.)
Fixation du microphone à la caméra
(Voir l’illustration
)
1 Éteignez la caméra.
Avant d’utiliser le microphone, veillez à fermer le ash intégré de la caméra. Si le
microphone est utilisé avec une caméra pourvue d’un ash intégré avec fonction
de ash automatique, réglez la fonction de ash automatique sur OFF.
2 Rattachez le support de microphone à la grie de la caméra.
Si vous rattachez l’adaptateur de grie au support de microphone, le microphone
pourra être xé à une caméra pourvue d’une grie porte-accessoire à verrouillage
automatique. Utilisez l’adaptateur de grie si la forme de la grie de votre caméra
l’exige.
Lorsqu’une caméra avec grie porte-accessoire est utilisée
(Voir l’illustration
-2
)
Insérez le support de microphone à fond dans la grie porte-accessoire de la
caméra et tournez le bouton de blocage à fond pour immobiliser le support.
Lorsqu’une caméra avec grie porte-accessoire à verrouillage
automatique est utilisée (Voir l’ illustration
-2
)
Insérez l’adaptateur de grie à fond dans la grie porte-accessoire à
verrouillage automatique de la caméra. Puis insérez le support de microphone
à fond dans l’adaptateur de grie et tournez le bouton de blocage à fond pour
immobiliser le support.
3 Rattachez le microphone au support de microphone.
Ouvrez la boucle du support de microphone et xez le microphone. Placez
l’entretoise de microphone rattachée au microphone dans le support de
microphone.
Fixez le microphone avec son commutateur d’alimentation/coupure du grave
orienté vers le haut pour que le son soit capté correctement.
4 Réglez la position du microphone et fermez la boucle du support de
microphone.
5 Raccordez le cordon de liaison à la prise d’entrée microphone de la
caméra.
6 Insérez le cordon de liaison dans la pince de cordon s’il est trop long.
Lorsque vous insérez le cordon de liaison dans la pince de cordon, faites-le passer
par l’avant, côté objectif.
Utilisation du microphone
Après avoir allumé la caméra, réglez le commutateur du microphone sur ON et
sélectionnez le mode souhaité.
Remarques
Ne forcez pas lorsque vous tournez le bouton de blocage ou rattachez la
grie. Ceci peut causer des dommages.
Ne tenez pas la caméra par le microphone ou le support de microphone
rattaché à la caméra.
Si vous changez de mode pendant la prise de vue, du bruit peut être enregistré.
Fixation de la bonnette antivent
Fixez la bonnette antivent pour éviter d’enregistrer le bruit du vent.
Retrait du microphone de la caméra
Retirez le microphone de la caméra en procédant à l’inverse de la pose.
Si l’adaptateur de grie est rattaché à la caméra, détachez-le tout en appuyant sur son
bouton de déblocage.
Spécications
Type Microphone électrostatique
Alimentation Pile sèche alcaline AA et alimentation PIP
(Plug-in-Power)
Pile recommandée Pile sèche alcaline taille AA (vendue
séparément)
Consommation Environ 0,5 mW
Prise de sortie Miniche stéréo en L plaqué or ø 3,5
Longueur du câble environ 35 cm (13 7/8
po.)
Commutateur Alimentation OFF/NORM (Normal)/
LOW CUT (Coupure du grave)
Autonomie en fonctionnement continu 900 heures ou plus
(à 25 °C (77 °F))
Dimensions Environ ø 21 mm × 261 mm
(Ø 27/32 po. × 10 3/8 po.)
(sans le cordon)
Poids Environ 85 g (3 oz) (sans la pile)
Directivité Directivité prononcée
Articles inclus Microphone de type shotgun (1), Bonnette
antivent (1), Support de microphone anti-
vibration (1), Entretoise de microphone
(1), Adaptateur de grie (1), Jeu de
documents imprimés
Réponse en fréquence 40 Hz ~ 20 kHz
Sensibilité -48 dB/Pa ±4 dB
Rapport signal sur bruit 18 dBspl (Moyenne)
Niveau de pression acoustique maximale
à l’entrée
100 dBspl ou plus
Plage dynamique 80 dB ou plus
Température de fonctionnement 0 °C à 40 °C (32 °F à 104 °F)
Température d’entreposage -20 °C à +60 °C (-4 °F à +140 °F)
La conception et les spécications peuvent être modiées sans préavis.
Dieses Richtrohr-Mikrofon (im Folgenden als „Mikrofon“ bezeichnet) ist zur
Verwendung mit einem Sony Camcorder und einer Digital-Standbildkamera mit
Mikrofon-Eingangsbuchse und Einsteck-Stromversorgungsbetrieb (im Folgenden als
„Kamera“ bezeichnet) gedacht. Das Mikrofon wird über eine Alkali-Trockenbatterie
im Format AA (R6, Mignonzelle) mit Strom versorgt.
< Hinweis für Kunden in Ländern, in denen EU-Richtlinien gelten >
Der Hersteller dieses Produkts ist Sony Corporation, 1-7-1 Konan Minato-ku Tokyo,
108-0075, Japan. Autorisierter Vertreter für EMV und Produktsicherheit ist die
Sony Deutschland GmbH, Hedelnger Strasse 61, 70327 Stuttgart, Deutschland.
Für Fragen im Zusammenhang mit Kundendienst oder Garantie wenden Sie sich
bitte an die in den separaten Kundendienst- oder Garantieunterlagen genannten
Adressen.
Für Kunden in Europa
Entsorgung von gebrauchten elektrischen und elektronischen
Geräten (anzuwenden in den Ländern der Europäischen Union
und anderen europäischen Ländern mit einem separaten
Sammelsystem für diese Geräte)
Das Symbol auf dem Produkt oder seiner Verpackung weist darauf
hin, dass dieses Produkt nicht als normaler Haushaltsabfall zu
behandeln ist, sondern an einer Annahmestelle für das Recycling
von elektrischen und elektronischen Geräten abgegeben werden
muss. Durch Ihren Beitrag zum korrekten Entsorgen dieses Produkts
schützen Sie die Umwelt und die Gesundheit Ihrer Mitmenschen.
Umwelt und Gesundheit werden durch falsches Entsorgen gefährdet.
Materialrecycling hil, den Verbrauch von Rohstoen zu verringern.
Weitere Informationen über das Recycling dieses Produkts erhalten
Sie von Ihrer Gemeinde, den kommunalen Entsorgungsbetrieben
oder dem Geschä, in dem Sie das Produkt gekau haben.
Merkmale
Mikrofon mit scharfer Richtcharakteristik und minimaler Empndlichkeit
gegen Umgebungsgeräusche
Die scharfe Richtcharakteristik des Mikrofons verbessert die Aufnahme in einem
engen Bereich und mittleren Abstand bei Anschluss an Ihre Kamera (siehe
Abbildung
).
Stromversorgung über eine Kombination einer Alkali-Trockenbatterie im
Format AA (R6, Mignonzelle) und Einsteckstromversorgung
Der Strom wird über die Mikrofon-Eingangsbuchse Ihrer Kamera oder eine
Alkali-Trockenzelle (AA, R6) zugeführt (im Folgenden als „Batterie“ bezeichnet.)
Mikrofonhalter mit elastischer Aufhängung mitgeliefert
Der mitgelieferte Mikrofonhalter verringert Störgeräusche durch Vibration, wenn
Sie das Mikrofon an der Kamera anbringen.
Hinweise zur Verwendung
Das Mikrofon ist ein empndliches Gerät. Lassen Sie es nicht fallen und schützen
Sie es vor extremen Erschütterungen.
Bei Filmaufnahme können Betriebsgeräusche der Kamera oder des Objektivs
ebenfalls aufgenommen werden. Sie können Geräusche vom Objektiv verhindern,
indem Sie im manuellen Modus fokussieren.
Vermeiden Sie längeren Betrieb oder Lagerung bei hoher Lufeuchtigkeit oder
hohen Temperaturen.
Lassen Sie das Mikrofon bei Verwendung im Freien nicht mit Regen oder
Meerwasser nass werden.
Das Mikrofon ist nicht staubdicht oder spritzfest konstruiert.
Wischen Sie Verschmutzungen vom Mikrofon mit einem trockenen Tuch ab.
Wenn akustische Rückkopplung beim Gebrauch auritt (ein Heulgeräusch kommt
von den Lautsprechern), richten Sie das Mikrofon von den Lautsprechern weg
oder vergrößern Sie den Abstand zwischen dem Mikrofon und den Lautsprechern.
Achten Sie darauf, nicht die Kamera fallen oder umkippen zu lassen, indem Sie
sich beim Anbringen des Mikrofons im Mikrofonkabel oder Gegenständen in der
Nähe verfangen.
Machen Sie zuerst eine Probeaufnahme mit diesem Mikrofon, um sicherzustellen,
dass Ton richtig aufgenommen wird.
Namen und Funktionen der Teile (Siehe Abbildung
)
* Die hier abgebildete Kamera ist die SLT-A55V/NEX-VG10.
Mikrofonkörper
Schiebeschalter (Strom OFF/NORM (Normal)/LOW CUT (Trittschall))
Stellen Sie den Schalter entsprechend der Tonquelle ein.
ON Das Gerät wird eingeschaltet.
NORM Zum natürlichen Aufnehmen von Ton, vom
Tiefenfrequenzbereich bis zum Hochfrequenzbeeich.
LOW CUT Zum wirksamen Entfernen tiefer Frequenzen (Trittschall),
um Störgeräusche von durch z.B. Wind, Vibrationen oder
Klimaanlagen zu verringern.
OFF Das Gerät wird ausgeschaltet.
Batterieprüämpchen
Wenn die Batterie ausreichende Stärke hat, blinkt wenn der Schiebeschalter
von OFF auf ON gestellt wird, blinkt das Batterieprüämpchen kurz, um die
restliche Batteriestärke anzuzeigen.
Hinweise
Wenn Strom über die Einsteck-Stromversorgung zugeführt wird, blinkt das
Batterieprüämpchen nicht.
Wenn das Batterieprüämpchen schwach oder überhaupt nicht blinkt,
ersetzen Sie die Batterie durch eine neue.
Modelle mit Einsteck-Stromversorgung können über die Mikrofon-
Eingangsbuchse mit Strom versorgt werden.
Anschlusskabel
Verbinden Sie die Ausgangsbuchse des Mikrofons mit der
Mikrofoneingangsbuchse Ihrer Kamera.
Gri
Mikrofonhalter
Führen Sie das Mikrofon zum Anbringen an die Kamera ein.
Verriegelungsknopf
Verwenden Sie den Verriegelungsknopf zum Befestigen des Schuhadapters.
Mikrofon-Abstandsstück
Bringen Sie dies am Mikrofon an, um es am Mikrofonhalter anzubringen.
Schuhadapter
Verwenden Sie den Schuhadapter bei Verwendung eines Mikrofons mit einer
Sony α Kamera.
Zubehörschuh
Selbstarretierender Fuß
Freigabeknopf
Windschutz
Dieses Teil kann am Mikrofon angebracht werden, um Knistergeräusche durch
Wind oder Atem zu verringern.
Hinweise
Wenn der Windschutz durch Regen nass wird, nehmen Sie ihn vom Mikrofon ab
und lassen Sie ihn o, Schatten trocknen.
Anbringen des Mikrofons
Anbringen des Mikrofon-Abstandsstücks am Mikrofon
(Siehe Abbildung
)
Bringen Sie das Mikrofon-Abstandsstücks entlang der Linie am Gri des Mikrofons
(
a
) an.
Bringen Sie das Mikrofon-Abstandsstücks in der richtigen Position am Gri an, um
den Ton richtig einzufangen.
Einsetzen/Entnehmen der Batterie (Siehe Abbildung
)
Bei Verwendung einer Kamera, die nicht mit Einsteck-Stromversorgung kompatibel
ist, setzen Sie immer eine neue Batterie ein. Bei Verwendung einer Kamera, die
mit Einsteck-Stromversorgung kompatibel ist, brauchen Sie nicht eine Batterie im
Mikrofon einzusetzen.
Anweisungen zum Prüfen, ob Ihre Kamera mit Einsteck-Stromversorgung
kompatibel ist, nden Sie in der Gebrauchsanleitung Ihrer Kamera.
Hinweise
Verwenden Sie eine Alkali-Trockenbatterie im Format AA (R03, Mignon). Wenn
Sie eine andere Batterie verwenden (Mangandioxid-Batterie, Ni-MH-Akku usw.)
kann das Mikrofon möglicherweise nicht richtig funktionieren. Wir empfehlen
die Verwendung einer Sony-Batterie, um die technischen Daten wie Leistung,
Betriebszeit usw. voll auszunutzen.
Ersetzen Sie vor einer wichtigen Aufnahme die Batterie durch eine neue.
Schalten Sie die Stromversorgung des Mikrofons immer auf OFF und trennen das
Anschlusskabel ab, bevor Sie die Batterie einsetzen oder entfernen.
1 Prüfen Sie, ob das Anschlusskabel abgetrennt ist. Drehen Sie dann
den Gri und ziehen ihn, wie in der Abbildung gezeigt.
Der Gri kann nicht vollständig vom Mikrofonkörper getrennt werden. Ziehen
Sie ihn nicht gewaltsam.
2 Setzen Sie die Batterie ein.
Setzen Sie beim Einsetze der Batterie zuerst die Minusseite
und dann die
Plusseite
ein.
Entfernen Sie die Batterie mit den gleichen Schritten in umgekehrter Reihenfolge.
Hinweise
Zum Entfernen der Batterie vom Mikrofon fassen Sie die Plusseite
der Batterie
mit Ihrem Fingernagel.
Batteriewechselzeitraum
Wenn die Batterie ausreichende Stärke hat, bewirkt ein Umstellen des
Schiebeschalters von OFF auf ON, dass das Batterieprüämpchen kurz blinkt, um
die restliche Batteriestärke anzuzeigen. Falls das Batterieprüämpchen schwach oder
überhaupt nicht blinkt, ersetzen Sie die Batterie durch eine neue.
Hinweise zur Batterie
Falsche Behandlung der Batterie kann bewirken, dass diese leck wird oder birst.
Beachten Sie immer Folgendes.
Setzen Sie die Batterie mit richtiger Ausrichtung der Markierungen
und
ein.
Versuchen Sie nicht, die Batterie aufzuladen. Sie ist nicht auadbar.
Entnehmen Sie die Batterie, wenn das Mikrofon längere Zeit nicht verwendet
werden soll.
Wenn die Batterie leck wird*, wischen Sie jeglichen austretenden Elektrolyt aus
dem Batteriefach ab und setzen dann eine neue Batterie ein. (Wenn die Batterie
leck wird, müssen Sie das Mikrofon reparieren.)
Anbringen des Mikrofons an der Kamera
(Siehe Abbildung
)
1 Schalten Sie die Stromversorgung der Kamera aus.
Vor der Verwendung des Mikrofons schließen Sie immer den eingebauten
Blitz der Kamera. Bei Verwendung des Mikrofons mit einer Kamera, die
einen eingebauten Blitz mit Automatikblitzfunktion hat, stellen Sie die
Automatikblitzfunktion auf OFF.
2 Bringen Sie den Mikrofonhalter am Schuh der Kamera an.
Wenn Sie den Schuhadapter am Mikrofonhalter anbringen, kann dieser an einer
Kamera angebracht werden, die einen selbstarretierenden Zubehörschuh hat.
Verwenden Sie den Schuhadapter nach Bedarf, je nach Form des Schuhs an Ihrer
Kamera.
Bei Verwendung einer Kamera mit Zubehörschuh
(Siehe Abbildung
-2
)
Schieben Sie den Mikrofonhalter vollständig auf den Zubehörschuh der
Kamera und drehen den Verriegelungsknopf vollständig zum Befestigen.
Bei Verwendung der Kamera mit selbstarretierendem Zubehörschuh
(Siehe Abbildung
-2
)
Schieben Sie den Schuhadapter vollständig auf den selbstarretierenden
Zubehörschuh der Kamera. Schieben Sie dann den Mikrofonhalter voll auf
den Schuhadapter und drehen Sie den Verriegelungsknopf fest zum Befestigen.
3 Bringen Sie das Mikrofon am Mikrofonhalter an.
Lösen Sie die Schnalle des Mikrofonhalters und bringen Sie das Mikrofon an.
Setzen Sie das Mikrofon-Abstandsstück am Mikrofon auf den Mikrofonhalter.
Bringen Sie das Mikrofon mit seinem Strom/Trittschall-Schalter nach oben
weisend an, um das richtige Aufnahmemuster zu erhalten.
4 Entscheiden Sie die Position des Mikrofons und verriegeln Sie die
Schnalle am Mikrofonhalter.
5 Schließen Sie das Anschlusskabel an der Mikrofon-Eingangsbuchse
der Kamera an.
6 Setzen Sie das zusätzliche Anschlusskabel in die Kabelklemme.
Beim Einsetzen des Anschlusskabels in die Kabelklemme verlegen Sie das Kabel
um die Objektivseite.
Verwendung des Mikrofons
Nachdem Sie die Kamera eingeschaltet haben, stellen Sie den Schiebeschalter des
Mikrofons auf ON und verwenden des im gewünschten Modus.
Hinweise
Wenden Sie beim Drehen des Verriegelungsknopfes oder Anbringen des
Schuhs keine Gewalt an. Dadurch könnten Beschädigungen verursacht
werden.
Halten Sie die Kamera nicht am an die Kamera angebrachten Mikrofon
oder Mikrofonhalter.
Wenn Sie den Modus während der Aufnahme umschalten, kann ein
Berührungsgeräusch aufgenommen werden.
Anbringen des Windschutzes
Bringen Sie den Windschutz an, um zu verhindern, dass Windgeräusche
aufgenommen werden.
Abnehmen des Mikrofons von der Kamera
Nehmen Sie das Mikrofon von der Kamera ab, indem Sie die Schritte zum
Anbringen in umgekehrter Reihenfolge ausführen.
Wenn der Schuhadapter an der Kamera angebracht ist, schieben Sie den
Schuhadapter, während Sie gleichzeitig den Freigabeknopf gedrückt halten.
Technische Daten
Typ Elektret-Kondensatormikrofon
Stromversorgung Kombination von Alkali-Trockenbatterie
im Format AA (R6, Mignonzelle) und
Einsteckstromversorgung
Empfohlene Batterie Alkali-Trockenbatterie im Format AA (R03,
Mignon) (getrennt erhältlich)
Leistungsaufnahme Ca. 0,5 mW
Ausgangsbuchse ø 3,5 goldbeschichteter L-Typ-Stereo-
Ministecker Kabellänge Ca. 35 cm
Schalter Strom OFF/NORM (Normal)/LOW CUT
(Trittschall)
Dauerbetriebszeit 900 Stunden oder mehr
(Betrieb bei 25 °C)
Abmessungen Ca. ø 21 mm × 261 mm
(ohne Kabel)
Gewicht Ca. 85 g (ohne Batterie)
Richtcharakteristik Scharfe Richtcharakteristik
Mitgeliefertes Zubehör Richtrohr-Mikrofon (1), Windschutz (1),
Mikrofonhalter mit elastischer Auängung
(1), Mikrofon-Abstandsstück (1),
Schuhadapter (1), Anleitungen
Frequenzgang 40 Hz ~ 20 kHz
Empndlichkeit -48 dB/Pa ±4 dB
Signal-/Rauschabstand 18 dBspl (Durchschnitt)
Maximaler Eingangsschalldruckpegel 100 dBspl oder mehr
Dynamikumfang 80 dB oder mehr
Betriebstemperatur 0 °C bis 40 °C
Lagertemperatur -20 °C bis +60 °C
Änderungen bei Design und technischen Daten bleiben ohne vorherige
Ankündigung vorbehalten.
Este micrófono de cañón (a partir de ahora “micrófono”) es para utilizarse con una
videocámara y una cámara fotográca Sony con toma de entrada para micrófono
y operación de alimentación a través de la clavija (a partir de ahora “cámara”). Este
micrófono se alimenta con una pila alcalina AA.
< Aviso para los clientes de países en los que se aplican las directivas de la
UE >
El fabricante de este producto es Sony Corporation, 1-7-1 Konan Minato-ku Tokyo,
108-0075, Japón. El representante autorizado en lo referente al cumplimiento de
la directiva EMC y a la seguridad de los productos es Sony Deutschland GmbH,
Hedelnger Strasse 61, 70327 Stuttgart, Alemania. Para resolver cualquier asunto
relacionado con el soporte técnico o la garantía, consulte las direcciones que
se indican en los documentos de soporte técnico y garantía suministrados por
separado.
Para los clientes en Europa
Tratamiento de los equipos eléctricos y electrónicos al nal de
su vida útil (aplicable en la Unión Europea y en países europeos
con sistemas de recogida selectiva de residuos)
Este símbolo en el equipo o el embalaje indica que el presente
producto no puede ser tratado como residuos domésticos normales,
sino que debe entregarse en el correspondiente punto de recogida de
equipos eléctricos y electrónicos. Al asegurarse de que este producto
se desecha correctamente, Ud. ayuda a prevenir las consecuencias
negativas para el medio ambiente y la salud humana que podrían
derivarse de la incorrecta manipulación en el momento de deshacerse
de este producto. El reciclaje de materiales ayuda a conservar los
recursos naturales. Para recibir información detallada sobre el reciclaje
de este producto, póngase en contacto con el ayuntamiento, el punto
de recogida más cercano o el establecimiento donde ha adquirido el
producto.
Características
Micrófono de direccionalidad bien denida con sensibilidad mínima al
ruido ambiental
La direccionalidad bien denida del micrófono mejora la grabación en un margen
estrecho y distancia media cuando se conecta a su cámara (Consulte la ilustración
).
Alimentado mediante una combinación de pila alcalina AA y operación de
alimentación a través de la clavija
La alimentación se suministra desde la toma de entrada de micrófono de su
cámara o una pila alcalina AA (a partir de ahora “pila”).
Soporte elástico para micrófono suministrado
El soporte para micrófono suministrado reduce el ruido de vibración cuando se
ja el micrófono a la cámara.
Notas sobre la utilización
El micrófono es un dispositivo delicado. No lo deje caer ni lo someta a golpes
excesivos.
Durante la grabación de una película, es posible que se graben ruidos de operación
o pitidos de la cámara o del objetivo. Puede evitar el ruido procedente del objetivo
ajustando en el modo de enfoque manual.
Evite la utilización o el almacenamiento prolongados en lugares de gran humedad
o alta temperatura.
No permita que el micrófono se humedezca con la lluvia o el agua del mar cuando
lo utilice en exteriores.
El micrófono no posee especicaciones de resistencia al polvo ni a las salpicaduras.
Elimine cualquier suciedad del micrófono con un paño seco.
Si se produce retroalimentación acústica (sonido de aullido oído a través de los
altavoces) cuando lo utilice, apunte con él alejándolo de los altavoces o aumente la
distancia ente el micrófono y los altavoces.
Tenga cuidado de no dejar caer ni volcar su cámara enganchando el cable conector
en un objeto de los alrededores cuando je el micrófono.
Pruebe con antelación la grabación con este micrófono para cerciorarse de que
grabe adecuadamente.
Nombres y funciones de las partes
(Consulte la ilustración
)
* La cámara de la ilustración es la SLT-A55V/NEX-VG10.
Cuerpo del micrófono
Deslice el interruptor (Alimentación OFF/NORM (Normal)/LOW CUT
(Corte bajo))
Ajuste el interruptor de acuerdo con la fuente de sonido.
ON La alimentación se conecta.
NORM Para captar sonido de forma natural desde la gama de
bajos tonos a la de altos tonos.
LOW CUT Para cortar efectivamente la gama de tonos bajos a
n de reducir el ruido del viento, la vibración o el aire
acondicionado.
OFF La alimentación se desconecta.
Lámpara de comprobación de la pila
Si la pila tiene suciente energía, cuando deslice el interruptor de OFF a ON,
la lámpara de comprobación de la pila parpadeará momentáneamente para
indicar el nivel de pila restante.
Notas
Cuando la alimentación se suministre a través de la clavija, la lámpara de
comprobación de la pila no parpadeará.
Cuando la lámpara de comprobación de la pila parpadea débilmente o no
parpadea en absoluto, reemplace la pila por otra nueva.
Los modelos compatibles con alimentación a través de la clavija pueden
alimentarse con la toma de entrada de micrófono.
Cable conector
Conecte la toma de salida del micrófono a la toma de entrada de micrófono
de su cámara.
Empuñadura
Soporte de micrófono
Inserte el micrófono para jar a la cámara.
Perilla de bloqueo
Utilice la perilla de bloqueo para jar el patín para accesorios.
Separador de micrófono
Fíjelo al micrófono para jarlo al soporte de micrófono.
Patín para accesorios
Utilice el patín para accesorios cuando use un micrófono con una cámara α Sony.
Zapata para accesorios
Pata de bloqueo automático
Botón de liberación del micrófono
Parabrisas
Colóquelo en el micrófono para reducir el ruido causado por el viento o el
aliento.
Notas
Si el parabrisas se humedece con la lluvia, quítelo del micrófono y deje que se
seque a la sombra.
Fijación del micrófono
Fijación del separador de micrófono al micrófono
(Consulte la ilustración
)
Fije el separador de micrófono a lo largo de la línea de la empuñadura del micrófono
(
a
).
Fije el separador de micrófono en la posición correcta de la empuñadura para captar
adecuadamente el sonido.
Inserción/extracción de la pila (Consulte la ilustración
)
Cuando utilice una cámara que no sea compatible con alimentación a través de la
clavija, cerciórese de insertar una pila nueva. Cuando utilice una cámara que no sea
compatible con alimentación a través de la clavija, cerciórese de insertar una pila
nueva.
Para saber si su cámara es compatible con alimentación a través de la clavija,
consulte el manual de instrucciones de su cámara.
Notas
Utilice una pila alcalina de tamaño AA. Si utilizase otra pila (pila de dióxido
de magnesio, batería de Ni-MH, etc.), el micrófono podría no funcionar
correctamente. Le recomendamos utilizar una pila Sony para sacar el máximo
partido posible de las especicaciones del micrófono, el rendimiento y el tiempo
de funcionamiento, etc.
Antes de una grabación importante, reemplace la pila por otra nueva.
Antes de insertar o extraer la pila, cerciórese de poner en OFF la alimentación del
micrófono y de desconectar el cable conector.
1 Compruebe que el cable conector esté desconectado. Después gire
la empuñadura y tire de ella como se muestra en la ilustración.
La empuñadura no puede separarse completamente del cuerpo del micrófono.
No tire de ella a la fuerza.
2 Inserte la pila.
Cuando inserte la pila, hágalo con su lado
en primer lugar, y después inserte
el lado
.
Extraiga la pila siguiendo el proceso inverso.
Notas
Para extraer la pila del micrófono. sujete el lado
con una uña.
Período de reemplazo de la pila
Si la pila tiene suciente energía, cuando cambie el interruptor deslizante de OFF
a ON, la lámpara de comprobación de la pila parpadeará momentáneamente para
indicar el nivel de pila restante. Si la lámpara de comprobación de la pila parpadea
débilmente o no parpadea en absoluto, reemplace la pila por otra nueva.
Notas sobre la pila
El mal uso de la pila puede causar fugas o su ruptura. Tenga en cuenta siempre lo
siguiente.
Instale la pila con la orientación correcta de
y
.
No intente recargar la pila. No es recargable.
Cuando no vaya a utilizar el micrófono durante mucho tiempo, extráigale la pila.
Si la pila tiene fugas*, limpie cuidadosamente el electrólito del compartimiento de
la pila y después instale una nueva pila. (Si la pila tiene fugas, tendrá que reparar
el micrófono.)
Fijación del micrófono a la cámara
(Consulte la ilustración
)
1 Apague la cámara.
Antes de utilizar el micrófono, cerciórese de cerrar el ash incorporado de
la cámara. Cuando utilice el micrófono con una cámara que posea ash
incorporado con función de ash automático, ajuste dicha función a OFF.
2 Fije el soporte de micrófono a la zapata de la cámara.
Si ja el patín para accesorios al soporte de micrófono, podrá jarlo a una
cámara que posea una zapata de accesorios de bloqueo automático. Utilice el
patín para accesorios cuando sea necesario dependiendo de la forma del patín de
su cámara.
Cuando utilice una cámara con zapata de accesorios
(Consulte la ilustración
-2
)
Deslice el soporte de micrófono completamente en la zapata de accesorios de
la cámara y gire completamente la perilla de bloqueo para jarla.
Cuando utilice una cámara con zapata de accesorios de bloqueo
automático (Consulte la ilustración
-2
)
Deslice el patín para accesorios completamente en la zapata de accesorios de
bloqueo automático de la cámara. Después deslice el soporte de micrófono
completamente en el patín para accesorios y gire la perilla de bloqueo para
jarlo.
3 Fije el micrófono al soporte de micrófono.
Suelte la hebilla del soporte de micrófono y je el micrófono. Fije el separador de
micrófono al micrófono en el soporte de micrófono.
Fije el micrófono con su interruptor de alimentación/corte bajo encarado hacia
arriba para obtener el patrón de captación correcto.
4 Decida la posición del micrófono y cierre la hebilla del soporte de
micrófono.
5 Conecte el cable conector a la toma de entrada de micrófono de la
cámara.
6 Fije el cable conector extra a la abrazadera para el cable.
Cuando je el cable conector en la abrazadera para el cable. coloque el cable
alrededor del lado del objetivo.
Utilización del micrófono
Después de encender la cámara, ponga el interruptor deslizable del micrófono en
ON y utilícelo en el modo deseado.
Notas
No utilice la fuerza para girar la perilla de bloqueo ni para jar la zapata.
Si lo hicieses, podría causar daños.
No sujete la cámara por el micrófono ni por el soporte de micrófono jado
a la cámara.
Si cambia el modo durante la grabación, es posible que se grabe ruido.
Fijación del parabrisas
Fije el parabrisas para evitar que se grabe el sonido del viento como ruido.
Extracción del micrófono de la cámara
Extraiga el micrófono de la cámara siguiendo el procedimiento inverso al de jación.
Si ja el patín para accesorios a la cámara, deslice el patín para accesorios mientras
presione el botón de liberación del micrófono.
Especicaciones
Tipo Micrófono electrostático de electreto
Fuente de alimentación Combinación de pila alcalina AA y alimentación
a través de la clavija
Pila recomendada Pila alcalina de tamaño AA y (vendida aparte)
Consumo de energía Aprox. 0,5 mW
Toma de salida Cable con miniclavija estéreo tipo L con
recubrimiento de oro de ø 3,5 con longitud de
aprox. 35 cm
Interruptor Alimentación OFF / NORM (Normal) / LOW
CUT (Corte bajo)
Tiempo continuo de
funcionamiento
900 horas o más
(Utilización a 25 °C)
Dimensiones Aprox. ø 21 mm × 261 mm
(excluyendo el cable)
Peso Aprox. 85 g (excluyendo la pila)
Direccionalidad Direccionalidad bien denida
Elementos incluidos Micrófono de cañón (1), Parabrisas (1), Soporte
para micrófono con montura antigolpes (1),
Separador de micrófono (1), Patín para
accesorios (1), Juego de documentación impresa
Respuesta en frecuencia 40 Hz ~ 20 kHz
Sensibilidad -48 dB/Pa ±4 dB
Relación señal-ruido 18 dBspl (Promedio)
Nivel máximo de presión acústica
de entrada
100 dBspl o más
Gama dinámica 80 dB o más
Temperatura de funcionamiento 0 °C a 40 °C
Temperatura de almacenamiento -20 °C a +60 °C
El diseño y las especicaciones están sujetos a cambio sin previo aviso.
Auto-lock Accessory Shoe