


STRDA6400ESUC 3-875-815-11(1) GB
Calibrating the appropriate speaker settings
automatically (Auto Calibration)
You can set up the speakers to obtain the desired sound from all
connected speakers automatically by using the auto calibration
function.
Before you perform the auto calibration
During the calibration, the sound that comes out of the speakers is very
loud. Pay attention to the presence of children or to the effect on your
neighborhood.
Perform the measurement in a quiet environment to avoid the effect of noise
and get a more accurate measurement.
If there are any obstacles in the path between the optimizer microphone and
the speakers, the calibration cannot be performed correctly. Remove any
obstacle from the measurement area to avoid measurement error.
1
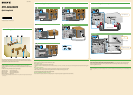
Install and connect the speakers and TV.
For detail, see front page.
2
Connect the supplied optimizer microphone to
the AUTO CAL MIC jack.
The AUTO CAL MIC jack is used for the supplied optimizer
microphone only. Do not connect other microphones. Doing
so may damage the receiver and the microphone.
3
Set up the optimizer microphone.
Place the optimizer microphone at your seating position. Use
a stool or tripod so that the optimizer microphone remains
at the same height as your ears. Orient the L end of the
optimizer microphone toward the front left speaker and the
R end of the optimizer microphone toward the front right
speaker.
On setting up the active subwoofer
When a subwoofer is connected, turn on the subwoofer and turn
up the volume beforehand. Turn the MASTER VOLUME knob
to just before the mid-point.
If you connect a subwoofer with the crossover frequency
function, set the value to maximum.
If you connect a subwoofer with an auto standby function, set it
to off (deactivated).
Performing auto calibration
The auto calibration function allows you to measure the following:
speaker connections, polarity of speakers, speaker distance,
speaker angle, speaker size, speaker level, frequency characteristics.
1
Connect a TV monitor to this receiver.
Refer to “3: Connecting the monitor” in the operating
instructions.
2
Turn on the receiver and the TV.
Switch the input of the TV so that an image of the menu is
displayed.
3
Press AMP.
The receiver can be operated using the remote.
4
Press GUI MODE.
After “GUI MODE ON” has appeared in the display window
of the receiver, “GUI MODE” appears.
The menu is displayed on the TV screen.
5
Press
/
repeatedly to select “ Settings,” then
press or
.
The Settings menu list appears on the TV screen.
6
Press
/
repeatedly to select “Auto Calibration,”
then press or
.
7
Press
/
repeatedly to select “Quick Setup,” then
press .
The screen on which you can select the item to be measurered
appears.
8
Press
/
repeatedly and to un-check the items
you do not want to measure, then press
.
The confirmation screen, asking whether you are ready to
start measurement, appears.
9
Press to select “Start.”
The measurement starts in five seconds.
When the measurement ends, a beep sounds and the
measurement result appears on the TV screen.
10
Press to select “Next.”
11
Press
/
repeatedly to select “Yes,” then press
.
The selecting screen of the calibration type appears.
12
Press
/
repeatedly to select the auto calibration
type, then press .
Parameter Explanation
Full Flat Makes the measurement of frequency from
each speaker flat.
Engineer Sets the frequency to one that matches that
of the Sony listening room standard.
Front Reference Adjusts the characteristics of all the
speakers to match the characteristics of the
front speaker.
OFF Sets the auto calibration EQ to off.
The measurement results are saved.
13
Press
.
The exit screen appears.
14
Press .
When error codes appear
When “Save auto calibration (auto speaker setup)?” appears on
the TV screen in step 10, you can select whether to confirm the
warning (“Yes”) or not (“No”). Follow the instructions of the TV
screen when you select “Yes.” For details on warning and error
codes, see “Message list after auto calibration measurement” in “9:
Calibrating the appropriate speaker settings automatically (Auto
Calibration)” in the operating instructions.
Tip
The size of a speaker (LARGE/SMALL) is determined by the low characteristics.
The measurement results may vary, depending on the position of the optimizer
microphone and speakers, and the shape of the room. It is recommended that
you follow the measurement results. However, you can change those settings
in the Speaker settings menu. Save the measurement results first, then try to
change the settings if you want.
To select the language displayed on the TV
screen
You can select the language to be used for messages on the TV
screen from 4 languages.
English
Español
Français
Deutsch
For details, see “ System settings” in the operation instructions.
Setting up other components
You should set up each component so that take out sound is
output from speakers correctly when you play back a connected
component. The following case describes Sony components. Refer
to the operating instructions supplied with each component.
Sony Super Audio CD player
Select a suitable playback area (multi-channel or 2 channel).
Sound may come out from only the front speaker left/right when 2
channel is selected.
After the setting
The receiver is now ready to use. Refer to the operating instruction
supplied with the receiver for details.
AUTO CAL MIC
3
4
5-14
4 GUI MODE
5
/
, /
6
/
, /
7
/
,
8
/
, ,
9
10
11
/
,
13