


7
SONANCE SYMPHONY
®
SST, SSTR and SRS1
Insulating the Ceiling Cavity
You can also reduce sound transmission to adjacent rooms and improve speaker performance by inserting a sheet of unfaced fiberglass insulation over the
back of the speaker. To reduce mechanical noise produced by unsupported drywall, install fiberglass insulation in the ceiling bays adjacent to the speaker
location.
Sonafill
®
Sonafill is a retrofittable acoustical treatment system consisting of two pillows and four tiles that virtually eliminates noises produced by resonating drywall. The
tiles have pressure-sensitive adhesive and are installed on the back of the drywall on either side of the speaker between the joists or studs; the pillows are then
stuffed in place behind the tiles. The system dramatically improves midbass sound quality and reduces sound transmission into adjacent rooms.
INSTALLING THE SPEAKERS
Before Installation: New Construction
For installations in new construction, Sonance recommends using a Symphony FlexBracket (SSTR/SRS1 part # 92337; SST part # 92336) to reserve a
location for the speaker. The FlexBracket has perforated wings that can be positioned at any angle around the bracket, and is nailed or screwed to the
studs. This serves as a guide for the drywaller so that the speaker hole will be in the desired location once the drywall is installed.
Before Installation: Retrofit
1. Determine the location for the speaker (see
Speaker Placement
on page 4).
2. Perform an obstruction sur vey to be certain that there are no studs , conduit, pipes, heating ducts or air returns in the ceiling cavity that will interfere
with the speaker.
3. The cutout for the S623
SSTR, S621SSTR and SRS1 speakers is 8
5
/
32
” (207mm) in diameter. There also must be at least 5
3
/
16
” (152mm) depth within the ceiling
cavity. The cutout for the S623SST is 6
13
/
16
" x 10
11
/
16
" (172mm x 270mm), and there must be at least 3
7
/
8
” (86mm) depth within the wall cavity.
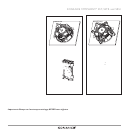
4. Position the included cutout template where the speaker is to be located and pencil an outline on the ceiling or wall.
• If you are unsure about obstructions, drill a small hole in the center of the outline and insert a coat hanger wire into the hole to feel-around for
possible obstructions.
5. Cut the mounting hole using a drywall saw, and run the speaker wires from the mounting hole to the amplifier location.
• Consult local building codes before running speaker wires through ceilings and walls.
Installation
Sonance Symphony SST/SSTR and SRS1 speakers feature exclusive FastMount
®
tabs and an integral RotoLock
®
mounting system for quick mounting directly
into existing ceilings and walls.
WARNING:The edges of FastMount tabs are very sharp. Use caution when handling the speaker.
1. Remove the paint plug from the speaker.
2. Run speaker wire from each speaker to the amplifier location.
3. Strip ¼” – ½” of insulation from each speaker lead. Twist the strands or tin the exposed wire with solder to ensure that there are no stray strands.
(Stray strands that touch each other can cause a short-circuit that can damage your amplifier.)