


5
Interchangeable Nozzle Insert
Three varieties of nozzle insert provide customizable frequency
responses for a personalized listening experience. Use these in-
structions to replace or clean the nozzle insert.
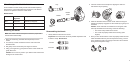
Nozzle Inserts
Color Sound
Signature
Response
Blue Balanced Neutral (as shipped)
White Bright +2.5 dB, 1 kHz to 8 kHz
Black Warm −2.5 dB, 1 kHz to 8 kHz
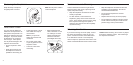
Removing the Nozzle
Note: The nozzle contains small parts. Choose a proper work
surface before disassembly.
1. Place the nozzle key (included with earphones) over the
nozzle.
2. Turn the key counter-clockwise to loosen and remove the
threaded collar.
3. Pull gently on the nozzle with your fingers to remove.
4. Using your fingers only, grasp the end of the nozzle insert and
gently slide it out.
Caution: Do not use any tools or your teeth as this could cause
damage to the nozzle insert.
Nozzle
Threaded
collar
Nozzle
insert
Key
Reassembling the Nozzle
1. Gently slide the insert into the nozzle.
Important: The insert needs to be fully seated. Reposition until
it slides in easily. Do not force.
Correct
Incorrect
2. Insert the nozzle into the earphone, aligning the dots so it
matches the keyed opening.
3. Place the threaded collar over the nozzle. After ensuring the
threads are properly engaged, use the nozzle key to gently turn
clockwise.
Caution: There should be no resistance to turning the collar
until fully threaded into the housing. Check the following:
• The insert is fully seated in the nozzle.
• The nozzle is properly seated in the housing (dots
aligned).
4. Once you are certain that the nozzle is properly seated and the
collar threaded all the way into the earphone housing, use the
key to tighten the collar just enough to ensure it will not loosen
during normal earphone usage.