English
5
Setting Low-Frequency Response
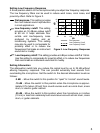
A three-position switch on the microphone lets you adjust low frequency response.
The low frequency filters can be used to reduce wind noise, room noise, and
proximity effect. Refer to Figure 2.
20 100050 100
98765432
+5
0
–10
Hz
dB
Low-Frequency Cutoff
Low-Frequency Rolloff
Flat Response
Figure 2. Low Frequency Response
s
Flat response. This setting provides
the most natural sound reproduction
in most applicatons.
Low-frequency cutoff. This setting
provides an 18 dB-per-octave cutoff
at 80 Hz. It helps eliminate floor
rumble and low-frequency noise
produced by heating and air
conditioning systems. This setting
may also be used to compensate for
proximity effect or to reduce low
frequencies that make an instrument
sound dull or muddy.
Low-frequency rolloff. This setting provides a 6 dB-per-octave rolloff at 115 Hz.
Use this setting to compensate for proximity effect or to reduce low frequencies
that could make an instrument sound dull or muddy.
Setting Attenuation
The attenuation switch lets you reduce the signal level by up to 25 dB without
altering frequency response. This can prevent extremely loud sounds from
overloading the microphone. Set the switch to the desired attenuation levels as
follows:
0 dB – Move the switch to this position for “quiet” to “normal” sound levels.
-15 dB – Move the switch to this position when the microphone is approxi-
mately 0.75 meters (2 feet) from sound sources such as a kick drum, snare
drum, or electric guitar cabinet.
-25 dB – Move the switch to this position when the microphone is 4 inches
(10 cm) or less from extremely loud sound sources such as kick drum, snare
drum, or guitar cabinets.


