


Fig.5
CONNECTIONS
External microphone
Connect an external microphone (not supplied) to the MIC socket. (the
built-in microphone is automatically disconnected.)
Earphone
Connect an earphone (not supplied) to the EAR socket for private
listensing.
(The speaker is automatically disconnected.)
CONEXÕES
Microfone externo
Ligue o microfone externo (não incluso) à entrada MIC (o microfone
interno é automaticamente desligado).
Fone de ouvido
Ligue o fone de ouvido (não incluso) à entrada EAR para escutar
individualmente. (o alto falante é automaticamente desligado.)
CONEXIONES
Micrófono externo
Conecte un micrófono externo (no suministrado) al conector MIC.
(el micrófono integrado se desconectará automáticamente.)
Auriculares
Conecte unos auriculares (no suministrados) al conector EAR para
escuchar las grabaciones en privado. (El altavoz se desconectará
automáticamente.)
CONNEXIONS
Microphone externe
Connectez un microphone externe (non fourni) à la prise d’entrée
MIC. (le microphone est automatiquement déconnecté.)
Ecouteur
Connectez un écouteur (non fourni) à la prise d’entrée EAR pour une
écoute privée. (Le haut-parleur est automatiquement déconnecté.)
ANSCHLÜSSE
Externes Mikrofon
Schließen Sie ein externes Mikrofon (nicht mitgeliefert) an die MIC-
Buchse an (das eingebaute Mikrofon wird automatisch deaktiviert).
Kopfhörer
Schließen Sie zum privaten Hören die Kopfhörer (nicht mitgeliefert) an
die EAR-Buchse an (der Lautsprecher wird automatisch deaktiviert).
ENREGISTREMENT:
1. Ouvrez le compartiment cassette.
2. Insérez une cassette, face de lecture souhaitée orientée vers
l’extérieur (visible à travers la fenêtre du compartiment) comme
indiqué en Fig. 4.
3. Fermez le compartiment cassette.
4. Réglez le bouton interrupteur VAS sur OFF (pour un enregistrement
normal) ou sur ON (pour activer le système à commande vocale).
5. Appuyez sur la touche RECORD. La touche PLAY est
automatiquement engagée. Le voyant Enregistrement va alors
s’allumer.
6. Placez le magnétophone à proximité de la source du son.
VAS ON: Enregistrement à commande vocale
Lorsque vous parlez, l’appareil démarre l’enregistrement.
Lorsque vous arrêtez de parler aussi longtemps que pendant 2
à 6 secondes, l’appareil arrête l’enregistrement (les variations de
niveau de voix n’arrêtent pas l’enregistrement).
Utilisez la manette de réglage –VOL+/VAS SENS an d’ajuster la
sensibilité du microphone à votre voix. Si les voix n’activent pas
l’enregistrement, veuillez monter le volume. Si l’enregistrement ne
s’arrête pas lorsque la conversation s’arrête, veuillez baisser le
volume.
NOTE
Si les tous premiers mots que vous énoncez activent
l’enregistrement mais ne sont pas enregistrés, veuillez dire un mot
de plus an de démarrer l’enregistrement avant de commencer
à dicter. (pour des enregistrements importants, veuillez régler le
bouton interrupteur VAS sur OFF.)
VAS OFF: Enregistrement standard
L’enregistrement continue jusqu’à ce que vous appuyiez sur la
touche STOP/EJECT.
7. Appuyez sur la touche STOP pour arrêter l’enregistrement.
AVANCE RAPIDE et REMBOBINAGE:
Pour faire avancer rapidement la bande ou la rembobiner, appuyez
sur la touche F.FWD ou REW. Pour arrêter la bande à l’endroit
souhaité ou dès que la n de la bande est atteinte, appuyez à
nouveau sur la touche STOP.
Fonctionnement de l’arrêt temporaire
Faites glisser le bouton interrupteur PAUSE vers la droite. Faites le
glisser vers la gauche pour revenir au fonctionnement en cours.
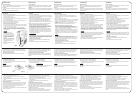
Protections contre un effacement non volontaire (Fig.5)
Pour protéger la face A, veuillez retirer l’ergot de sûreté (1).
Pour protéger la face B, veuillez retirer l’ergot de sûreté (2).
- Pour effacer ou enregistrer une cassette protégée, couvrez les
ouvertures de l’ergot de sûreté avec du ruban adhésif (3).
NOTE
Lorsque vous utilisez une cassette protégée, vous ne pouvez pas
appuyer sur la touche REC.
LECTURE
1. Insérez la micro-cassette comme indiqué en Fig. 4.
2. Réglez le bouton interrupteur SPEED sur Low (faible) ou Nor
(normal) an de correspondre à la vitesse de la bande enregistrée.
3. Appuyez sur la touche PLAY et ajustez la manette de réglage
–VOL+/VAS SENS.
4. Appuyez sur la touche STOP/EJECT pour arrêter la lecture.
Système d’Arrêt Automatique
Au cours de l’enregistrement ou de la lecture, lorsque la n de la
bande est atteinte, la platine à cassettes s’arrête automatiquement
et les touches sont relâchées. Ce système ne fonctionne pas lors du
fonctionnement de l’avance rapide ou du rembobinage. En ce cas,
veuillez ne pas oublier d’appuyer sur la touche STOP lorsque la n
de la bande est atteinte.
Exemple (Lorsque vous utilisez une cassette C-60):
Appuyez sur la touche STOP après qu’environ 2 minutes se soient
écoulées en avance rapide ou rembobinage.
AUFNAHME:
1. Öffnen Sie das Batteriefach.
2. Legen Sie eine Kassette mit der gewünschten Seite nach außen
zeigend (durch das Fenster sichtbar) ein, wie in Abb. 4 dargestellt.
3. Schließen Sie das Kassettenfach.
4. Stellen Sie den VAS Schalter auf OFF (zur normalen Aufnahme)
oder ON (zur Aktivierung des Sprachaktivierungssystems).
5. Drücken Sie die RECORD-Taste. Die PLAY-Taste wird dabei
automatisch heruntergedrückt. Der Aufnahmeindikator leuchtet nun
auf.
6. Stellen Sie den Rekorder in der Nähe der Geräuschquelle auf.
VAS ON: über Stimme aktivierter Aufnahmestart
Wenn Sie sprechen, startet das Gerät die Aufnahme. Wenn
Sie über eine Dauer zwischen 2 und 6 Sekunden aufhören zu
sprechen, stoppt das Gerät die Aufnahme (Schwankungen in der
Stimmlautstärke brechen die Aufnahme nicht ab).
Nutzen Sie den –VOL+/VAS SENS Regler zum Anpassen der
Empndlichkeit des Mikrofons an Ihre Stimme. Wenn Stimmen
die Aufnahme nicht starten, erhöhen Sie die Lautstärke. Wenn
die Aufnahme nicht abbricht, wenn nicht mehr gesprochen wird,
verringern Sie die Lautstärke.
ANMERKUNG
Wenn die ersten paar Worte die Aufnahme zwar starten, aber nicht
aufgenommen werden, sprechen Sie ein zusätzliches Wort zum
Starten der Aufnahme bevor Sie diktieren (für wichtige Aufnahmen:
den VAS-Schalter auf OFF stellen).
VAS OFF: Standardaufnahme
Die Aufnahme wird fortgesetzt, bis die STOP/EJECT-Taste
gedrückt wird.
7. Drücken Sie die STOP-Taste zum Anhalten der Aufnahme.
SCHNELLER VORLAUF und RÜCKLAUF:
Um schnell vor- oder zurückzuspulen, drücken Sie die F.FWD
oder REW-Taste. Drücken Sie die STOP/EJECT-Taste, wenn die
gewünschte Stelle oder das Bandende erreicht wurde.
Vorübergehendes Anhalten des Betriebes
Schieben Sie den PAUSE Schalter nach rechts zur Anhalten des
Betriebes. Schieben Sie ihn nach links zur Wiederaufnahme des
Betriebs.
Sicherheitsmaßnahmen gegen versehentliches Löschen (Abb.5)
Zum Schutz der Seite A: Lasche herausbrechen (1).
Zum Schutz der Seite B: Lasche herausbrechen (2).
- Zum Löschen oder Aufnehmen auf geschützter Kassette: Öffnung
mit Klebeband abkleben (3).
ANMERKUNG
Die REC-Taste kann bei herausgebrochener
Lasche nicht gedrückt werden.
WIEDERGABE
1. Legen Sie die Mikrokassette wie in Abb. 4 dargestellt ein.
2. Stellen Sie den SPEED-Schalter auf low (niedrig) oder Nor (normal),
entsprechend der Aufnahmegeschwindigkeit.
3. Drücken Sie die PLAY-Taste und passen Sie den –VOL+/VAS
SENS -Regler an.
4. Drücken Sie die STOP/EJECT-Taste zum Anhalten der
Wiedergabe.
System zum automatischen Anhalten
Das Kassettendeck stoppt während der Aufnahme oder Wiedergabe
automatisch am Ende des Bandes und die Tasten werden entriegelt.
Das System funktioniert nicht im schnellen Vorlauf oder Rücklauf.
Stellen Sie sicher, dass Sie die STOP-Taste drücken, wenn das Ende
des Bandes erreicht wurde.
Beispiel (unter Nutzung einer C-60 Kassette):
Drücken Sie während des schnellen Vorlaufs und Rücklaufs die
STOP-Taste, nachdem ungefähr 2 Minuten verstrichen sind.
RECORDING:
1. Open the cassette compartment.
2. Install a cassette with desired side facing outward (visible through
window) as shown in Fig. 4.
3. Close the cassette compartment.
4. Set the VAS switch to OFF (for normal recording) or ON (to activate
the voice activated system).
5. Press the RECORD button. The PLAY button will automatically
engage. The Record indicator will alight.
6. Place the recorder close to the sound source.
VAS ON: Voice activated recording
When you talk, the unit will start recording. When you stop talking
for as long as 2 to 6 seconds, the unit will stop recording (variations
in voice level do not stop recording).
Use the –VOL+/VAS SENS control to adjust the microphone
sensitivity to your voice. If voices are not activating recording,
increase the volume. If recording does not stop when talking stops,
decrease volume.
NOTE
If the rst few words you
speak activate recording but
are not recorded, say an extra
word to start recording before
you dictate. (For important
recordings, set the VAS switch
to OFF.)
VAS OFF: standard recording
Recording will continue until
the STOP/EJECT button is
pressed.
7. Press the STOP button to stop
recording.
FAST FORWARD and REWIND:
To rapidly advance or rewind the tape, press the F.FWD or REW
button. To stop the tape at the desired position or once the tape has
ended press STOP button again.
Temporarily stopping operation
Slide the PAUSE switch right. Slide it left to resume operation.
Safeguards against accidental erasure (Fig. 5)
To protect side A, break out tab (1).
To protect side B, break out tab (2).
- To erase or record a protected cassette, cover the tab openings
with adhesive tape (3).
NOTE
The REC button cannot be
depressed when using a
protected cassette.
PLAYBACK
1. Load the micro-cassette as shown in Fig. 4.
2. Press the SPEED switch to low or Nor to correspond with the
recorded tape speed.
3. Press the PLAY button and adjust the –VOL+ or –VOL+/VAS SENS
control.
4. Press the STOP/EJECT button to stop playback.
Automatic Stop system
At the end of the tape while recording or playing back, the cassette
deck stops automatically and the buttons are released. This system
does not work in fastward and rewind operation. Be sure to press
STOP button when the end of the tape has been reached.
Example (When using C-60 tape):
Press TOP button after approximately 2 minutes have elapsed under
fast forward and rewind.
GRABACIÓN
1. Abra el compartimento del cassette.
2. Inserte una cinta con la cara deseada hacia fuera (visible por la
ventana) tal como se muestra en la Fig. 4.
3. Cierre el compartimento del cassette.
4. Establezca el interruptor VAS a OFF (para grabación normal) o ON
(para activar el sistema de activación por voz).
5. Pulse el botón RECORD. El botón PLAY se pulsa simultáneamente.
Se encenderá el indicador de grabación.
6. Coloque el grabador cerca de la fuente de sonido.
VAS ON : Grabación activada por voz
Cuando usted habla, la unidad empezará a grabar. Cuando deja
de hablar entre 2 y 6 segundos, la unidad dejará de grabar (las
variaciones en el nivel de voz no interrumpen la grabación).
Utilice el control –VOL+/VAS SENS para ajustar la sensibilidad
del micrófono a su voz. Si existen voces que no estén activando
la grabación, aumente el volumen. Si la grabación no se detiene
cuando deje de hablar, disminuya el volumen.
NOTA
Si los primeros segundos en los que habla activan la grabación
pero no se graban, diga una palabra extra para iniciar la grabación
antes de lo que quiera grabar. (En grabaciones importantes,
establezca el interruptor VAS a OFF.)
VAS OFF: grabación estándar
La grabación continuará hasta que pulse el botón STOP/EJECT.
7. Pulse el botón STOP para detener la grabación.
AVANZADO RÁPIDO y REBOBINADO:
Para avanzar rápidamente o rebobinar la cinta, pulse los botones
F.FWD o REW. Pulse el botón STOP cuando alcance el punto de la
cinta deseado o el nal de la misma.
Detención temporal del funcionamiento
Deslícelo hacia la izquierda para reanudar el funcionamiento.
Protección contra borrado accidental (Fig.5)
Para proteger la cara A, rompa la pestaña (1).
Para proteger la cara B, rompa la pestaña (2).
- Para borrar o grabar sobre una cinta protegida, cubra los huecos de
las pestañas con cinta adhesiva (3).
NOTA
El botón REC no puede ser pulsado cuando se use una cinta
protegida.
REPRODUCCIÓN
1. Inserte un microcassette tal como se muestra en la Fig.4.
2. Establezca el selector SPEED a Low (baja) o Nor (normal) de
acuerdo con la velocidad de grabación de la cinta.
3. Pulse el botón PLAY y ajuste el control –VOL+/VAS SENS.
4. Pulse el botón STOP/EJECT para detener la reproducción.
Sistema de parada automático
Durante la reproducción y la grabación, al llegar al nal de la cinta
el microcassette se detiene automáticamente y se desbloquean los
botones. Este sistema no funciona en operaciones de avanzado
rápido o rebobinado. Asegúrese de pulsar el botón STOP cuando
llegue el nal de la cinta.
Ejemplo (Usando una cinta C-60):
Pulse el botón STOP cuando hayan pasado aproximadamente 2
minutos de avanzado rápido o rebobinado.
GRAVAÇÃO
1. Abra o compartimento da ta.
2. Coloque a ta com o lado desejado para cima (visível através da
janela) como mostrado da Fig. 4.
3. Feche o compartimento da ta.
4. Ajuste a chave VAS na posição OFF (para gravação padrão) ou na
posição ON (para ativar o comando de voz).
5. Prima o botão RECORD. O botão PLAY será acionado
automaticamente. O indicador de gravação acenderá.
6. Posicione o gravador próximo à fonte de som.
VAS ON: Acionamento por Voz
Quando você falar, o aparelho comecará a gravar. Quando você
parar e car sem falar de 2 a 6 segundos, o aparelho irá parar de
gravar (variações no tom de voz não param a gravação).
Use o controle –VOL+/VAS SENS para ajustar a sensibilidade do
microfone à sua voz. Se a voz não estiver ativando a gravação,
aumente o volume. Se a gravação não parar quando não estiver
falando, diminua o volume.
NOTA
Se as primeiras palavras que você falar ativam a gravação, mas
não são gravadas, diga uma palavra extra para começar a gravar
antes de ditar. (Para gravações importantes, ajuste a chave VAS
para OFF)
VAS OFF: Gravação Padrão
A Gravação continuará até que o botão STOP/EJECT seja
pressionado.
7. Prima o botão STOP para parar a gravação.
AVANÇAR RAPIDAMENTE e REBOBINAR:
Para avançar a ta rapidamente ou rebobiná-la, prima o botão F.FWD
ou REW. Para parar a ta na posição desejada ou se a ta tiver
acabado, prima o botão STOP novamente.
Operação de parada temporária
Mova a chave PAUSE para a direita para parar a operação. Mova-a
para a esquerda para reiniciar a operação.
Protecções contra supressão acidental (Fig.5)
Para proteger o lado A, retire a tira (1).
Para proteger o lado A, retire a tira (2).
- Para apagar ou gravar em um ta protegida, cubra as aberturas
com ta adesiva das tiras (3).
NOTA
O botão REC não pode ser acionado quando você estiver usando
uma ta protegida.
REPRODUÇÃO
1. Carregue a micro-ta como mostra a Fig.4.
2. Prima a chave SPEED em baixa (LOW) ou normal (NOR), de
acordo com a velocidade da ta gravada.
3. Prima o botão PLAY e ajuste o controle –VOL+/VAS SENS.
4. Prima o botão STOP/EJECT para parar a reprodução.
Sistema de parada automática
Se chegar o nal da ta enquanto estiver gravando ou reproduzido a
gravação, o compartimento da ta pára automaticamente e os botões
são desprendidos. Este sistema não funciona nas operações de
avançar rapidamente ou rebobinar. Certique-se de primar o botão
STOP quando chegar ao m da ta.
Exemplo (quando usar ta C-60):
Prima o botão STOP depois de aproximadamente 2 minutos
apertando os botões de avançar rapidamente ou rebobinar (F.FWD ou
REW).
Fig.4