


English 25
|
04
Settings
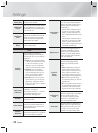
Reset
Reverts all settings to their defaults
except for the network and Smart
Hub settings, and then starts the
Setup function. Requires that you
enter your security PIN. The default
security PIN is 0000
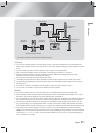
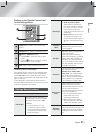
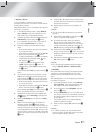
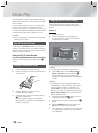
Auto Sound Calibration
By setting the Auto Sound Calibration (ASC) function just
once when you relocate or install the product, you can
have the product automatically recognize the distance
between speakers, levels between channels, and
frequency characteristics to create a 7.1-channel sound
field optimized for your environment.
ASC IN
LAN
SPEAKERS OUT
CENTER
SUBWOOFER
FRONT
L
FRONT
R
FRON
FRON
IMPEDANCE : 3
AUX IN FM ANT
OPTICAL
DIGITAL
AUDIO IN
L
R
ASC microphone
Auto Sound Calibration
Select whether to run and apply automatic sound
calibration.
• Off: The unit produces sound according to the speaker
configuration specified in Speaker Settings.
• On: The unit runs Auto Sound Calibration, and then
produces sound optimized for your environment,
according to the calibrated speaker settings.
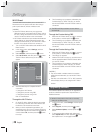
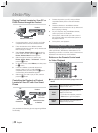
Running Auto Sound Calibration
Before running the calibration, make sure there is no disc
in the disc tray.
1. Plug the ASC microphone into the ASC IN jack.
2. Place the ASC microphone at the listening position.
• Auto Sound Calibration automatically runs and
calibrates speakers in the following sequence :
Front L
Centre
Front R
Surround R
Front Top R
Front Top L
Surround L
Subwoofer
• Press the RETURN button to cancel the Auto
Sound Calibration Setting.
Networks and the Internet
When you connect this product to a network, you can
use network based applications and functions such as
Smart Hub and BD-LIVE, and upgrade the product's
software through the network connection. For more
information about accessing and using Internet services,
see the Network Services chapter of this manual on
pages 43~51. Instructions for configuring the network
connection start below.
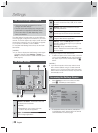
Configuring Your Network Connection
If you didn't configure your network connection during the
initial settings procedure or you need to reset the network
connection, follow the directions below.
Before you begin, contact your Internet Service Provider
to find out if your IP address is static or dynamic. If it
is dynamic, and you have a wired or wireless network,
we recommend using the Automatic configuration
procedures described below.
If you are connecting to a wired network, connect the
product to your router using a LAN cable before you start
the configuration procedure.
To begin configuring your network connection, follow
these steps:
1. In the Home screen, select Settings, and then
press the
E
button.
2. Select Network, and then press the
E
button.
3. Select Network Settings, and then press the
E
button.
4. Go to the instructions for Wired networks starting
below or the instructions for Wireless networks
starting on page 26.
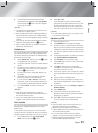
Wired Network
❑
Wired – Automatic
After following Steps 1 to 3 above:
1. In the Network Settings screen, change Network
type to Wired. Then, select Connect and press
the
E
button. The product detects the wired
connection, verifies the network connection and
then connects to the network.
2. When it is done, highlight OK, and then press
E
button.
❑
Wired - Manual
If you have a static IP address or the automatic procedure
does not work, you'll need to set the Network Settings
values manually.