


|
26 English
Settings
❑
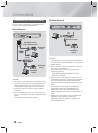
Wireless - Manual
If you have a static IP address or the Automatic
procedure does not work, you'll need to set the Network
Settings values manually.
After following Steps 1 to 3 in "Configuring Your Network
Connection" on page 24:
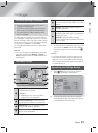
1. In the Network Settings screen, change Network
type to Wireless. Then, select Connect and press
the
E
button.
The product searches for and then displays a list of
the available networks.
2. Scroll through the list, select the desired network or
Add Network, and then press the
E
button.
3. If you selected a network in Step 2, go to Step 6.
If you selected Add Network, go to Step 4.
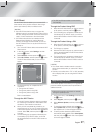
4. Enter your wireless network or wireless router's
name.
• Enter numbers directly using the number buttons
on your remote control.
• Enter letters by selecting a letter with the ▲▼◄►
buttons, and then pressing the
E
button.
• To display capital letters (or redisplay small letters
if capital letters are displayed), select
, and
then press the
E
button.
• To display symbols and punctuation, select
123#&, and then press the
E
button. To
redisplay letters, select 123#&, and then press
the
E
button.
When finished, select Done, and then press the
E
button.
5. On the Security type screen that appears, use the
▲▼buttons to select the network's Security type,
and then press the
E
button. On the next screen,
enter your network's security code or pass phrase.
• Enter numbers directly using the number buttons
on your remote control.
• Enter letters by selecting a letter with the ▲▼◄►
buttons, and then pressing the
E
button.
When finished, select Done, and then press the
E
button. The product searches for the network.
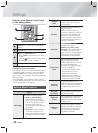
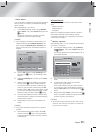
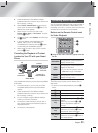
6. The Network connection fail screen appears. Use
◄► buttons to select IP Settings, and then press
the
E
button.
7. Select the IP Setting field, and then set it to Enter
manually.
8. Select a network value to enter (IP Address, for
example), and then press
E
button. Use the
number keypad on your remote control to enter the
numbers for the value. You can also enter numbers
using the ▲▼ buttons. Use the ◄► buttons on the
remote control to move from entry field to entry field
within a value. When done with one value, press the
E
button.
9. Press the ▲ or ▼ button to move to another value,
and then enter the numbers for that value following
the instructions in Step 8.
10. Repeat Steps 8 and 9 until you have filled in all
values.
| NOTES |
\
You can get the Network values from your Internet
provider.
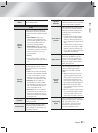
11. When finished, select OK, and then press the
E
button. The Security Screen appears.
12. On the Security screen, enter your network's
Security Code or Pass Phrase. Enter numbers
directly using the number buttons on your remote
control. Enter letters by selecting a letter with the
▲▼◄► buttons, and then pressing the
E
button.
13. When finished, select Done at the right of the
screen, and then press the
E
button. The product
verifies the network connection and then connects
to the network.
14. After the home theater verifies the network, select
OK, and then press the
E
button.
| NOTES |
\
You can also begin the Manual Network setting by
going to Settings >Network > Network Status.
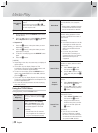
❑
WPS(PBC)
One of the easiest ways to set up the wireless network
connection is using the WPS(PBC) function. If your
wireless router has a WPS(PBC) button, follow these
steps:
After following Steps 1 to 3 in "Configuring Your Network
Connection" on page 24:
1. In the Network Settings screen, change Network
type to Wireless. Then, select Connect and press
the
E
button.
The product searches for and then displays a list of
the available networks.
2. Scroll the list down, select WPS(PBC), and then
press the
E
button.
3. Press the WPS(PBC) button on your router within
two minutes. Your product automatically acquires all
the network settings values it needs and connects
to your network.
The product connects to the network after the
network connection is verified.
4. When it is done, highlight OK, and then press
E
button.
| NOTES |
\
For WPS connection, set your wireless router’s
security encryption to AES. Setting to WEP security
encryption does not support WPS connection.